First halo build - Reach inspired helmet

Status
Not open for further replies.

Geirulf

New Member
Howdy folks!
First post, figured I might as well make it a good un!

Backstory: I made my kid a Master Chief costume for halloween this past year. He's six years old and idolizes Master Chief. He was so excited and asked me if I would dress up as a Spartan with him next year - I'm a sucker when the kid takes an interest in something I like, so here I am!

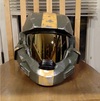
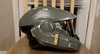
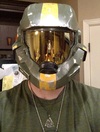
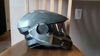
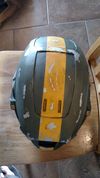
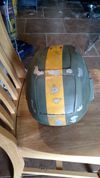
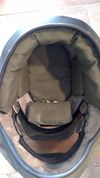
I just got done painting this. It's inspired by the Noble Six/Thom/Fred (FUD) helmet, but customized to my liking (and abilities). I removed a few details that I either messed up on pep or was unable to get looking how I wanted with the bondo. I used fiberglass to get the accessible bits and rondo for the inaccessible bits, then a layer of rondo all over the inside to smooth out the fiberglass. This is only my second pep (the first was a Sith Mask from The Old Republic - MUCH simpler) and I'm pretty pleased! There are a few glaring problems - the area where the helmet meets the visor is pretty rough. I tried two ways of getting a good fit - bondo in the gaps between the helmet and visor and paintable caulking in the same place. Neither worked well at all, both just pulled off and left some PITA bits behind. I wound up gluing in a piece of craft foam as a gasket. I might try to do a bit of touchup work with some spot filler now that it's sorted. The visor is a plain-jane motorcycle faceshield. I still have a bit of work to do - I'm going to use a scotch brite pad to soften the colors a bit and take the sheen off (gloss was all I could get in the yellow) and get some brown and black acrylic to dirty it up a bit. I might take a look at the local hobby store to see if there's any decals I like. I have some padding in the works right now, and will hopefully velcro that in in the next few days.
Anyway, without further ado, here we go:

helmet1.jpg

helmet2.jpg

helmet3.jpg


My goal is to come up with the undersuit or neck seal next. I want to make sure the armor pieces fit over the undersuit, so I don't want to start them just yet. Comments/questions welcome!

Pete
 

Attachments

  • helmet1.jpg
    helmet1.jpg
    390.9 KB · Views: 212
  • helmet2.jpg
    helmet2.jpg
    419.3 KB · Views: 215
  • helmet3.jpg
    helmet3.jpg
    232.6 KB · Views: 223
Ey pete, nice helmet, i would like to see the undersuit though... im kinda stuck on that... my MK VI MILONIR armour checklist follows

1,Undersuit-Little reaserch
2, Armour-alot of it <3 (thanks to people in my signature shoutout section)
3, Weapons-Working in a SAw, have boomco magnum/plasma pistol
4, Energy sword???-idk
--
Not meaning to steal thread...
--
___---===Welcome===---___
to the 405th...
~Yort
 
The undersuit is often time just a spandex bodysuit that has practically no thickness to it.

If you order a zentai that has a "open face" online you can use it and it can negate the need for a balaclava or neck seal . as a side it holds hair in place too!
 
Great helmet!


"I'm just a witness"
 
Thanks y'all!
peterthethinker, good suggestion on the zentai, as far as spandex/lycra goes but before I consider that option I want to think about something with more detail - the undersuit is pretty visible in a lot of the later halo armors and I'd rather not just have a plain black undersuit. I am planning on using magazine pouches and grenades though, which could block out some of the undersuit - craft foam might take me the rest of the way!

Today I did dirt/grime washes, clear coat and got most of the padding wrapped in cloth - I just used the green canvas from one of my old army duffel bags. I think I'm going to use some rubber vacuum hose (or similar) to edge the inside lip of the helmet opening to tidy it up a bit - should be completely done in a couple days!
 
Thanks MNCProps - I hope so too :D

The helmet is pretty much done now. Here are some details:

Paint
All spraypaints used were Krylon covermaxx if I recall right, except the primer which was a rustoleum automotive filler primer. The large paint chips were done using vaseline as a resist - I've used mustard and toothpaste before, but they tend to dry and I've found them difficult to remove in entirety and the toothpaste is rather gritty. The vaseline obviously cannot be used if it's too hot, as you don't want it running and ruining your paint job. After paint, the helmet was dry brushed with silver to simulate wear and scuff marks. The silver was the same as the sprayed undercoat, just sprayed into a plastic cup. I also did this for the other colors for touchups. I have used this method with success with other paints, but would not recommend it with the covermaxx - it seems that to get the super-fast drying time they put as much thinner in the paint as possible. Brushed on, it is watery with horrible coverage - I had better luck removing previous layers of paint than applying new paint. For drybrushing, it worked fine though.
After drybrushing, I scuffed everything up with a green scotch-brite pad. This dulled the paints (the yellow was gloss) and gave a scratched-plastic look to the black parts. It also helps to remove the spray-texture and soften the drybrushing and 'chips', which can look quite severe on a piece intended to look well-worn and dirty. The next step was dirtying it up. For this I had two paint brushes, a cup of water and acrylic paint in black and brown. I did it by putting little bits of paint in crevices and then dabbing it with the other paintbrush, which was damp. I also used by fingers and tissues to smudge the paint to get the look I wanted. I did this on pretty much all the 'lowlights' including the paint chips - since the paint chips have a little depth, the paint will cling in those edges and give a nice look. I did black first and then brown. After that, it was all clear coated. I used the same line of paint for the clearcoat as I did the sprays, but it still managed to crinkle on the yellow which annoyed me, but ultimately it wasn't enough to damage the paint and contributed to the worn look.

Padding
The padding was foam left over from making a travel mattress. It was 2" upholstery foam with a 1" memory foam top. I found a section where the glue hadn't stuck well and peeled them apart with only minor difficulty. The memory foam served as the bulk of the padding while the 2" foam did the forehead pad to try and keep my glasses away from the visor. They were all covered in green canvas from a busted duffel bag and held into the helmet with velcro. The self-adhesive velcro didn't stick well to either the inside of the helmet or the fabric, so I used contact cement. The velcro allows the pads to be cleaned separately, replaced or removed to add wiring if I ever put in lights or a fan. I hate sewing stuff, so I also used contact cement to cover the foam.

Visor
The visor is a motorcycle visor I cut to fit. I didn't want to heat form the visor for fear of warping, clouding or damaging the mirrored layer, so it was just pressed in. A craft foam gasket prevented scratching during this process. Since the screws would hold the visor against its own tension, I didn't want to drill holes in it, so drilled and tapped some pieces of mild steel to clamp it in place. They have craft-foam washers to avoid damaging the visor. They're all that holds the visor in, so it could be removed and replaced. The angular pieces behind the screw heads are pieces of aluminum to spread the load across the bondo. I have a set of bar clamps that can be 'reversed' to act as spreaders, which is how I held the visor in place while fixing it.

Piping
I slit some rubber vacuum line and hot glued it over the edge of the helmet opening just to tidy it up a bit.

All in all, I am quite pleased with the result!

Sorry for the wall of text - have some pictures!

reachhelm1.jpg

reachhelm2.jpg

reachhelm3.jpg

reachhelm4.jpg

reachhelm5.jpg
 

Attachments

  • reachhelm1.jpg
    reachhelm1.jpg
    133.7 KB · Views: 199
  • reachhelm2.jpg
    reachhelm2.jpg
    136.6 KB · Views: 201
  • reachhelm3.jpg
    reachhelm3.jpg
    117.5 KB · Views: 209
  • reachhelm4.jpg
    reachhelm4.jpg
    112.7 KB · Views: 186
  • reachhelm5.jpg
    reachhelm5.jpg
    116 KB · Views: 208
looks great! Nice to see some padding, I'm going to be padding my helm on Thursday but I'm gonna be using a large Sponge lol
 
When i was padding my Stormtrooper helmet I went to the dollar store and bought $2 knee pads for doing construction. They are an inexpensive way to get the right fit. You can cut them into whatever shape you need and glue them together if you need more padding.


"I'm just a witness"
 
Thanks y'all :D
Mesh, that would probably work quite well!
Another option for anyone interested could be the military helmet pads - you buy them in sets of 6-7 or so and they'll stick to the hook side of velcro. They would have been too bulky for this build I think, but they're a good highly-customizable and low-effort option!
 
Great helmet, love the battle damage look. Padding: you can also check out furniture locations. They might just have scrap pieces of foam that they will give for free.
 
Status
Not open for further replies.
Back
Top