first helm build

Status
Not open for further replies.

Leembell

New Member
hi this is how far i got last night when watching e3 probably took about 2-3 hours

constructive criticism and advice more then welcome

WP_20140609_19_17_13_Pro_zpsb9c4150d.jpg

WP_20140609_19_17_08_Pro_zps6289e899.jpg

WP_20140609_19_17_03_Pro_zps8cc193c9.jpg

thanks for looking
 

Attachments

  • WP_20140609_19_17_13_Pro_zpsb9c4150d.jpg
    WP_20140609_19_17_13_Pro_zpsb9c4150d.jpg
    54.6 KB · Views: 116
  • WP_20140609_19_17_08_Pro_zps6289e899.jpg
    WP_20140609_19_17_08_Pro_zps6289e899.jpg
    55.7 KB · Views: 107
  • WP_20140609_19_17_03_Pro_zps8cc193c9.jpg
    WP_20140609_19_17_03_Pro_zps8cc193c9.jpg
    69.2 KB · Views: 124
Everything looks real clean and symmetrical so far, keep it up!

Also, it is easier if you simply paste the direct image link from photobucket which is listed as IMG. All you have to do is copy that link (more often than not, it auto copies for you when you click on it), and paste.

That way the images show up in your thread and we don't have to leave the page to view them :)
 
Just a bit of advice in terms of that helmet, I found it much easier the second time I made it by finishing off the last few pieces at the back. Meaning build from the chin, around the ears and face; then finish off at the back and top.

Just a little piece of advice that might grant you some extra crisp corners, rather than trying to jam a visor in last.
 
thanks retralpha :)

didn't see your msg till this morning as i have no pc at home.
i have sorter tried working from the ground up......some of the parts are sooo small. if i had known how hard this was i think i would have chosen a different helm for my first attempt lol

day 2 of build
WP_20140610_21_42_42_Pro_zps51f58562.jpg

WP_20140610_21_42_51_Pro_zpse872c125.jpg

WP_20140610_21_43_02_Pro_zps3b69392e.jpg

WP_20140610_21_43_18_Pro_zpscc9131e8.jpg
 

Attachments

  • WP_20140610_21_43_02_Pro_zps3b69392e.jpg
    WP_20140610_21_43_02_Pro_zps3b69392e.jpg
    39.9 KB · Views: 110
  • WP_20140610_21_42_51_Pro_zpse872c125.jpg
    WP_20140610_21_42_51_Pro_zpse872c125.jpg
    40 KB · Views: 101
  • WP_20140610_21_42_42_Pro_zps51f58562.jpg
    WP_20140610_21_42_42_Pro_zps51f58562.jpg
    45.5 KB · Views: 120
  • WP_20140610_21_43_18_Pro_zpscc9131e8.jpg
    WP_20140610_21_43_18_Pro_zpscc9131e8.jpg
    30.2 KB · Views: 91
If I may make a suggestion - try building your helmet from the top down rather than the bottom up. You'll thank yourself later when you're not having to reach in and fiddle around with fitting the top together - the bottom half is easier to finish up on than the top.
 
here is some more pix from the weekend

WP_20140614_18_14_09_Pro_zpsb4b3e6d2.jpg
WP_20140614_18_14_21_Pro_zpsa75b0030.jpg
WP_20140614_18_14_30_Pro_zpsc75e44cc.jpg
WP_20140614_18_14_44_Pro_zps53140317.jpg
WP_20140614_18_14_53_Pro_zps87803efa.jpg
WP_20140614_20_00_15_Pro_zps9ee62d3d.jpg
WP_20140614_20_00_21_Pro-Copy_zps6e1ca6c7.jpg
WP_20140614_22_55_22_Pro_zps50341085.jpg

i have some questions ....

the chin part is not quite level and to me makes the helm look unbalanced and some of the more fiddly parts haven't come out as well as i had hoped can this all be rectified in the resin bondo stage of the build. i don't think its massively out of sync but i notice it.

what do you think?? is it noticeable and is it fix able

as my first build with minimal tools and probably not the correct card i guess its OK but im not 100% happy with it as it stands.

any advice or constructive criticism welcome
 

Attachments

  • WP_20140614_18_14_21_Pro_zpsa75b0030.jpg
    WP_20140614_18_14_21_Pro_zpsa75b0030.jpg
    55.9 KB · Views: 119
  • WP_20140614_18_14_09_Pro_zpsb4b3e6d2.jpg
    WP_20140614_18_14_09_Pro_zpsb4b3e6d2.jpg
    64.5 KB · Views: 106
  • WP_20140614_18_14_30_Pro_zpsc75e44cc.jpg
    WP_20140614_18_14_30_Pro_zpsc75e44cc.jpg
    52.9 KB · Views: 117
  • WP_20140614_18_14_44_Pro_zps53140317.jpg
    WP_20140614_18_14_44_Pro_zps53140317.jpg
    62.6 KB · Views: 102
  • WP_20140614_18_14_53_Pro_zps87803efa.jpg
    WP_20140614_18_14_53_Pro_zps87803efa.jpg
    65.1 KB · Views: 133
  • WP_20140614_22_55_22_Pro_zps50341085.jpg
    WP_20140614_22_55_22_Pro_zps50341085.jpg
    44.7 KB · Views: 104
  • WP_20140614_20_00_21_Pro-Copy_zps6e1ca6c7.jpg
    WP_20140614_20_00_21_Pro-Copy_zps6e1ca6c7.jpg
    62.9 KB · Views: 114
  • WP_20140614_20_00_15_Pro_zps9ee62d3d.jpg
    WP_20140614_20_00_15_Pro_zps9ee62d3d.jpg
    70.2 KB · Views: 121
This is THE most important phase of the build. I have said it many times before... be sure that everything is symmetrical before applying resin. If something is out of whack, correct it during the pep phase. I found that popsicle or craft sticks work wonders. The best part is that they are sand-able in case they get added to a bit of resin during that or the Rondo stage. I generally put mine on the inside, and not only to correct something that was non-symmetrical, but also where there might be buckling or bowing (usually where there are large parts without any folds). In certain cases, I have put them on the outside when appropriate. Doing this now will spare you many headaches in the future, and possibly save a build.

With that said, it is looking very good. :)
 
thanks im unsure if its and easy fix tbh lol i used super glue as its all i had to hand...... guess ill start over when all the new craft tools and correct card turns up. never mind ill just treat it as a example of what not to do :)

cheers for the help fella
 
Great job so far, as EVA said, keep an eye on the buckling and make sure that everything is as you want it before you get to the resin and bondo stages.
 
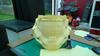
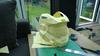
It is really close btw, but having heavy cardstock sure makes everything that much better in the long run.

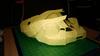
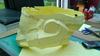
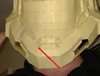
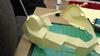
Even though it is hard to see from this angle, I believe that where I put the red line would be where you could reinforce a wooden stick on the inside of the helmet to correct the slight variance.

aaaa1_zps81ade193.jpg

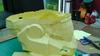
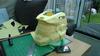
Also, I was appreciative of the fact that you were using superglue. I see it is the gel type, and I have not experienced that before, but I am very partial to the brush on superglue myself.

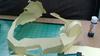
Also, don't be afraid to cut a seam that went wrong in order to correct it. You can always use a backer piece of cardstock to rejoin the pieces while at the same time, making the correction.

Another tip I have is when gluing two pieces together, start in the middle of the two. Example: If there are 5 tabs on one, and 6 on the other, start on #3 with the one with the 5 tabs. This will help make sure that all the pieces align properly.

Lastly, as you pretty much stated, practice makes for perfection! Keep it up, you are doing great!
 

Attachments

  • aaaa1_zps81ade193.jpg
    aaaa1_zps81ade193.jpg
    11.5 KB · Views: 117
after spending about a hour looking at ways to sort the issue i think its beyond my ability to get it sorted i tried wooden kebab squwers and looked at place's to cut and it just pulls the the rest of the helm out of alignment :(

i now have 2 options....

1: carry on and see if it sorts its self out once its fully built(before resin)

2: start from scratch and use it later for a how not to video :)

bit gutted i cant fix it but im gonna try and build the same helm again with better tools and card and use you advice to get it 100% instead of 89% :)

i take my hat off to you guys this stuff isnt easy.its fun and interesting but far from easy
 
Whatever the issue is, maybe cut off the problem area, then start again just on the problem area. I had a similar issue with the Reach Helmet, I couldn't fit the visor properly. I just modified the visor then to make it fit to my current pep. You may have to visit the same path as I had to
 
As long as you have the motivation (I am sure you do), I would suggest going with your gut feeling and starting over when all the proper tools you have ordered arrive. Finish this helmet out though so you can continue to get a feel for pep in general, but also to learn how this helmet is built to completion. You did a really good job the first time, and I am sure the next one will be perfect :)
 
thanks peeps.

here is what i have decided to do...

finish it as a test helm,build the same helm again once bits and bobs turn up,use only help to practic resin bondo and painting before i attack the one i build 100% lol this i hope will mean less mess ups on the next one. will add more pix as and when
 
I used an Ironman Helm as a practice piece. After completing it, I have learned to start with all the little pieces. Then they are a bit larger so you cant lose them.

Also I'm not seeing too much of a problem on the chin area of the helm. bondo and sanding would probably fix the issue.
 
Status
Not open for further replies.
Back
Top