First step for cosplay-kind…

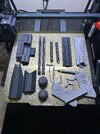
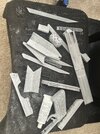
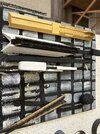
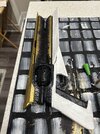
Now that my printer works again and I’ve dialed in my setting, I’ve come to a decision. After talking with some members at FanExpo in Portland, I’ve decided to make my first cosplay a Halo: Reach ODST. I plan on 3-D printing all of the parts. Going to research a good under-suit to pursue. I plan on pursuing something like this:
 

Attachments

  • IMG_3768.jpeg
    IMG_3768.jpeg
    315.3 KB · Views: 22
True…and will PLA+ help with that? Or should I just opt for PETG all together. I’d have to upgrade my printer to print at PETG so I’m just trying to avoid that if I can.
I don't quite know what Washington weather is like, so you may want to ask some folks in that area how they go with PLA/PLA+ in that weather (maybe some of our fine forum members in that area can shed some light on the subject?) I'm in Australia and print in PLA+, but since I don't make armour to wear outside, it hasn't been an issue so far.
 
I don't quite know what Washington weather is like, so you may want to ask some folks in that area how they go with PLA/PLA+ in that weather (maybe some of our fine forum members in that area can shed some light on the subject?) I'm in Australia and print in PLA+, but since I don't make armour to wear outside, it hasn't been an issue so far.
Okay, thanks for the information and help! I’ll ask around.
 
True…and will PLA+ help with that? Or should I just opt for PETG all together. I’d have to upgrade my printer to print at PETG so I’m just trying to avoid that if I can.

Not really. Like PlanetAlexander said there isn't really a standard for PLA+. You can expect it to be a bit tougher (bends instead of breaks) at the cost of some rigidity, but other than that all bets are off.

There doesn't seem to be a difference in heat resistance. Looking at the datasheets for some common PLA variants (and +) the HDT is almost always at or around 53c.

You can look into annealing PLA, but that comes with its own challenges (warping/shrinkage during the annealing process). Coating the inside with epoxy should help maintain the overall shape though?
Okay I see that makes sense. When you say at the cost of rigidity, what do you mean by that?

Sounds like for my cosplay, I’m going to stick with either PLA or PLA+ because it’s something I’m familiar with. Even if it’s standard PLA. Considering I’m just doing a reach odst, I want my build to be somewhat easy as opposed to doing a full blown Mark VII ya know?
 
Had a lot of fun hanging with you guys at FanExpo. Learned a LOT about what my options are for my first build and now I have a very good idea what my build is going to look like (Reach ODST). Wanted to post this because I almost couldn’t go to FanExpo due to financial reasons and weather, however, I was able to and the path forward is a lot clearer! Plus I might have gotten a solution to fixing my print head. Will post an update on that when I can!
IMG_3721.jpeg
 

Attachments

  • IMG_3766.jpeg
    IMG_3766.jpeg
    1.6 MB · Views: 25
This is my first non test print that I will actually have use for! It is a holder/stand for the Halo Infinite Rockstar collectibles!
I know I'm a bit late to the party....but where did you find that file? Mine are currently taking up space on the back of my stove, though I only have 3 haha.
 
Okay I see that makes sense. When you say at the cost of rigidity, what do you mean by that?

Sounds like for my cosplay, I’m going to stick with either PLA or PLA+ because it’s something I’m familiar with. Even if it’s standard PLA. Considering I’m just doing a reach odst, I want my build to be somewhat easy as opposed to doing a full blown Mark VII ya know?
Stiffness, basically. PLA+ usually is a bit less stiff/rigid/hard compared to pure PLA. Not a problem for our usecase though, might even make it a bit easier to sand.

I want my build to be somewhat easy as opposed to doing a full blown Mark VII ya know?

Yeah, that makes perfect sense. I'm working on a mkVI suit and...it's a lot.

Also, glad you were able to make it and got some good tips! What's the current problem with your print head if I may ask?
 
Finally made it back home from FanExpo and put the printer back together! Pipninja gave me an extra print head he had since we have the same exact printer and it seems to be working great! Recalibrating E-steps and leveling again! Thanks bro! Hopefully it’s smooth sailing from here for at least a week…a week with no problems is all I ask
 

Attachments

  • image.jpg
    image.jpg
    2.8 MB · Views: 18
Last edited:
Stiffness, basically. PLA+ usually is a bit less stiff/rigid/hard compared to pure PLA. Not a problem for our usecase though, might even make it a bit easier to sand.


Yeah, that makes perfect sense. I'm working on a mkVI suit and...it's a lot.

Also, glad you were able to make it and got some good tips! What's the current problem with your print head if I may ask?
Okay hopefully if I switch to PLA+ I don’t have to tweak my setting that much. Finally got them dialed in.

The current problem I had was…I have no idea lol. It would just clog up above the nozzle so my bud pip gave me his print head and he took my broken one to fix it (we have the same exact printer). He has two printers so he can still print.
 
Stiffness, basically. PLA+ usually is a bit less stiff/rigid/hard compared to pure PLA. Not a problem for our usecase though, might even make it a bit easier to sand.


Yeah, that makes perfect sense. I'm working on a mkVI suit and...it's a lot.

Also, glad you were able to make it and got some good tips! What's the current problem with your print head if I may ask?
Accidentally sent the same reply twice and I have yet to find out how to delete posts lol. So instead of leaving a duplicate I’ll at least make the extra reply substantial:

Can PLA+ use the same setting or very similar settings as normal PLA or should I treat it as a completely different material?
 
Finally made it back home from FanExpo and put the printer back together! Pipninja gave me an extra print head he had since we have the same exact printer and it seems to be working great! Recalibrating E-steps and leveling again! Thanks bro! Hopefully it’s smooth sailing from here for at least a week…a week with no problems is all I ask

Hey great, glad it's working again (and awesome of pipninja to trade parts :) )

A clog above the nozzle (in the heatbreak) is often caused by the hotend fan not working, or retraction being set too high. In both cases you can get molten filament in the heatbreak, which then solidifies and jams. Might have been the case here.

In my experience PLA+ prints a little bit hotter than regular PLA. IIRC eSun recommends printing their PLA+ at 210c or so. Other than that it prints pretty much the same.
My two side fans stopped working completely so maybe that’s what happened

Okay thanks for the temp info! I appreciate it!
 
FINALLY!!! After so many headaches and a really different kind of learning curve, I have every part of my Sunshot printed! Some of the pieces were previously sprayed with primer, so that’s my next step going forward. Time to tackle sanding!
 

Attachments

  • IMG_3835.jpeg
    IMG_3835.jpeg
    2.7 MB · Views: 17
Everything has been sanded and the next step is to put some bondo in those seams and sand it down. Sorry for the messy photo but I am tired and cramping after all that sanding.

Edit: Finished applying bondo to fill in those seams and doing my final sanding pass. Everything feels so smooth!

Edit 2: Everything has the initial paint coat on it, however I had a bit of an oopsie and had to re-apply bondo on one particular spot. Going to resand and see how it comes out!
IMG_3924.jpeg

IMG_3885.jpeg
 

Attachments

  • IMG_3871.jpeg
    IMG_3871.jpeg
    2.1 MB · Views: 15
Last edited:

Your message may be considered spam for the following reasons:

If you wish to reply despite these issues, check the box below before replying.
Be aware that malicious compliance may result in more severe penalties.
Back
Top