- Member DIN
- S188
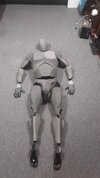
For my 1,000 post here on the forums, it's time to show progress on a mannequin project I've been working on the past few months. While not completely done yet, and some parts may be redesigned in the future, I am liking the progress so far. So without further ado, here we go!
Materials list:
1- 10ft section of 3/4" PVC pipe
4- 3/4" PVC 90° elbows
5- 3/4" PVC Tee connectors
22- 3/4" PVC furniture grade end caps
22- 3/4" long #20 1/4" bolts, nuts, and washers
2- 3" long #20 1/4" bolts
14- Ball and socket camera tripod adapters
8- sheets of EVA foam
5- Cans of expanding foam
2- 2" x 2" galvanized steel wood post connectors
1- Tube of Loctite thread compound
1- Set of plastic mannequin feet
1- Set of breathable work gloves
1- Tube of 100% silicone caulking
5- Metal clothes hangers
4- Packs of 3/4lb lead fishing weights
1- Small bag of play sand
Tools list:
- Power drill with bits of various sizes (most important 1/4")
- Tools for crafting foam armor (blades, glues, etc)
- Dremel with cut-off wheels
- Hot glue gun
- 7/16 wrench or socket
- Phillips head screwdriver
- PVC pipe cutter
- PVC glue
In this first post I'll be going over the lower half of the mannequin's construction.
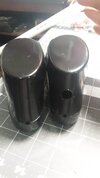
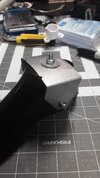
Getting started with the feet. I bought a set of size 7.5 womens mannequin feet (Which is around a size 6 mens). A bit small, but all I really needed was a foot shape sturdy enough to hold weight and fit inside a shoe properly. Drilled a hole in the top for a bolt to come up out of to hold the joint for the ankle. A bit tricky to set the bolt up through, but I drilled a hole in the back of the foot and carefully maneuvered the bolt up with a magnet. Then I drilled holes through the 2x2 steel plate that wraps around the top and sides of the foot and set the 3" long bolts through them. This helps give better stability as the plastic on the feet isn't strong enough to support the full weight of the mannequin on its own. After this inserted the lead fishing weights into both feet and packed them with the play sand, sealing the hole in the back of the ankle with hot glue once I was done. This gives a nice hefty weight of 6lbs per foot, which helps keep the legs from trying to move around if bumped into.
Next up is the foam work. Just the basic EVA foam work we all love, just make sure to scale the pieces to your actual size, and not scale it to wear it. The file contains all the pieces you'll need.
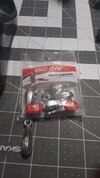
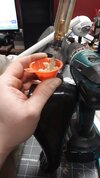
Moving onto the PVC skeleton. The length of the pipes will ultimately be determined by your own individual size, as everyone is different. But for each end you'll want to attach one of the PVC furniture ends. DO NOT PVC GLUE THEM IN YET THOUGH. Before attaching them, drill 1/4" holes directly through the center of the flat bottom. For one of them, run a 3/4" long #20 screw out from the inside, using 1 washer inside and one on the outside, attaching a nut to hold in in place. Then to ensure no further movement, fill the inside with hot glue up to the top of bolt head. For the other PVC furniture end, the one that'll attach to the ball socket, place a nut inside the PVC end, and then screw the ball and socket joint into it. Once again use hot glue up to the top of the bolt inside to secure it. Also of note, for each nut and bolt attachment, as well as the threads on the ball and joint socket, I used a little bit of the Loctite Thread Compound to ensure they won't accidentally unscrew. Had it happen a few times during initial construction and would cause the limbs to start spinning freely, which we don't want.
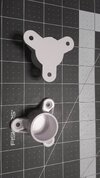
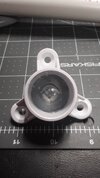
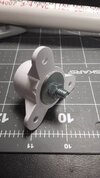
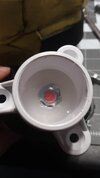
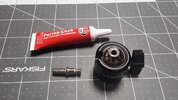
Once you have the ends made up, it's time to run the pipe through the foam pieces of the shins and thighs. For each section I added foam to the bottom to completely close off piece. Then using a section of pipe to trace a hole to be cut in the center of the piece (The shins were made off center a bit whoops). This allows the pipe to slide through and adjust it's position within the piece. Then the ends can be added, and glued into place. All pieces had enough space to keep the tabs on, except for the forearms which I'll show in the next update. Once in place, you can add the spray foam into the piece. Although, the spray foam may not be entirely necessary as it adds a fair bit of weight. I may work on a better solution for the future, but for now it helps keep the PVC in place.
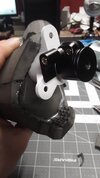
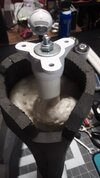
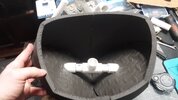
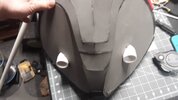
Lastly we get to the waist. For this we find the center of the waist and add a PVC Tee connector, with the center connector facing upwards towards the torso. Out of the sides we come out a bit and insert 2 of the 90° angle PVC connectors facing downwards. These poke down through each leg hole, which we once again cover up with foam and slot the pipes through holes in the foam. Add the furniture connectors to attach it to the ball and socket joints coming off the thigh pieces. Once done we can add the spray foam to the waist.
And fully assembled we have the legs!

In the next update I'll go over the poseable hands, and maybe the rest of the upper half of the mannequin. I currently have to go back and rebuild the torso as I messed up and added too much weight to the chest piece. This is why I am hesitant on saying spray foam is necessary as I'm already running into weight issues with it in the upper half. This may also have to apply to the waist as well since it also weighs more than I'd like it to, but time will tell. Until next time!
Materials list:
1- 10ft section of 3/4" PVC pipe
4- 3/4" PVC 90° elbows
5- 3/4" PVC Tee connectors
22- 3/4" PVC furniture grade end caps
22- 3/4" long #20 1/4" bolts, nuts, and washers
2- 3" long #20 1/4" bolts
14- Ball and socket camera tripod adapters
8- sheets of EVA foam
5- Cans of expanding foam
2- 2" x 2" galvanized steel wood post connectors
1- Tube of Loctite thread compound
1- Set of plastic mannequin feet
1- Set of breathable work gloves
1- Tube of 100% silicone caulking
5- Metal clothes hangers
4- Packs of 3/4lb lead fishing weights
1- Small bag of play sand
Tools list:
- Power drill with bits of various sizes (most important 1/4")
- Tools for crafting foam armor (blades, glues, etc)
- Dremel with cut-off wheels
- Hot glue gun
- 7/16 wrench or socket
- Phillips head screwdriver
- PVC pipe cutter
- PVC glue
In this first post I'll be going over the lower half of the mannequin's construction.
Getting started with the feet. I bought a set of size 7.5 womens mannequin feet (Which is around a size 6 mens). A bit small, but all I really needed was a foot shape sturdy enough to hold weight and fit inside a shoe properly. Drilled a hole in the top for a bolt to come up out of to hold the joint for the ankle. A bit tricky to set the bolt up through, but I drilled a hole in the back of the foot and carefully maneuvered the bolt up with a magnet. Then I drilled holes through the 2x2 steel plate that wraps around the top and sides of the foot and set the 3" long bolts through them. This helps give better stability as the plastic on the feet isn't strong enough to support the full weight of the mannequin on its own. After this inserted the lead fishing weights into both feet and packed them with the play sand, sealing the hole in the back of the ankle with hot glue once I was done. This gives a nice hefty weight of 6lbs per foot, which helps keep the legs from trying to move around if bumped into.


Next up is the foam work. Just the basic EVA foam work we all love, just make sure to scale the pieces to your actual size, and not scale it to wear it. The file contains all the pieces you'll need.

Moving onto the PVC skeleton. The length of the pipes will ultimately be determined by your own individual size, as everyone is different. But for each end you'll want to attach one of the PVC furniture ends. DO NOT PVC GLUE THEM IN YET THOUGH. Before attaching them, drill 1/4" holes directly through the center of the flat bottom. For one of them, run a 3/4" long #20 screw out from the inside, using 1 washer inside and one on the outside, attaching a nut to hold in in place. Then to ensure no further movement, fill the inside with hot glue up to the top of bolt head. For the other PVC furniture end, the one that'll attach to the ball socket, place a nut inside the PVC end, and then screw the ball and socket joint into it. Once again use hot glue up to the top of the bolt inside to secure it. Also of note, for each nut and bolt attachment, as well as the threads on the ball and joint socket, I used a little bit of the Loctite Thread Compound to ensure they won't accidentally unscrew. Had it happen a few times during initial construction and would cause the limbs to start spinning freely, which we don't want.


Once you have the ends made up, it's time to run the pipe through the foam pieces of the shins and thighs. For each section I added foam to the bottom to completely close off piece. Then using a section of pipe to trace a hole to be cut in the center of the piece (The shins were made off center a bit whoops). This allows the pipe to slide through and adjust it's position within the piece. Then the ends can be added, and glued into place. All pieces had enough space to keep the tabs on, except for the forearms which I'll show in the next update. Once in place, you can add the spray foam into the piece. Although, the spray foam may not be entirely necessary as it adds a fair bit of weight. I may work on a better solution for the future, but for now it helps keep the PVC in place.


Lastly we get to the waist. For this we find the center of the waist and add a PVC Tee connector, with the center connector facing upwards towards the torso. Out of the sides we come out a bit and insert 2 of the 90° angle PVC connectors facing downwards. These poke down through each leg hole, which we once again cover up with foam and slot the pipes through holes in the foam. Add the furniture connectors to attach it to the ball and socket joints coming off the thigh pieces. Once done we can add the spray foam to the waist.


And fully assembled we have the legs!
In the next update I'll go over the poseable hands, and maybe the rest of the upper half of the mannequin. I currently have to go back and rebuild the torso as I messed up and added too much weight to the chest piece. This is why I am hesitant on saying spray foam is necessary as I'm already running into weight issues with it in the upper half. This may also have to apply to the waist as well since it also weighs more than I'd like it to, but time will tell. Until next time!

