Halo 4 Assassination Knife - First Build

Status
Not open for further replies.

u60n0

New Member
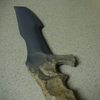
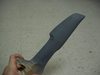
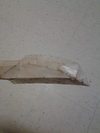
I've been a member here for a few months and I wanted to post some beginning progress I'm making on my first full build. Its small, and its going to probably take me a while. I have very little free time and am usually broke haha. But I want to make sure I get this done right. I started about 2 months ago, and after a week and a half I got the pepakura part of the build knocked out (always my least favorite part) here was the result

15kcEfel.jpg


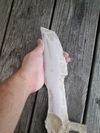
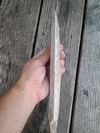
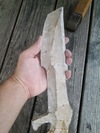
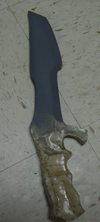
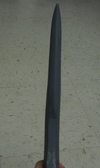
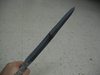
It came out looking ok, but there was some serious asymmetry I would need to correct. I wasn't able to able to work on it for a while after that, and I finally got around to Resining the outside last week. I followed that up with a Rondo slush coat inside. As I find it easier to work with lots of wiggle room, I ended up filling it completely with the Rondo, and the solid rock heavy came out like this

3u0dPXMl.jpg
0X6N6otl.jpg

HV455lIl.jpg
CkSwI9rl.jpg


I'll add part 2 of my progress tonight when I finish some work that I'm doing. Wish me luck!
 

Attachments

  • 15kcEfel.jpg
    15kcEfel.jpg
    29.9 KB · Views: 192
  • 3u0dPXMl.jpg
    3u0dPXMl.jpg
    32.6 KB · Views: 217
  • 0X6N6otl.jpg
    0X6N6otl.jpg
    26.5 KB · Views: 215
  • HV455lIl.jpg
    HV455lIl.jpg
    32.9 KB · Views: 194
  • CkSwI9rl.jpg
    CkSwI9rl.jpg
    32.3 KB · Views: 189
Looking good, it looks a little huge:D 
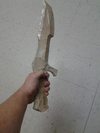
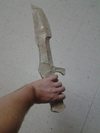
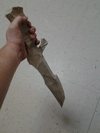
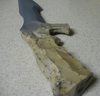
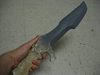
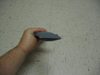
I think spartan scale and human scale are a bit different....
 
I appreciate the support guys! Sometimes I feel like I don't stack up against some of the amazing talent I see here, but hopefully I'll get there one day. It is definitely a big ass knife. When I finished pepping it I was so surprised. I like it though, shows you how big a spartans hand is cuz in the pictures...

Halo_4_Spartan_Ops_Palmer_Knife.jpg


It looks pretty damned small haha
 

Attachments

  • Halo_4_Spartan_Ops_Palmer_Knife.jpg
    Halo_4_Spartan_Ops_Palmer_Knife.jpg
    35.1 KB · Views: 207
Great start, man! Don't fret over skill level, practice makes perfect and the more you build the better you'll get. My first prop was a hideous chunk of bondo and fiberglass that I tried to call a helmet, I wish I had a picture of it so you could have a cheap laugh. Keep chuggin' along, I'm excited to see the knife come to shape. :)

-Ryan M-082
 
Alright guys PART 2!

I finished up some MAJOR sanding, because the blade was looking quite chunky and not very knifelike.
Some mid-sanding here
20140603_131908.jpg

The unsanded side for comparison
20140603_131915.jpg

A head on view
20140603_131925.jpg


20140603_131929.jpg


After 2 days, and an undercoat of grey paint (to reveal imperfections) here is the result

fbvktytl.jpg
WOb5nGQl.jpg
KOc9jzGl.jpg


I'm feeling confident that its looking good. I am pretty nervous about fixing that handle though, it got the worst of the asymmetry, and the details are so tiny. The knife wields well though.

MwmpNp9l.jpg
tQTrcWMl.jpg


The amount of work it took to get the blade symmetrical was a bit, but I think it was totally worth it.

Qpho4TIl.jpg
Og4czs7l.jpg

dNAPtEul.jpg
omThx1bl.jpg


Wish me luck on the next step!
 

Attachments

  • 20140603_131908.jpg
    20140603_131908.jpg
    177.7 KB · Views: 180
  • 20140603_131925.jpg
    20140603_131925.jpg
    183.8 KB · Views: 199
  • 20140603_131929.jpg
    20140603_131929.jpg
    182.3 KB · Views: 164
  • 20140603_131915.jpg
    20140603_131915.jpg
    166.5 KB · Views: 188
  • fbvktytl.jpg
    fbvktytl.jpg
    52.3 KB · Views: 194
  • WOb5nGQl.jpg
    WOb5nGQl.jpg
    57.6 KB · Views: 186
  • KOc9jzGl.jpg
    KOc9jzGl.jpg
    23.6 KB · Views: 205
  • MwmpNp9l.jpg
    MwmpNp9l.jpg
    36.1 KB · Views: 188
  • Qpho4TIl.jpg
    Qpho4TIl.jpg
    36.7 KB · Views: 188
  • Og4czs7l.jpg
    Og4czs7l.jpg
    37 KB · Views: 196
  • tQTrcWMl.jpg
    tQTrcWMl.jpg
    35.2 KB · Views: 185
  • omThx1bl.jpg
    omThx1bl.jpg
    26.1 KB · Views: 188
  • dNAPtEul.jpg
    dNAPtEul.jpg
    35.4 KB · Views: 186
I LOVE the fact that you went down a path less travelled and Rondo'ed the whole inside. I is looking fantastic so far! Don't forget, you have two directions you can work now. You can always build up with some bondo to help the symmetry :)
 
I was thinking if I really needed to I could just touch it up with some spotting putty or something. You think mixing up some bondo would do better?
 
Yes... spot putty is only good for the most minor of imperfections and will crumble... not to mention be a horrible hassle to work with. Personally, I love working with a 50/50 Rondo mix, maybe even a 75/25 bondo to resin mix and use it just like bondo. The added resin gives a better texture and will not chip as easily as straight bondo.
 
Status
Not open for further replies.
Back
Top