Foam HALO Infinite Master Chief Build (EVA Foam)

TylerBH2014

Active Member
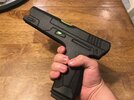
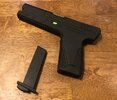
This will be my second attempt at making the Infinite Master Chief. I first tried using pepakura, and was able to successfully make a fore arm, but found that that process, is not for me. So I am instead going to be making the suit of EVA foam, which I know how to use, and will hopefully do better at. I will take even more pictures of the steps I go through, so that those of you who are interested, can learn more if you want.

I am not new to cosplay however, and I've been wanting my own HALO suit for quite some time now.

My first cosplay was the Witch King of Angmar. It looked ok for being made out of cardboard. I made the helmet, pauldrons, and shin guards, but bought some real knight gauntlets. LOL. As well as sabatons (Knight shoes) but those came the day after my Comi-con I went to. My next cosplay was my own Star Wars/HALO soldier, which turned out as my best cardboard build. Later on my friend wanted a Shore Trooper from Star Wars, so we built that together. That cosplay was my first one using EVA foam, and it turned out fine, but I eventually got better and better. I then started learning more and more tips and tricks. Then on one fateful Christmas day, I got the book Make: Props and Costume Armor. By Shawn Thorsson. That book opened new doors for my creativity, as it show me several ways to make thing look "real" as well as practical and stronger.

I hope y'all enjoy my cosplay.
 
Last edited:
I do apologize for taking so long to post some progress. I finished the fore arm about a week ago, and have been forgetting to post about it, because I've started working on the chest plate. Any way, here is the progress.

IMG_6087.jpg
IMG_6083.jpg
IMG_6085.jpg
IMG_6084.jpg


And because I'm working with foam. (Which I am pretty good at) I was able to include more details, such as the little wrist spikes. All that't left for this piece is to seal it, and engrave the lines, but I'm going to do that later. I plan to make most of the armor, then go back and detail some of it, and paint it all at once. I may even put bondo and fiberglass mat on the inside to further strengthen my build.
 
As I said before, I have started working on the chest plate, just to get the biggest piece out of the way. Most of it was actually pretty enjoyable. Except for the bottom center piece. (The one shaped like a hexagon) Took me about five tries to get a decent shape, and eventually I gave up and made the chest plate fit it better.

IMG_6115.jpg

IMG_6102.jpg
IMG_6104.jpg
IMG_6103.jpg


I am going to make the ab-plate separate so that I may have more mobility and freedom. My goal is to be as comfortable as possible. All that's left is some minor adjustments and details.
 
Are you working off templates or eyeballing it? It looks fantastic either way. If templates, I’ve been working to convert MarineSnipers models to foam templates, if you are doing the same we could collaborate.
 
Are you working off templates or eyeballing it? It looks fantastic either way. If templates, I’ve been working to convert MarineSnipers models to foam templates, if you are doing the same we could collaborate.
I am working off of shandeDark515's templates (Which are very accurate. I've only had to tweak a thing or two here and there), and thank you. I do not have any experience converting templates, but I'm sure I could learn. Anyway, I'm happy to help you any way I can.
 
I may even put bondo and fiberglass mat on the inside to further strengthen my build.
May I suggest doing the fiberglass and bondo on the outside?
Yes, it is a ton of sanding, but it’ll give you a nice hard shell like 3dprinting that won’t get all dinged and torn up like foam, lasting you much longer and it is way easier to repaint... also no awkward Plastidip/ flex seal to deal with and no peeling.
I’m totally biased tho as it is what I’ll be doing with mine when the time comes (later this summer).
I know that the fiberglass and bondo will protect my armor, but when I used that process, I feel that it hid a lot of details I had. Thank you for the advice, but I just don't think I'm ready for pepakura. Maybe someday in the near future.
 
Oh yeah, no, I’m not saying pepakura. I don’t have the patience for all that warping and detail loss. I was taking about going over the foam. You do lose some detail but you can add it back in with some dremelling and sanding. But to each their own. Do what you are comfortable with. Adding the fiberglass to the inside of foam might make the suit more rigid and less comfortable with minimal benefits tho.
 
Oh yeah, no, I’m not saying pepakura. I don’t have the patience for all that warping and detail loss. I was taking about going over the foam. You do lose some detail but you can add it back in with some dremelling and sanding. But to each their own. Do what you are comfortable with. Adding the fiberglass to the inside of foam might make the suit more rigid and less comfortable with minimal benefits tho.
Okay. Once again thank you. I'm just afraid I'd goof up the armor with fiberglass. I may test it on other prototypes though. I'll keep your advice in mind.
 
So I took a small break from making the armor to make the Sidekick. Now, a lot people refer to it as the new Magnum and I hope it's not. Because in my opinion it doesn't stay true to the original design. If so, there are worse problems, and I still like the look and feel of it.


So I first printed out the template from Andrew DFT who gives away all his templates for free, which is so nice and awesome of him.
IMG_6154.jpg


I then traced it onto the foam and cut out four layers of 5mm foam. The reason being so that I could have a magazine slide in and out of the handle. (I forgot to cut a notch for the trigger, so that sadly didn't come out mechanically correct)
IMG_6153.jpg


Afterwards I engraved all the lines into the foam to give it the nice detail it has.
IMG_6159.jpg


Afterwards, I sanded down the edges so that it all meets up nicely and feels smooth. I also then dremeled the edges for the added detail.
IMG_6162.jpg


And behold. The end result...
IMG_6167.jpg
IMG_6165.jpg


IMG_6168.jpg
And I super glued a washer onto the tip to make a barrel.

IMG_6171.jpg
IMG_6170.jpg


Also sure made the iron sight lined up, because, what good is a gun if you can't aim with it?
 

Attachments

  • IMG_6164.jpg
    IMG_6164.jpg
    575.6 KB · Views: 354
  • IMG_6165.jpg
    IMG_6165.jpg
    511 KB · Views: 172
Finally got some more progress on the suit. I decided to build the shin armor. The current knee piece is attached, but Chief has a knee pad that is attached to his undersuit. Which fits into the knee piece I've currently made. And to actually fit inside the boot, the shin plate is a separate piece attached, via high powered velcro. There are still some minor adjustments and details to add, but other than that, this suit is coming along pretty well.

IMG_6256.jpg
IMG_6259.jpg

IMG_6261.jpg
IMG_6257.jpg
 
Looking good man. What brand foam are you using?
Nothing specific. I just use whatever foam I can get. The black foam is 5mm to allow more space for smaller areas of the suit, such as the ankle in my boot. The gray foam is 10mm, and my main income for that is five below, where it costs 3$ a panel. All in all, good foam.
 
This thread is more than 6 months old.

Your message may be considered spam for the following reasons:

  1. This thread hasn't been active in some time. A new post in this thread might not contribute constructively to this discussion after so long.
If you wish to reply despite these issues, check the box below before replying.
Be aware that malicious compliance may result in more severe penalties.
Back
Top