Halo Reach Custom Spartan w/ FOAM - First Build

Status
Not open for further replies.
2 questions, if you don't mind. :)
You said you had issues getting the foamies to line up when covering your torso, how did you remedy that in the end?
And what did you use to coat your armour before painting? Was it Plasti-dip?

-S420

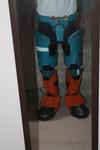
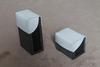
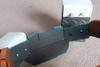
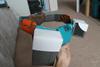
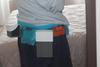
I re-read through my thread, and didn't see anywhere were I mentioned foamies not lining up. Could you maybe quote it? Perhaps I am just blind. As for lining up foamies, I just used the same templates as the EVA foam pieces, but slightly over-sized them to be able to adjust them later.

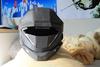
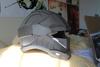
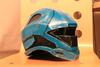
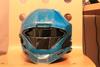
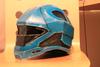
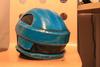
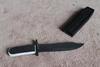
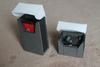
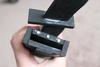
I coated the armour with some other version of Plasti dip, the local home hardware didn't have any name brand Plasti dip. Though I have to say, the stuff I got did well, but it stuck to the painters tape, and tore off a bit in some areas. Not sure if its the sealer or the tape, though the tape didn't stick to the spray paint or remove it at all.
 
Sorry I wasn't very clear and kinda worded it wrong.

I spent all day today fixing up my chest piece by doing the same craft foam layer technique in LilTyrant's build. I have to say, it's quite difficult at some times, and I don't know how she got it so clean, I've fixed most of the problem areas, but a few joints have become... unsightly.

That's what I was referring to, what did you mean by that?

-S420
 
Basically I used craft foam to cover all the joints on the EVA foam, as craft foam is a bit easier to work with. In saying that some joints were unsightly, it was me being a perfectionist, they turned out ok after the sealer and pant were applied.

EDIT:

Time for a quick little update. I've been busy with other things, so this is not gonna be huge. I've almost got the helmet finished (well, the building stage at least).

IMG_0982.jpg


IMG_0983.jpg
 

Attachments

  • IMG_0982.jpg
    IMG_0982.jpg
    68.7 KB · Views: 174
  • IMG_0983.jpg
    IMG_0983.jpg
    53.7 KB · Views: 175
Sorry for the double post, but editing my last post doesn't seem to update the thread to a "new comment" status.

It's been a while, mainly because I've been taking a break from all this foam armour, and working on a Borderlands psycho cosplay (been playing lots of Borderlands 2).

Aside from that, it's UPDATE TIME

I tried my hand at filling some of the nasty gaps in my recon helmet, using some waterproof and paint-able silicone caulking I got from home hardware. So far, it seems to be the foam equivalent of bondo :p Only problem is smoothing it out, because I highly doubt it is sand-able. To do this, I use scrap pieces of foam to apply and smooth out the caulking, and just rub off the excess stuff on some paper towel. I use a bit of water when things get finicky, but generally water is not needed. Some of the areas will most likely need multiple "coats" and so I will update on that when I can.

I then tried to use it to fill the lovely open spaces on my cardboard magnum, doesn't work so well. It is very difficult to smooth out caulking on cardboard, as well as getting the caulking to actually fill all the holes. I'm going to try bondo next (when I manage to get my hands on some). Unless there is something everyone uses that I haven't come across in all my Google-ing and research. Anyways, enough rambling, its PICTURE TIME.

IMG_0998.jpg


IMG_1000.jpg


IMG_1001.jpg


IMG_0996.jpg


Thanks for looking guys!

IMG_0998.jpg


IMG_1000.jpg


IMG_1001.jpg


IMG_0996.jpg
 
Last edited by a moderator:
Dude.This is looking GREAT for a freehand foam build. Keep it up.
 
Last edited by a moderator:
For filling the gaps in the foam and the magnum, I'd recommend using drywall spackle. It's light, goes on easily, and very much sandable. I usually use the Home Depot "Patch n' Paint" brand
 
Dude.This is looking GREAT for a freehand foam build. Keep it up.

The build isnt entirely freehand. I'd say close to 40% of it is freehand, and the rest is pep files-made-foam-templates. But I appreciate the support :D

For filling the gaps in the foam and the magnum, I'd recommend using drywall spackle. It's light, goes on easily, and very much sandable. I usually use the Home Depot "Patch n' Paint" brand

Aww, this is a shame. Just my luck : spent all day yesterday filling the holes with hot glue and smoothing it out with the glue gun's nozzle. And I didn't think to check the forums :$ But that's ok, I plan on making a second magnum (Yes, with the front part of the receiver that is a fail-turned-personal mod I've grown to like) and will definitely use this next time. (Wanna have dual magnums as my weapons, haven't seen it on the forums thus far.)

Wow, definitely the best foam helmet I've seen thus far. Love it!

Thanks a lot bud! Reading this gave me that warm fuzzy feeling of pride, and a huge smile. <3


Would post an update, but I'm in Montreal at the moment on some personal errands. I've got some paint jobs I'm real excited to show you all :D

Thanks for the support guys, really appreciate it.
 
Last edited by a moderator:
Alright, sorry for the double post, but I'm super excited to share this with you guys. Got some car window tint, and put it on both sides of a piece of plastic I had from a food container. Right now its 3 pieces cut and taped in, as this was a test. I'm trying to find either mirrored or gold tinted, but if not this black will do. (kind of goes with the whole recon/lightweight/scout build I was going for too, but then the colour for the suit is terribly off haha)

Suit is almost painted up to my satisfaction, but there's soooo much more work I could do (as always). Anyways, I' off to bed, enjoy the pictures ladies and gents.

IMG_1046.jpg


IMG_1045.jpg


IMG_1044.jpg


IMG_1043.jpg


IMG_1042.jpg
 

Attachments

  • IMG_1045.jpg
    IMG_1045.jpg
    57.2 KB · Views: 169
  • IMG_1046.jpg
    IMG_1046.jpg
    55.9 KB · Views: 176
  • IMG_1042.jpg
    IMG_1042.jpg
    59.8 KB · Views: 166
  • IMG_1043.jpg
    IMG_1043.jpg
    56 KB · Views: 166
  • IMG_1044.jpg
    IMG_1044.jpg
    54 KB · Views: 170
To backtrack a bit, bondo/resin/rondo is a viable option for the cardboard magnum for filling in holes, and might be slightly less brittle than drywall spackle, but I don't know for sure. Wouldn't recommend the spackle for the helmet or other foam builds, though, because of the brittle-ness. Better to fill those gaps the same way you did with the magnum: hot glue. Cheaper than trying to fill it in with plastidip, easier to shape and smooth than caulk, as you can use the heat from the tip of the glue gun (have seen at least one video tutorial about using the glue gun tip in the forums, just can't remember where exactly).

Are you sticking with the three piece visor or will you look for a larger single piece or perhaps get a thin (1/8" or less) sheet of polycarbonate?
 
Are you sticking with the three piece visor or will you look for a larger single piece or perhaps get a thin (1/8" or less) sheet of polycarbonate?

I'm still doing a few tests, but I plan on using a single piece for the visor, it will look a lot nicer. Might check out that polycarbonate stuff too, I've never heard of it, but it looks cool.
 
There's a seller on Ebay, POPdisplays, who sells sheets of polycarbonate. You'll need the thinner stuff to be able to bend it properly, and the use of a heatgun might help get it into shape and keep it there so it doesn't warp the helmet trying to lay flat again. This is the stuff they use for store displays, motorcycle/atv helmets, and (in much thicker applications) bullet-proof glass, so it will be much more durable than a regular sheet of plastic. And with the Recon's relatively narrow visor size, even one of the smaller sheets they sell you could probably get 2-3 visors out of it if you wanted to make more helmets or just be able to swap out visors for different colors or as replacements in the unlikely but still possible chance of the visor cracking or breaking.
 
That is a very nice looking helmet! Love the paint work too. I continue to be awed by what you guys can do with foam... Keep up the good work!
 
There's a seller on Ebay, POPdisplays, who sells sheets of polycarbonate. You'll need the thinner stuff to be able to bend it properly, and the use of a heatgun might help get it into shape and keep it there so it doesn't warp the helmet trying to lay flat again. This is the stuff they use for store displays, motorcycle/atv helmets, and (in much thicker applications) bullet-proof glass, so it will be much more durable than a regular sheet of plastic. And with the Recon's relatively narrow visor size, even one of the smaller sheets they sell you could probably get 2-3 visors out of it if you wanted to make more helmets or just be able to swap out visors for different colors or as replacements in the unlikely but still possible chance of the visor cracking or breaking.

Awesome, I will look into this. Thanks.

That is a very nice looking helmet! Love the paint work too. I continue to be awed by what you guys can do with foam... Keep up the good work!

Thanks bud! Suit is nearing completion! WOO.

I just have a quick question. I'm not sure if this is a big deal, as I can always add to the helmet to fix the problem, but is it normal that this much of my chin protrudes from the helmet? (and yes my mouth is closed) I feel like it's the recon helmet design, because if I were to make it bigger, it would be oversized. Any solutions? Or is this normal? Thanks guys! :D

I also still have to add in the padding, which should be fun to figure out.

20131119_123152.jpg
 

Attachments

  • 20131119_123152.jpg
    20131119_123152.jpg
    51.4 KB · Views: 183
Annnd time for another double post. Haha.

I've been real busy on finishing this suit. There is a con coming up here in Ottawa, and I am HELLBENT on attending with my suit completed. The painting is pretty much done, just have to spray the protective coat over the torso and that's it!
Also, I've been working on the rigging and thinking about the undersuit (I just have cycling pants and long sleeve shirt I bought from a sports store) I'm thinking of doing what kitnip did and hot gluing pleather to add the detail. Though I still want to make a real nice undersuit (maybe the next build). Also tested some mirrored window tinting film, and it looks fantastic.
Since the suit is completed (more or less) but is still quite simple (to me) I built a knife and sheath, as well as some pouches to hold things like my wallet and keys. I will also be trying to build something to hold my phone on my forearm, inspired by U513's build.

I also need to test run the suit, make sure nothing falls apart while I'm walking around haha.

Well, that's whats on the agenda for me. I'm sorry I've told you about all of these things, but I haven't been taking many pictures. I will try to get some up soon. In the mean time, enjoy this one I found laying around. It's not the greatest quality though, sorry.

Thanks for reading.

IMG_1049.jpg
 

Attachments

  • IMG_1049.jpg
    IMG_1049.jpg
    49 KB · Views: 166
very nice. like the helmet a lot. Great use of filler on that!

Thanks! That means a lot coming from you :D

Alrighty, time for some of those promised pictures from my previous update.

Here's the knife and sheath. Kept the sheath simple, and magnetized the blade to it using small rare earth magnets, and some paper clips on the hilt of the blade. Tried to make them look like part of the knife, we'll see how it turns out.

IMG_1072.jpg


IMG_1073.jpg


IMG_1074.jpg


And the pouches. Turns out my phone fits with my wallet. I'm going to add some straps and buckles after the paint job to make them fancier. (And keep my stuff safe, call me paranoid, I get it from my mom :p ) I mounted them to the back of the belt/codpiece, because there is a severe lack of detail there. And it's not in the way. Since they were "load-bearing" I reinforced the "joint" with some wooden dowels to help with weight distribution.

IMG_1066.jpg


IMG_1068.jpg


IMG_1071.jpg


IMG_1070.jpg


IMG_1069.jpg
 

Attachments

  • IMG_1072.jpg
    IMG_1072.jpg
    126.5 KB · Views: 170
  • IMG_1073.jpg
    IMG_1073.jpg
    133.8 KB · Views: 175
  • IMG_1066.jpg
    IMG_1066.jpg
    64 KB · Views: 174
  • IMG_1068.jpg
    IMG_1068.jpg
    61.5 KB · Views: 171
  • IMG_1071.jpg
    IMG_1071.jpg
    71.4 KB · Views: 161
  • IMG_1074.jpg
    IMG_1074.jpg
    41.9 KB · Views: 179
  • IMG_1070.jpg
    IMG_1070.jpg
    44.9 KB · Views: 172
  • IMG_1069.jpg
    IMG_1069.jpg
    48.1 KB · Views: 162
Alrighty, time for a ...

HUGE UPDATE

I've got more WIP pictures to show you guys, as well as some fantastic news:

So, it is done. For now. I've finished my suit. *Exhales a long breath*

I just want to say thanks to everyone who helped me out and supported me. Thank you for all the inspiration, motivation, templates, useful tips, laughs, and everything else.
I'm not to great with words, so that's all I got.

But seriously, thank you all.

Now, where's that finished armour thread... :D


So, to cover up the nasty first bicep I made, I decided to make the recon shoulder pad, since it's relatively simple, and I have the recon helmet, so why not right? The emblem I painted on was the one I used in Halo 3 and ODST. I like it cause it kinda looks like a tentacle-ed eyeball sorta thing. (I'm not crazy I swear)

IMG_1081.jpg


IMG_1084.jpg


Here's some amazing art to help out with seeing what I see in the emblem.

Halologo.png


Neck seal

IMG_1078.jpg


IMG_1076.jpg


Pouches and knife. I put the 405th logo on the pouches as a sort of brand logo haha. And well, I love to customize my stuff, so the knife got camo-ed up. :D

IMG_1083.jpg


IMG_1085.jpg


ANNNNDDDD here's the pic you all want to see. I promise better ones will be uploaded later.

IMG_1088.jpg


IMG_1081.jpg


IMG_1084.jpg


Halologo.png


IMG_1078.jpg


IMG_1076.jpg


IMG_1083.jpg


IMG_1085.jpg


IMG_1088.jpg
 
Last edited by a moderator:
Oh sweet, it came out awesome! The pouches are a good idea. I see more and more people trying to do something like that, it makes sense. But anyways! Weathering looks great as well, take more pics! You can never have too many photos.
 
Status
Not open for further replies.
Back
Top