Props How to finish interior of 3D Printed helmet?

ArcaneGhoul

New Member
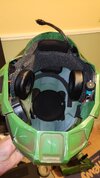
I’m working on my MkVII helmet and I’m realizing that the interior has gotten pretty dirty while I’ve been working. It’s got some dust, residual overspray from painting, cobwebs (thank you overabundance of spiders this year, I swear there are probably 100 in my garage), etc, in there and I don’t really want to be breathing all that in every time I wear the helmet, and a damp cloth only does so much when I’ve got exposed layer lines that like to catch fabric.

So for anyone else with a 3D Printed Helmet, how’d you finish the interior? I’m debating doing a clear coat just to seal everything, but I’d love to hear some other solutions that may work better. Thanks all!

Arcane signing off.
 
Hello, u did a 3d printed movie helmet with headphones and fan.

Here is a picture of my inside. I just blew out all the dust, whipped it down multiple times and added passing. I don't see why you couldn't give it a clear coat to seal it but I didnt see a need to as with the exposed interior I can easily add more fans or pads with out worrying about it not sticking to my clear coat.
 

Attachments

  • 20250907_100755.jpg
    20250907_100755.jpg
    921.4 KB · Views: 18
Hello, u did a 3d printed movie helmet with headphones and fan.

Here is a picture of my inside. I just blew out all the dust, whipped it down multiple times and added passing. I don't see why you couldn't give it a clear coat to seal it but I didnt see a need to as with the exposed interior I can easily add more fans or pads with out worrying about it not sticking to my clear coat.
Awesome, thank you!
 
In my WIP I have a post where the inside of my helmet is visible and discussed:


WIP – Bargo MKVII EVA Build


To keep it short: I usually reinforce my prints with fiberglass and resin (not strictly necessary – they can still break). While painting, I spray the inside of the helmet with matte black and tape it up while painting the outside. If a little paint gets inside, it’s no big deal.


Then I figure out where my head needs to sit inside the helmet for padding. For example, I add extra padding in the front so my head sits further back – that way the fans work better and I have more room to place the headphones.


For this particular helmet I went all-in with the electronics, but what I really recommend for everyone is adding 5V fans with a switch to a small powerbank. It’ll keep you cool, and if there’s room for padding, there’s room for fans.


Hope that helps!
Bargo the legend appears again with great advice! Thank you for these notes and the link!
 

Your message may be considered spam for the following reasons:

If you wish to reply despite these issues, check the box below before replying.
Be aware that malicious compliance may result in more severe penalties.
Back
Top