Ironman pep helmet.W.I.P will be PIC Heavy ..

Status
Not open for further replies.
Updated 2-13-2014....
Ironman_progress_001_zps7eace323.jpg


First off. Hello again all.. been a few months since i posted any thing in a while.. month or two. Here's what i've been working on lately..
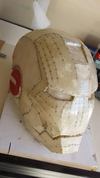
Started with Sharkmas's small Chin file ...IM_pep_000_zpsfc9abef6.jpg..
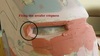
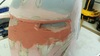
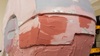
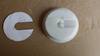
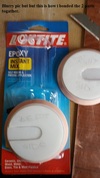
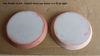
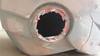
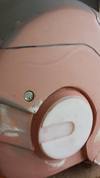
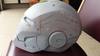
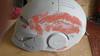
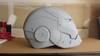
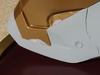
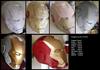
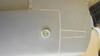
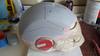
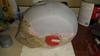
Moved on to pepping and first layers of bondo/rondo and inserting screws..IM_pep_019_zps16b312c0.jpgIM_pep_018_zps86d18da0.jpg

Youll notice paper around the screws .. thats to give the correct "gappage" between the screws and the "plate metal its attached to ...
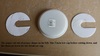
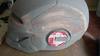
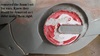
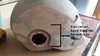
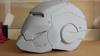
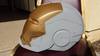
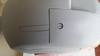
Here's the same areas after bondo dried up and paper was removed.IM_pep_017_zps51bf0b4c.jpgIM_pep_015_zpscb71cdd0.jpgIM_pep_014_zps95f1bd2c.jpgIM_pep_013_zps93aa54e2.jpgIM_pep_011_zpseaa22530.jpg

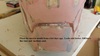
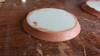
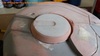
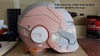
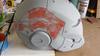
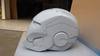
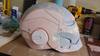
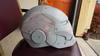
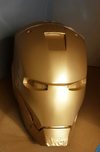
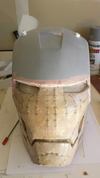
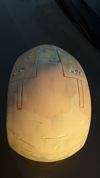
Next up is the Upper area sanded down after a coat of primer and sanding down again.. (i love sanding by hand) really i do ..
IM_pep_003_zps66318ca5.jpgIM_pep_008_zpsd5cc4623.jpgIM_pep_004_zps2345d7db.jpg

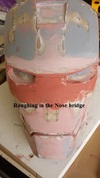
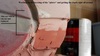
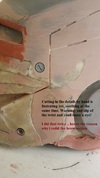
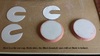
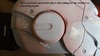
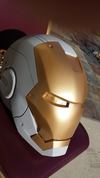
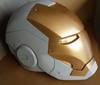
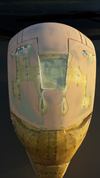
Theres a few areas that need some work to them still but so far im happy with the progress.. i also started carving in the slide plates where the face plate would flip up to , since this is goign to be a static helemt for display im not going to cut and robotic the face/chin area's. I'm doing this for a friend since he's a fan of Ironman and is in a rough period in his life .. hopefully it'll brighten him up. ( I've had thoose periods in life as well being a wounded vet and i get down as well but creating something brings me up in spirits untill i finish a project then i start another)

IM carving the lines by hand right now just to rough them in and will go back and straighten them up later.. for right now they are there for is guides.

As always.. comments are welcome..ill post more later this week as i move down and around the helmet..My time frame is to have this done in 3 weeks.. sooner would be nice.. but i cant stress taking time ...time frames kill you in the mind
 

Attachments

  • Ironman_progress_001_zps7eace323.jpg
    Ironman_progress_001_zps7eace323.jpg
    79.2 KB · Views: 218
  • IM_pep_000_zpsfc9abef6.jpg
    IM_pep_000_zpsfc9abef6.jpg
    32.7 KB · Views: 235
  • IM_pep_019_zps16b312c0.jpg
    IM_pep_019_zps16b312c0.jpg
    47.7 KB · Views: 214
  • IM_pep_018_zps86d18da0.jpg
    IM_pep_018_zps86d18da0.jpg
    29.4 KB · Views: 217
  • IM_pep_013_zps93aa54e2.jpg
    IM_pep_013_zps93aa54e2.jpg
    43.3 KB · Views: 223
  • IM_pep_014_zps95f1bd2c.jpg
    IM_pep_014_zps95f1bd2c.jpg
    46.3 KB · Views: 195
  • IM_pep_015_zpscb71cdd0.jpg
    IM_pep_015_zpscb71cdd0.jpg
    48.9 KB · Views: 352
  • IM_pep_017_zps51bf0b4c.jpg
    IM_pep_017_zps51bf0b4c.jpg
    37.6 KB · Views: 222
  • IM_pep_004_zps2345d7db.jpg
    IM_pep_004_zps2345d7db.jpg
    51.5 KB · Views: 194
  • IM_pep_008_zpsd5cc4623.jpg
    IM_pep_008_zpsd5cc4623.jpg
    50.5 KB · Views: 216
  • IM_pep_003_zps66318ca5.jpg
    IM_pep_003_zps66318ca5.jpg
    23.7 KB · Views: 208
  • IM_pep_011_zpseaa22530.jpg
    IM_pep_011_zpseaa22530.jpg
    35.4 KB · Views: 238
Update: with good weather here in California in the early mornings i was able to get some decent work done over the last few days.....

IM_pep_027_zpsa702d5c4.jpg
Was able to get the Nose area in and roughed up.. too awhile to get it nice and clean. First i had to sand down all the paint from the brow area. then draw out a socket area and cut it in.
IM_pep_028_zps9830e9ef.jpg
Finished roughing in the sockets and was going to start sanding down when i noticed this...bad bondo assistant...
Fixed that area then went to other side...IM_pep_026_zpsc01ce1a1.jpg
NOt alot of issues here on this side....decided to spend a little time to fix the mouth area
IM_pep_025_zps8dd8cc9b.jpg
I like this alot better now that i have taken my time and gone back and spend the first few hours of each morning looking at what i did the day before and correcting it.

After that i started in on the rear of the helmet...IM_pep_023_zpsd3d6208f.jpgIM_pep_024_zps39208236.jpg
Working this area by hand was little crampy... cutting sand.. cut ..sand.. rinse repeat... for about 2 hours getting it flush and edged just right. then i decided to cut in the jaw details...
IM_pep_022_zps8fd1051d.jpg..
Lotta work left to do but looks good so far ..
 

Attachments

  • IM_pep_027_zpsa702d5c4.jpg
    IM_pep_027_zpsa702d5c4.jpg
    59 KB · Views: 214
  • IM_pep_028_zps9830e9ef.jpg
    IM_pep_028_zps9830e9ef.jpg
    68.6 KB · Views: 211
  • IM_pep_026_zpsc01ce1a1.jpg
    IM_pep_026_zpsc01ce1a1.jpg
    103 KB · Views: 206
  • IM_pep_025_zps8dd8cc9b.jpg
    IM_pep_025_zps8dd8cc9b.jpg
    129.3 KB · Views: 208
  • IM_pep_023_zpsd3d6208f.jpg
    IM_pep_023_zpsd3d6208f.jpg
    140.1 KB · Views: 221
  • IM_pep_024_zps39208236.jpg
    IM_pep_024_zps39208236.jpg
    139.3 KB · Views: 204
  • IM_pep_022_zps8fd1051d.jpg
    IM_pep_022_zps8fd1051d.jpg
    140.2 KB · Views: 214
Update time..
First off this is how my weekend started
Alot of rain and temps in the upper 50's.. cold.. LOL yeah right...
Anyways i decided this weekend i would work on the ear plugs as i call them. the following show my progress..

I started with a reprint of the ears and detail part...
20140208_110009_zpscf7a9497.jpg20140208_110022_zps33a24731.jpg20140208_110033_zps15b066bd.jpg

Got them cut out and test fitted before any work is done to them ....
Moved onto the bondo and filling stages of the ears caps...
20140208_111926_zpse5667aeb.jpg20140208_115123_zpse9a252ce.jpg
20140208_112930_zps1057ce75.jpg
Then i went ahead and test fitted everythign again checking for size and placement issues....fitting well i then epoxed them into place..
20140208_121123_zps13eaac7e.jpg

After fixing them into place time to move to helmet to cut out ear caps there
20140206_164623_zps0e706647.jpg20140206_164620_zps4529597f.jpg20140206_164607_zps96641b3c.jpg20140206_164558_zps6abc683e.jpg

Moved on to sanding and trimming down the ear area and placement testing...
20140208_141400_zps25a60c7e.jpg20140208_141419_zpsbf0a3f0b.jpg20140208_152129_zpscac5a2e8.jpg20140208_152149_zps1567af31.jpg

So over the weekend i was able to adjust, cut , test , fit and place only one ear.. not sure if that is huge progress , but it was alot of stuff done for one ear LOL. Thats my update for now... will continue in the morning and update after the other side is done..
As always ...comments welcome.
 

Attachments

  • 20140208_110033_zps15b066bd.jpg
    20140208_110033_zps15b066bd.jpg
    91.6 KB · Views: 199
  • 20140208_110022_zps33a24731.jpg
    20140208_110022_zps33a24731.jpg
    34.1 KB · Views: 190
  • 20140208_111926_zpse5667aeb.jpg
    20140208_111926_zpse5667aeb.jpg
    59.3 KB · Views: 215
  • 20140208_110009_zpscf7a9497.jpg
    20140208_110009_zpscf7a9497.jpg
    125.5 KB · Views: 201
  • 20140208_112930_zps1057ce75.jpg
    20140208_112930_zps1057ce75.jpg
    129.6 KB · Views: 200
  • 20140208_121123_zps13eaac7e.jpg
    20140208_121123_zps13eaac7e.jpg
    114.1 KB · Views: 185
  • 20140208_115123_zpse9a252ce.jpg
    20140208_115123_zpse9a252ce.jpg
    115.5 KB · Views: 216
  • 20140206_164623_zps0e706647.jpg
    20140206_164623_zps0e706647.jpg
    48.4 KB · Views: 201
  • 20140206_164620_zps4529597f.jpg
    20140206_164620_zps4529597f.jpg
    99.2 KB · Views: 181
  • 20140206_164607_zps96641b3c.jpg
    20140206_164607_zps96641b3c.jpg
    41.7 KB · Views: 198
  • 20140206_164558_zps6abc683e.jpg
    20140206_164558_zps6abc683e.jpg
    79.3 KB · Views: 197
  • 20140208_141400_zps25a60c7e.jpg
    20140208_141400_zps25a60c7e.jpg
    95.5 KB · Views: 183
  • 20140208_141419_zpsbf0a3f0b.jpg
    20140208_141419_zpsbf0a3f0b.jpg
    109.5 KB · Views: 194
  • 20140208_152129_zpscac5a2e8.jpg
    20140208_152129_zpscac5a2e8.jpg
    122.8 KB · Views: 194
  • 20140208_152149_zps1567af31.jpg
    20140208_152149_zps1567af31.jpg
    29.7 KB · Views: 191
Update... weather was good today so i was able to get the other ear on...
IM_pep_029_zps4bb795fc.jpg
THen it was time to do a ton of sanding and priming.. over and over ....
IM_pep_031_zps73039be2.jpgIM_pep_032_zps73030aac.jpgIM_pep_034_zpsf6995a2f.jpgIM_pep_033_zps0c4ce3bc.jpgIM_pep_035_zps080c1d91.jpg
then it was time to do last prime coat before tomorrow's base coats....
IM_pep_039_zps9942db4f.jpgIM_pep_038_zpsf0cbc6a9.jpg
hopefully all will go well and the sun gods will be on my side again.. then again with a micro climate like in my area.. it could be raining all day and kill those plans...
As always ... please comment..
 

Attachments

  • IM_pep_034_zpsf6995a2f.jpg
    IM_pep_034_zpsf6995a2f.jpg
    51.1 KB · Views: 201
  • IM_pep_032_zps73030aac.jpg
    IM_pep_032_zps73030aac.jpg
    58.5 KB · Views: 196
  • IM_pep_031_zps73039be2.jpg
    IM_pep_031_zps73039be2.jpg
    35.3 KB · Views: 201
  • IM_pep_029_zps4bb795fc.jpg
    IM_pep_029_zps4bb795fc.jpg
    53.4 KB · Views: 194
  • IM_pep_033_zps0c4ce3bc.jpg
    IM_pep_033_zps0c4ce3bc.jpg
    56.7 KB · Views: 196
  • IM_pep_035_zps080c1d91.jpg
    IM_pep_035_zps080c1d91.jpg
    50.9 KB · Views: 202
  • IM_pep_039_zps9942db4f.jpg
    IM_pep_039_zps9942db4f.jpg
    39.6 KB · Views: 192
  • IM_pep_038_zpsf0cbc6a9.jpg
    IM_pep_038_zpsf0cbc6a9.jpg
    30.9 KB · Views: 204
Update again... Weather was awesome today.

Started the painting process. Used Dupli-color paint codes for Ford Sunburst and GM Dark Cherry Metallic. Was able to get Sunburst color on.

IM_pep_048_zps1f4044aa.jpgIM_pep_047_zps5dde243a.jpg

This is what it looked like before tape removal... AWESOME!!! 10 light coats of paint misting..And then off comes the tape...
IM_pep_041_zps90d7f35a.jpgIM_pep_042_zps7d2be3c2.jpg

And then i saw this when i was removing the last tape run...
IM_pep_044_zps8a39ce4b.jpgIM_pep_045_zps177d8e23.jpg
a rip in the paint.. so i did as i usually do and took out 1000 grit paper and sanded for about a hour and retaped and painted..
IM_pep_043_zps56d9422b.jpg
All better now.. the dirty spot is tape residue left over from removing the tape a little to soon. I wanted to get it off so i could cure it inside over night inside the house since we are actually moving into a new house i set the temp to 110 degrees.. and baking it inside over night (dont tell the wife) :) so tomorrow when i get there i will add about 4 layers of Silver base to the back of helmet and then 6 light layers of the dark cherry.

Barring any weather issues tomorrow and any other issues i should have this rough painted in. The next foreseen issue isthis..

I've seen ppl leave the paint job as is. Orange peel and all. Im a stickler for not liking the way new paint looks on things. Auto paints leave that orange peel and i cant stand it. And being new to the whole "fresh from the factory" paint jobs, is there a way to get rid of that other than wetsanding it? Reason i ask is because ive read that wetsanding metallic colors can cause them to "flip". Ive looked for info on this here on the forums and cant find anything. that or i didnt read past page 60+ ( which i just broke my own rule) , any help on this would be great. Any way ...

Untill Batman and Megatron get along.. I bid you all a fond Captain Kangaroo....
 

Attachments

  • IM_pep_042_zps7d2be3c2.jpg
    IM_pep_042_zps7d2be3c2.jpg
    47.8 KB · Views: 194
  • IM_pep_041_zps90d7f35a.jpg
    IM_pep_041_zps90d7f35a.jpg
    53.4 KB · Views: 195
  • IM_pep_047_zps5dde243a.jpg
    IM_pep_047_zps5dde243a.jpg
    78.7 KB · Views: 183
  • IM_pep_048_zps1f4044aa.jpg
    IM_pep_048_zps1f4044aa.jpg
    66.1 KB · Views: 184
  • IM_pep_044_zps8a39ce4b.jpg
    IM_pep_044_zps8a39ce4b.jpg
    19.9 KB · Views: 186
  • IM_pep_045_zps177d8e23.jpg
    IM_pep_045_zps177d8e23.jpg
    54.5 KB · Views: 173
  • IM_pep_043_zps56d9422b.jpg
    IM_pep_043_zps56d9422b.jpg
    41 KB · Views: 183
Well Update time again. Sorry for crappy pics also

Spent most of the last 2 days laying down the Dark Cherry Metallic over a base run of chrome paint to keep it from darkening up to much and here is the results...
IM_pep_057_zps3d255f0d.jpg

Whats left to do ? Paint the eyes and mouth area black after these layers dry up. Which will be done on Tuesday, Due to final move in to new house..finally...
 

Attachments

  • IM_pep_057_zps3d255f0d.jpg
    IM_pep_057_zps3d255f0d.jpg
    47.3 KB · Views: 164
Status
Not open for further replies.
Back
Top