Jay's Skyrim Dova helm [COMPLETED]

Status
Not open for further replies.
Haha nice mask!

So last night I got the glassing completed but because I added a little extra hardener to the resin it cured extremely fast which allowed me to then go on to Rondo the horns with slush. I mixed perhaps a little too much Rondo for the two horns and so I ended up giving the whole helmet a second reinforcement of Rondo, but that works out pretty well because there were a few tight spots I couldn't quite get to with the glass that I just sloshed a but of resin into. I feel much better about the structural strength of the whole thing now. The horns came out perfect, I'm very impressed with the slushing method!
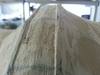
So here's the helmet with both glass and Rondo, super strong and surprisingly not that much thickness added to it!
20131023_075355_zps1bb274d6.jpg

And here's an example of just how strong the horns are after the rondo slush. They can now hold the entire weight of the helmet without bending.
20131023_075429_zps5fd62c2c.jpg


Time for Bondoing the exterior today. Let's see how this turns out!!
 

Attachments

  • 20131023_075355_zps1bb274d6.jpg
    20131023_075355_zps1bb274d6.jpg
    61.3 KB · Views: 234
  • 20131023_075429_zps5fd62c2c.jpg
    20131023_075429_zps5fd62c2c.jpg
    79.7 KB · Views: 244
My goodness that Bondo cures fast!! I've done about 70% of the helmet in 3 sets, each set was much less hardener than the last but it still sets incredibly fast! It's a lot of fun though watching the details come into shape. Will have some pictures later tonight of progress so far! Then it's time to sand!! I feel as though I'm almost over the hill.
 
Are you covering parts of the helmet in Bondo, or all of it before you do your sanding?
I'll do all of the helmet in bondo before I sand, but I'm thinking of leaving the horns as they are until the helmet is done, then bondoing and sanding those on their own. The helmet is gonna have an even, consistent texture of weathered, hammered metal, foe which I was going to completely bondo, sand, get the desired finish then add the texture. The horns have an entirely different texture so I was going to save that for after the helm is done.
 
Alright update on the Bondo!
I applied a very rough first coar because the helmet itself is incredibly edge heavy, but I want it to be rounded. So after applying the rough coat I went to filing down all those pesky edges with a rasp. Things were going great until I got a bit carried away and heard this horrible snap sound. Turns out I'd broken one of the horns clean in half.
Not to be deterred, I'm rolling with it. I think it'll add some character to the helmet.
So I filled out the broken horn with expansion foam, continued with my filing down, and tried to reinforce the details such as the ridges on the helmet.
20131025_091719_resized_zps52635bdf.jpg


Again this is just a first rough coat, I expect my second one (which I will be applying shortly) to look more like a truly Bondo's helmet.

20131025_091742_resized_zpsbc4d3600.jpg
 

Attachments

  • 20131025_091742_resized_zpsbc4d3600.jpg
    20131025_091742_resized_zpsbc4d3600.jpg
    74.7 KB · Views: 239
  • 20131025_091719_resized_zps52635bdf.jpg
    20131025_091719_resized_zps52635bdf.jpg
    110 KB · Views: 231
Second application of Bondo, this time adding detail and solidifying existing details.
Next bit will be the final 'spot' application just to get everything straightened out to be painted. Before that, though, comes the horns!

20131025_142711_resized_zps2eef3126.jpg


I'm actually preferring the one horn look now too. Reminds me of Bob:
3rju2t_zps6372d234.jpg
 

Attachments

  • 20131025_142711_resized_zps2eef3126.jpg
    20131025_142711_resized_zps2eef3126.jpg
    67.8 KB · Views: 210
  • 3rju2t_zps6372d234.jpg
    3rju2t_zps6372d234.jpg
    24.7 KB · Views: 197
Hah that's funny :p I saw this just now and have you considered doing those lines in craft foam instead of bondo? It's been done before sorry if I'm too late I'm sure you probably don't want to sand it down again.
 
Hah that's funny :p I saw this just now and have you considered doing those lines in craft foam instead of bondo? It's been done before sorry if I'm too late I'm sure you probably don't want to sand it down again.
Nah it's fine :] My favorite part is forming and shaping the Bondo, although everyone else seems to hate it lol. I'm having a lot of fun with it! I just hit the front with a light spray of primer to show up the imperfections better so I know what I'm shaping now. I'll hopefully have the helmet finished by next week I think. Haven't even thought about painting yet... yikes!

Looks great man...
Thanks man!
 
Mate, this looks great. You are off to a solid start with the bondo and resin. Keep this form going.
 
Thanks for the encouragement guys.
Just a quick update: Got the front almost detailed to the point I want. Still not entirely happy with it, there's a few spots I have to fill, sand, and correct, but the hit of primer really helped to highlight them for me. I've been thinking a lot about the horns too so I'm excited to get stuck into those. Painting is gonna be a blast I think, it's starting to take the shape now so I'm pretty stoked about it.
And to think, this is all just practice for my Iron Man build!! Can't wait to get started on it :p

20131026_184955_zpsba6ff8d8.jpg
 

Attachments

  • 20131026_184955_zpsba6ff8d8.jpg
    20131026_184955_zpsba6ff8d8.jpg
    80.2 KB · Views: 202
Thanks guys, it's coming along a bit better now. Really squaring and sharpening those ridges on the front, taking a while but hey it'll be worth it in the end. Then it'll be time for painting which I'm pretty excited for.
 
20131101_163311_zps378c25c2.jpg


It's about ready for the spot putty now, then I'll be getting my paint on. Can't wait !
 

Attachments

  • 20131101_163311_zps378c25c2.jpg
    20131101_163311_zps378c25c2.jpg
    69.9 KB · Views: 210
Build is looking great man. Doing great with the attention to the details. I think you will do great in the end man.
 
Hey thanks, and here's a really strange tip i wanna share with you guys:
I had a small section of the helmet that I missed with my resin and glass. It was on the point where the cheek and neck meet, I call them the wings. Well I didn't notice until I started to file, rasp and sand my bondo, and it cracked slightly due to the lack of structural support. I decided to just throw a it more glass and resin into that spot, but it was a really tight bit to get to, talking a 1inch^2 piece in a corner. So I cut the piece, laid it into the spot, and saturated it with Elmers, being sure to push it around with my finger to get it all really wet. I was only doing this to hold it in place so I could resin it later.
To my surprise, next morning when I came out to work on it some more, the Elmers had dried solid, holding the glass extremely well. The glass had absorbed the Elmers just like it does with the resin.
Now of course I don't expect that it's half as sturdy or solid as resin, but damn... that's a hell of a work around for people that really can't use Resin in doors, nor afford the Aqua resin.
I may try it again later on a bigger piece and see just how structurally sound it is. Needless to say I'm impressed right now though!!
 
Man, you're blazing hot right now, 179 posts, a near complete helmet, and less than a month old... great job. As for the little tidbit of info, I love it when people find little tricks that can and will come in handy, thank you.
 
Status
Not open for further replies.
Back
Top