Misriah Forge
New Member
Hi all,

This is a repost after having a discussion as to posting Airsoft centred builds here on the 405th. So, for clarity, this build thread is in no way advice or suggestions for doing your own airsoft build, either in regard to airsoft guns or protective equipment. For information on the subject, I would recommend you get in touch with a local airsoft site and seek professional advice there. While this build is cool as hell, it's tremendously expensive, made with unicorn parts that either are no longer available as they were part of a limited run, or parts I have made myself here in my shop. It's enormously impractical, heavy, exceptionally large, and has cost an absolute fortune to put together (in both time and money), so before you ask, no, I wont share the CAD files or sell you this piece or any replica of it to respect the rules of the 405th (and my own sanity). If any admins would like any of the content of this thread altering, please let me know.
With all that out of the way, lets get started.
In 2019 I got into airsoft, and have been into Halo since CE was released, nature took its course and in late 2019 I started drawing out a halo replica shell to go over top of an existing airsoft rifle, the KJWorks KC-02.
Started off looking at a BR, but without the three shot burst I wasn’t keen. The KC-02 is a semi-auto rifle so a perfect candidate for the mighty DMR. I won’t go too heavy into the inner workings of the airsoft piece here unless I’m told I can by a member of the moderation team, but the basics are, everything has been upgraded, heavyweight stainless bolt, trigger group….the whole shebang. Only original bits left on it is the receiver and the trigger housing.

The dilemma of which DMR to choose from was tough, Reach being the classic, H4 with the re-imagined M395, and H5 with the slightly sleeker M395B, smaller cheek weld, more top rail space. I settled on the M395B, but a bit more on this later.
Started by pulling up an a model pulled from the game I found on Thingiverse (can’t recall the original uploader, but thank you whoever you were). From there I drew in all of the KC-02 components and overlaid them to get the right scale such that I could hide the airsoft bit completely, turned out, full scale (as defined by the Halo Wiki) was the perfect size.

Started re-working the model from buttstock to muzzle, the entire thing has been completely re-drawn over the original model, increasing the resolution of some components, removing stuff that just wouldn’t print, and taking artistic licence in areas that needed to accommodate some of the running gear within. Most of this is the magwell at the rear of the DMR, which needed flaring out slightly to accommodate the airsoft bits. the charging handle has swapped sides as well.
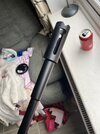
As I progressed it become increasingly clear that if I wanted to go full scale, the measly 370mm outer barrel of the KC-02 wasn’t going to work, as the barrel on the DMR extends 750mm past the KC-02 receiver, you can buy extensions, but given the amount of effort I’ve put in already, that felt like a cheap workaround, I wanted a single piece barrel. So I drew it up, and went on the hunt for a machinist who could spin one up for me. This was an area I wasn’t expecting to struggle with, I work in industry and have a few contacts, but none of them could help with a one off piece. I tried local maker spaces, model and full size steam engine communities, even had a chat with a few gunsmiths (which do exist in Blighty, we just don’t talk about it much). Everywhere I went, the answer was “I know someone who can”, and that’s where the conversation usually ended. I don’t even think it was the subject matter that put people off, it was the unit quantity, no one wanted to make 1.

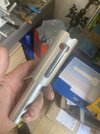
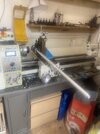
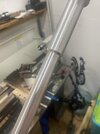
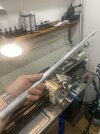
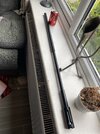
I gave up, and bought myself a lathe. I had owned an old model a few years ago with limited capability, but it wouldn’t have been up to this job even if I had kept it. I bought new, and got myself a Chester DB10 Super lathe with an extra long bed (of 750mm as it goes). Machining the barrel was surprisingly easy, it also meant I could machine up the muzzle brake, and a little piece to act as a fake gas tube. I’m also yet to machine the remote trigger block and pushrods, but those are on the dance cards. For now, I had a solution, and after bead blasting and anodising, it came out great!

I thought I would try one of Adam Savages tricks for scale model making, I found a nice render of the M395B and had it printed at full scale. As I got further with the design and started printing out parts, I’d lay them out on the picture, felt good to be filling in the puzzle. I’ll also use it for paint and decal reference.

In regard to printing, I used to own the mighty Ultimaker 2+, a super reliable little machine, but unfortunately this project had rather outgrown it’s build plate. I would need to cut the body into three separate pieces, in areas that were quite thin, then bolt+glue it back together. While thinking about how to approach this, I came across the company Ratrig, and swapped out the old Ultimaker for a V-Core 3 500X500X500 size printer, now I could print all the parts of the rifle, uncut, all on the same build plate at once! It’s a monster of a machine and it’s done some amazing prints thus far. The image below shows an ODST lid, the main body of my DMR model, an outline of the Ratrig's build volume, and the smaller square is what the Ultimaker could do.

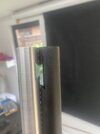
So, earlier I mentioned the model being something of a mashup between a M395 and M395B, I have the overall body shape of the M395B with the shorter cheek weld, but I felt the rifle needed some fancy electronics, which is where the tachyon round counter comes into play. Rail mounted ammo counter designed for Airsoft. As it’s a rail mounted round counter (like the M395) and not integrated into the optic (as is the case with the M395B), I’m calling it the M395A (thanks for leaving me a slot there 343i). For powering the electronics, and I’m pretty sure this is how it’s done on the “in universe” example, the space behind the buttpad is the perfect size to make an 18650 LiIon battery slot, so that’s where I’ve put it. Charged through the side of the body via one of those magnetic USB charger adaptors, keeps it splash resistant if I get caught in a bit of unexpected rain. Most of the electronics will be getting some conformal coating for protection as well.

As it stands, I have all the running gear the Airsoft bit will need, I need to put the remote trigger and trigger bar setup together, which is simple but needs some machined parts.

So what have I done, and what’s left to do:
Most of the body is printed in PLA (B/C I had an 8Kg roll of filament loaded in, made sense to use it. Might re-print in a better material if required).
I still need to do the top rail, which I’m just settling in on a few of the electronic components before I commit to the design and print it. I have metal picatinny rails to mount on top of it.
The handguard is being formed from some 304 stainless flatbar, I have the material, but need to put in the work here.

Remote trigger mechanism needs sorting out.


The main body need fettling somewhat to fit the gas regulator up front under the removable handgrip, and I need to make a small design tweak on the heatshield up front (which is fine, as that was one of the older test prints).
Filler, sanding and paint. I’m going to Cerakote it, use the air dry stuff, then pop waterslide decals on top of that.
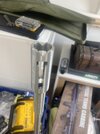
Sorting out the case, week or so back got an absolute steal on a Peli 1750 case, was just missing the middle layer of foam, gonna replace that, make specific cutouts for the rifle and some mags/gas bottles (can use 33/88g CO2 bottles), then going to line the whole thing with felt.

That’s pretty much where I am, been quite the journey thus far, and I’ve picked up a few extra tools along the way. Further plans also now consist of drawing up and printing a Halo Reach style Jetpack, with some rather insane 150mm Triangle drivers inside to sound out the DMR shot sounds I pulled from the H4 game files, to sound out when I pull the trigger on the DMR. There’s no way I’m hiding with a 1.24 meter long rifle, may as well bring the noise!

This is a repost after having a discussion as to posting Airsoft centred builds here on the 405th. So, for clarity, this build thread is in no way advice or suggestions for doing your own airsoft build, either in regard to airsoft guns or protective equipment. For information on the subject, I would recommend you get in touch with a local airsoft site and seek professional advice there. While this build is cool as hell, it's tremendously expensive, made with unicorn parts that either are no longer available as they were part of a limited run, or parts I have made myself here in my shop. It's enormously impractical, heavy, exceptionally large, and has cost an absolute fortune to put together (in both time and money), so before you ask, no, I wont share the CAD files or sell you this piece or any replica of it to respect the rules of the 405th (and my own sanity). If any admins would like any of the content of this thread altering, please let me know.
With all that out of the way, lets get started.
In 2019 I got into airsoft, and have been into Halo since CE was released, nature took its course and in late 2019 I started drawing out a halo replica shell to go over top of an existing airsoft rifle, the KJWorks KC-02.
Started off looking at a BR, but without the three shot burst I wasn’t keen. The KC-02 is a semi-auto rifle so a perfect candidate for the mighty DMR. I won’t go too heavy into the inner workings of the airsoft piece here unless I’m told I can by a member of the moderation team, but the basics are, everything has been upgraded, heavyweight stainless bolt, trigger group….the whole shebang. Only original bits left on it is the receiver and the trigger housing.
The dilemma of which DMR to choose from was tough, Reach being the classic, H4 with the re-imagined M395, and H5 with the slightly sleeker M395B, smaller cheek weld, more top rail space. I settled on the M395B, but a bit more on this later.
Started by pulling up an a model pulled from the game I found on Thingiverse (can’t recall the original uploader, but thank you whoever you were). From there I drew in all of the KC-02 components and overlaid them to get the right scale such that I could hide the airsoft bit completely, turned out, full scale (as defined by the Halo Wiki) was the perfect size.
Started re-working the model from buttstock to muzzle, the entire thing has been completely re-drawn over the original model, increasing the resolution of some components, removing stuff that just wouldn’t print, and taking artistic licence in areas that needed to accommodate some of the running gear within. Most of this is the magwell at the rear of the DMR, which needed flaring out slightly to accommodate the airsoft bits. the charging handle has swapped sides as well.
As I progressed it become increasingly clear that if I wanted to go full scale, the measly 370mm outer barrel of the KC-02 wasn’t going to work, as the barrel on the DMR extends 750mm past the KC-02 receiver, you can buy extensions, but given the amount of effort I’ve put in already, that felt like a cheap workaround, I wanted a single piece barrel. So I drew it up, and went on the hunt for a machinist who could spin one up for me. This was an area I wasn’t expecting to struggle with, I work in industry and have a few contacts, but none of them could help with a one off piece. I tried local maker spaces, model and full size steam engine communities, even had a chat with a few gunsmiths (which do exist in Blighty, we just don’t talk about it much). Everywhere I went, the answer was “I know someone who can”, and that’s where the conversation usually ended. I don’t even think it was the subject matter that put people off, it was the unit quantity, no one wanted to make 1.
I gave up, and bought myself a lathe. I had owned an old model a few years ago with limited capability, but it wouldn’t have been up to this job even if I had kept it. I bought new, and got myself a Chester DB10 Super lathe with an extra long bed (of 750mm as it goes). Machining the barrel was surprisingly easy, it also meant I could machine up the muzzle brake, and a little piece to act as a fake gas tube. I’m also yet to machine the remote trigger block and pushrods, but those are on the dance cards. For now, I had a solution, and after bead blasting and anodising, it came out great!
I thought I would try one of Adam Savages tricks for scale model making, I found a nice render of the M395B and had it printed at full scale. As I got further with the design and started printing out parts, I’d lay them out on the picture, felt good to be filling in the puzzle. I’ll also use it for paint and decal reference.
In regard to printing, I used to own the mighty Ultimaker 2+, a super reliable little machine, but unfortunately this project had rather outgrown it’s build plate. I would need to cut the body into three separate pieces, in areas that were quite thin, then bolt+glue it back together. While thinking about how to approach this, I came across the company Ratrig, and swapped out the old Ultimaker for a V-Core 3 500X500X500 size printer, now I could print all the parts of the rifle, uncut, all on the same build plate at once! It’s a monster of a machine and it’s done some amazing prints thus far. The image below shows an ODST lid, the main body of my DMR model, an outline of the Ratrig's build volume, and the smaller square is what the Ultimaker could do.
So, earlier I mentioned the model being something of a mashup between a M395 and M395B, I have the overall body shape of the M395B with the shorter cheek weld, but I felt the rifle needed some fancy electronics, which is where the tachyon round counter comes into play. Rail mounted ammo counter designed for Airsoft. As it’s a rail mounted round counter (like the M395) and not integrated into the optic (as is the case with the M395B), I’m calling it the M395A (thanks for leaving me a slot there 343i). For powering the electronics, and I’m pretty sure this is how it’s done on the “in universe” example, the space behind the buttpad is the perfect size to make an 18650 LiIon battery slot, so that’s where I’ve put it. Charged through the side of the body via one of those magnetic USB charger adaptors, keeps it splash resistant if I get caught in a bit of unexpected rain. Most of the electronics will be getting some conformal coating for protection as well.
As it stands, I have all the running gear the Airsoft bit will need, I need to put the remote trigger and trigger bar setup together, which is simple but needs some machined parts.
So what have I done, and what’s left to do:
Most of the body is printed in PLA (B/C I had an 8Kg roll of filament loaded in, made sense to use it. Might re-print in a better material if required).
I still need to do the top rail, which I’m just settling in on a few of the electronic components before I commit to the design and print it. I have metal picatinny rails to mount on top of it.
The handguard is being formed from some 304 stainless flatbar, I have the material, but need to put in the work here.
Remote trigger mechanism needs sorting out.
The main body need fettling somewhat to fit the gas regulator up front under the removable handgrip, and I need to make a small design tweak on the heatshield up front (which is fine, as that was one of the older test prints).
Filler, sanding and paint. I’m going to Cerakote it, use the air dry stuff, then pop waterslide decals on top of that.
Sorting out the case, week or so back got an absolute steal on a Peli 1750 case, was just missing the middle layer of foam, gonna replace that, make specific cutouts for the rifle and some mags/gas bottles (can use 33/88g CO2 bottles), then going to line the whole thing with felt.
That’s pretty much where I am, been quite the journey thus far, and I’ve picked up a few extra tools along the way. Further plans also now consist of drawing up and printing a Halo Reach style Jetpack, with some rather insane 150mm Triangle drivers inside to sound out the DMR shot sounds I pulled from the H4 game files, to sound out when I pull the trigger on the DMR. There’s no way I’m hiding with a 1.24 meter long rifle, may as well bring the noise!
Last edited: