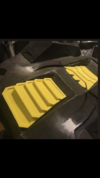
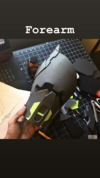
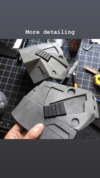
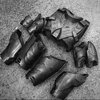
Making of: EVA Foam Spartan Armor

Status
Not open for further replies.
Hey Everyone! I have not been crafting in while but I decided to try to dig through the archives and make a collage of the steps I took to make my spartan suit. Stay tuned and I hope you are all safe.
 

Attachments

  • yod2.jpg
    yod2.jpg
    1.1 MB · Views: 1,308
Foam Smithing (Pocket Edition)
Quick Process Guide
Measure yourself»Paper study models» Apply to foam»Cut out» Glue together»Reinforce seams

-Study your references. Play the game and hit up that theatre mode!!
- I prefer to use contact cement and super glue to attach foam pieces together
-I prefer to use hot glue to REINFORCE connections on the inner surfaces

Feel free to leave some questions and I’ll share my experiences :) stay tuned!
 

Attachments

  • BCE37952-D83C-442F-9AE2-2F4A8A435F2A.png
    BCE37952-D83C-442F-9AE2-2F4A8A435F2A.png
    1.8 MB · Views: 198
  • F0981A9C-3766-4343-AE86-805A24284EE7.png
    F0981A9C-3766-4343-AE86-805A24284EE7.png
    1.2 MB · Views: 183
  • 1F9C035D-2A4C-4287-9F01-B4E716D00C9F.png
    1F9C035D-2A4C-4287-9F01-B4E716D00C9F.png
    2.1 MB · Views: 178
  • 9DC47030-9670-4F8E-8DB2-0FBD03CB0862.png
    9DC47030-9670-4F8E-8DB2-0FBD03CB0862.png
    2.2 MB · Views: 191
Torso Check
The torso can be a tricky piece to make in terms of measurements. Like blazers and sport coats, the important measurement is your shoulder width. I used thin craft foam and cardboard to make some details. I would prefer to work with all black foam pieces, but working in colors does make it slightly easier to visually separate different parts of your build
 

Attachments

  • 0C12982C-83F6-4EF5-9B17-3816EF495DC2.jpeg
    0C12982C-83F6-4EF5-9B17-3816EF495DC2.jpeg
    164.1 KB · Views: 171
  • D3EC1DAC-65AA-43D9-8D87-B08C252F309C.png
    D3EC1DAC-65AA-43D9-8D87-B08C252F309C.png
    1.3 MB · Views: 161
  • EBC836BA-ECDD-4733-AB74-106496B0C3AA.png
    EBC836BA-ECDD-4733-AB74-106496B0C3AA.png
    2 MB · Views: 150
Upper Body Fit
Wrapping up the torso I create the biceps and shoulder pauldrons
-the biceps function like arm bands. They just wrap around my biceps with elastic
-I made a few iterations for the hayabusa shoulders and this is what I came up with. I just abused theatre mode and did my best. They are basically 3 eva plates staggered, with details and layers of course to each

*I lose a lot of mobility because of these shoulder pieces. Sadly my arms don’t pop out of my torso like an action figure xD. For best range of motion, you want to keep your shoulder joint as free as possible. Master chiefs shoulder pieces are much less intrusive than the hayabusa’s, for example
 

Attachments

  • EFF032E0-C1A1-4C90-8D97-F5C8359F5E17.png
    EFF032E0-C1A1-4C90-8D97-F5C8359F5E17.png
    2.3 MB · Views: 164
  • D245D4BD-AB6F-4B52-9A88-7A0AA1C28B11.png
    D245D4BD-AB6F-4B52-9A88-7A0AA1C28B11.png
    2.1 MB · Views: 157
  • D68CD199-7430-4D8A-8001-FAD343FB0E8B.png
    D68CD199-7430-4D8A-8001-FAD343FB0E8B.png
    1.2 MB · Views: 179
Awesome man. I deleted all my social media and I logged out from my master colt IG, taking a break from it indefinitely. Glad to see you posting your amazing suit on here!
Ohhh alright. Well take care man! You do do. Appreciate the support! I just wish I did a better job documenting
 
Forearms
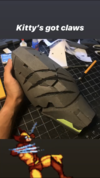
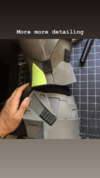
If you know me, I’m all about details. In my head I had a story of a close quarters combat situation with an alien beast. Don’t be shy with battle damage everyone! Clean and pristine is nice and all, but I feel a stronger connection with scars. Chips, scratches, etc. all tell a story of a life LIVED.
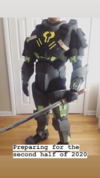
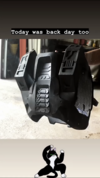
 

Attachments

  • D1157BED-F48B-4F6C-AF4C-5C6F74CA7DA8.png
    D1157BED-F48B-4F6C-AF4C-5C6F74CA7DA8.png
    1.7 MB · Views: 147
  • 55559651-0385-4313-8DF1-EF9735F53637.png
    55559651-0385-4313-8DF1-EF9735F53637.png
    2.5 MB · Views: 144
I love seeing stuff like this! building your backstory through little details like this can really add so much to your build!
 
The Lower Half
-Thighs and calves

-proportions are super important to me so it was a lot of trial and error. Like my other pieces, the armor just slips on and off.
(Wearing them like a hat is an optional step but it’s recommended to keep things lighthearted) As always, spam the theater mode lol. That’s where I keep my trust
 

Attachments

  • 1E1998D1-2F98-4E3D-9E03-BF6739B52E0E.png
    1E1998D1-2F98-4E3D-9E03-BF6739B52E0E.png
    1.9 MB · Views: 146
  • F78EF050-2483-49FA-B7ED-9D8A4B6B3096.png
    F78EF050-2483-49FA-B7ED-9D8A4B6B3096.png
    1.2 MB · Views: 132
  • 814E5063-38DA-4C53-94D1-6A6A7500875D.png
    814E5063-38DA-4C53-94D1-6A6A7500875D.png
    2.3 MB · Views: 166
  • B9BE9D0E-56A7-4D7F-A03F-C322A628C03E.png
    B9BE9D0E-56A7-4D7F-A03F-C322A628C03E.png
    1.3 MB · Views: 128
  • 8DEE2FB4-BC20-4CB8-8A99-A27455EE00BF.png
    8DEE2FB4-BC20-4CB8-8A99-A27455EE00BF.png
    1.3 MB · Views: 139
Miscellaneous Parts
Cod piece, handplates, boot detailing
-these were the remaining big ticket items for the build (aside from the helmet)
-I might redo the Cod piece in the future...
-for the boots I decided to take an existing real boot and cover it with foam. These were super fun to make, so many details and angles. The toe area is separated allowing for foot flexibility
 

Attachments

  • 352D4C99-AF79-4B35-948C-7E851A630360.png
    352D4C99-AF79-4B35-948C-7E851A630360.png
    1.9 MB · Views: 135
  • 586E32C6-2A72-4580-BB6D-DDE31533E06B.png
    586E32C6-2A72-4580-BB6D-DDE31533E06B.png
    2 MB · Views: 159
  • D5E3949B-7F82-459E-99E1-C2781DD5FAFD.png
    D5E3949B-7F82-459E-99E1-C2781DD5FAFD.png
    1.5 MB · Views: 139
  • 17C5E081-C485-4696-B183-23A93D34C0AE.png
    17C5E081-C485-4696-B183-23A93D34C0AE.png
    1.6 MB · Views: 133
  • 006FC77E-3339-4E6C-85E0-7846F0494E46.png
    006FC77E-3339-4E6C-85E0-7846F0494E46.png
    2 MB · Views: 134
Primed and Sealed
- black Plastidip baby!! So far that is my favorite means of priming foam builds
-be sure to heat seal foam builds before apply Plastidip or however you decide to prime
 

Attachments

  • 79C377C3-91BB-4FC5-966E-69A5A4AF806B.jpeg
    79C377C3-91BB-4FC5-966E-69A5A4AF806B.jpeg
    330.1 KB · Views: 153
  • A80231B6-6D54-43DC-8E03-39B35325CB57.png
    A80231B6-6D54-43DC-8E03-39B35325CB57.png
    1.8 MB · Views: 131
Status
Not open for further replies.
Back
Top