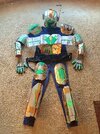
Okay! So let’s talk about the materials I used in this cosplay. It’s very simple, cheap- and was very accessible for me.
Tools I used: Scissors. Exacto knife. Screw driver (to poke holes). Pencils. Markers. Hot glue gun.
1- This suit was majorly just plain old cardboard.
I chose cardboard for a few reasons.
One: I had a crap ton of it. Zero money spent on that haha.
Two: I am familiar with it and how it works and moves.
Three: Very easy to make things with it, layer and it wasn’t a big deal if I had to redo a piece.
Four: I wanted to see if some of the YouTube videos with costumes would work just as well with cardboard as it did with EVA foam.
(Conclusion to Four: For short no. Long response- It kinda does. It just works differently as it is a completely different material. Cardboard is hard, stiff, and doesn’t like to bend. Depending on what kind of card board you use. Cereal card board is easily bendable, just thin. The thicker your cardboard the harder it is to work with. The thicker the cardboard- you’ll see that in the inside is these thin small cardboard beams making it thicker. It’s why when you step on cardboard it indents. With thin cardboard it’ll just crease and wrinkle. As there is no give. Note: keep this in mind for later!!^
EVA foam is a lot more durable and most importantly… WATER PROOF!(well- more water resistant then cardboard haha) Also, the technique while building with cardboard needs to be a tad more blocky. Again, cardboard does not live to bend. And when it does it leaves creases that are uncanny when you’re adding colours, paints and other things. You don’t/can’t get that perfect smooth surface/transition from piece to piece/layer to layer.)
2- Duck Tape. I found that duck tape was crucial in the beginning stages as it will fit your pieces together and give you the ability to really see your pieces together before any permanent decision making… not to mention that using some kind of heat will melt the duck tap and actually turn it into a glue like substance that dries hard! This is easy to do with the help of- A HOT GLUE GUN!
3- The next material I chose is I think an all time favourite… HOT GLUE!!! Fast, easy, simple, efficient, cheap and great. Need I say more? The glue guns heated tip that I’m sure we’ve all burned ourselves with before is perfect for melting things as well!
(Just be careful to not BURN/SET FIRE to anything. This can be avoided by not leaving it on any kind of surfaces for too long when you are melting something. Keep it in a consistant motion to avoid all that. When you are not using your hot glue gun make sure that tip isn’t touching anything/on its side when on. Cause… I hope you don’t need more clarification!!)
4- Metallic sticker sheets…. My oh my… these saved me so much time and came out so cool. Metallic sticker sheets are exactly what the name is! Sheets of metallic stickers. I found this at my local dollaramma. They were cheap, and made my costume look impossible shinny. Not very realistic- as paint is better for that. But MAN. I feel it just added to the uniqueness of the costumes armour as it was already fairly blocky. (Cause cardboard…)
The only down side to these sticker sheets was that I would have to take a gift card or something and slowly smooth it out while putting it on at the same time. I had to do this to avoid wrinkles- but again with cardboard.. it didn’t give the smoothest surface in places. Since I covered the whole thing with these sticker sheets- it’s safe to say I am now an

expert
at putting on stickers and making ‘em smooootthh.
5- Paint!!! I used paint to really bring my costume to
life
. I created a design for the character that I felt really went with the mandolorian traditional paint jobs while still being unique to myself. I used acrylic to paint in artificial shadows and blurry patches on the very mirror like sticker surface. I tried to use acrylic paint for the over all design- but it just chipped off too easily and did not apply well at all to the surface. (That’s why it was actually pretty good for shadows. It could just blend.)
What I ended up using was gouache paint. This applied thick and and went on really REALLY nicely. (Down side is that… it’s not water proof.. ITS OKAY. As soon as I knew I was making a cardboard costume I was never gonna let it near water… side note: It did just fine with snow though xD.)
5.1 I used masking tape to get spear sharp lines and really fill in sections I had my design.
5.2 I used paper towel to roughly dab on paint to give it a little bit of a gruff look/ make blended shadows.
5.3 I mixed together my own colours since I didn’t have the exact colour of green that I wanted.
6- Velcro! I used Velcro that I sewed into clothing and hot glued onto the costume. (In the future I will not be using Velcro as I found it was way too easy for it to rip off, as in it just didn’t like sticking to the cardboard. I definitely in The future will be using clips for things like the chest plate. A combination of both will be good- as it should put less strain on those little Velcro strips.
The Velcro strips were really good at keep the armour plastered to my body- but again. To much stress on them. My armour was just a little to heavy- so either use double the amount that you think you need or also use clips.
")
)
EXCLUSIVE TO THE HELMET
7- Chop sticks. I used chop sticks to create the scope on the helmet.
8- Brass fasteners. I used these so I could get my scope to move up and down. Got those at a store called Staples.
9- Plastic. I used plastic for the visor and on the scope. I got my plastic from Dollarramma- it was really just one of those COVID shield masks, I just cut it to shape.
10- Car tint. This was THE MOST EXPENSIVE thing in this costume. It cost me 60$ CAD because you couldn’t just get a small amount- NAH you could only get the amount for your car windows! To say the least- I have a whole bunch for future projects and it worked SUPER well. I could see everyone… and no one could see me!
(I had tried other methods, but nothing worked, or I just simply failed at those.)
CLOTHING- For clothing I just went to a thrift store, got myself a pair of jeans and a long sleeve shirt that went good with the costume and colours. The colour in this case was a pretty dark blue.
THE CAPE.- I got a very long piece of cloth for very cheap at some extra fabriques store.
That’s it! That’s all the materials I used! (Or at least what I remember haha) I hope this makes sense- please ask if you are confused about anything I chose or decided to do!