This is amazing!!! I envy your seam work!!!! Its just so good!!!!!!!!!
Thank you, my skills have definitely improved from my first foam build!
I'd say you got "Fred Teal" pretty damn close. This is bloody amazing work.
I'm pretty happy with it, thanks for the feedback!
So the actual color you used was "Teal"? Just plain Teal? I know you might not have the same paint companies down under but what brand paint did you use?
\So the colour ''Teal'' is a generic colour, its kind of like saying ''Red'' or ''Green''. Usually they have names like ''Ocean mist'' or ''Seafoam".
Im using a mixture of house acrylic house paints. A mix of Resene, Dulux and British Paints.
I dare say you got the colour just about perfect! Especially with the weathering you did the picture on the far left looks practically identical. And the way it changes in different lighting matches the way the armour in game changes exactly. Terrific painting work man, and I'm excited to see the helmet finished! Keep it up!
Thanks for the feedback dude!
I just saw it on your instagram ! Amazing job ! Do you paint it with a brush for the "flats" or with a spray ?
I will outline my whole painting technique below for everyone
")
Update:
Went into work on Saturday to get some more colour onto the armour. However life (as per usual) gets in the way and I didnt get as much done as I'd like.
This being said, I am at the stage now where I can begin to weather the armour.
although I have done a small ammount I might save this until last as it will be a nice treat for the end. I still have gloves and things to build yet.
So, what are you posting for then mawrTRON?
Due to the high amount of people asking and the fact that my highly experimental painting/weathering method not backfiring, I'd like to introduce you to......
_______________________________________________________
The mawrTRON Procedure™
The weird way mawrTRON uses acrylic paints on foam
Introduction:
This is a comprehensive guide on how to use acrylic paints to paint armour/weather armour the way I do..
After using rattle cans on my first 2 suits I decided to give acrylic paints a try.
Apart from the low cost and low toxicity of acrylics, they also offer a lot of flexibility with tinting colour which I was pretty keen to explore.
Please enjoy this step by step guide loving crafter by myself, mawrTRON.
Much love 405th.
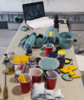
Equipment/Materials
Colour matched acrylic house paint test pots
Acrylic house paint white test pot
Heat gun
PVA glue (2 litres or more)
Plastic cups
Mixing sticks
Variety of paint brushes
Acrylic Craft Paints (Raw Umber, Burnt Sienna, Black, White, Metalic silver)
Rags
Step 0. Temperature/humidity
As with all painting, temperature plays a big part in the drying process. However as acrylic are waterbased you want to ensure that you are doing this in summer. The paint can absorb moisture from the aid and take days to dry.
The temperatures at the time that this tutorial was made ranged between 25C - 38C (77F - 100F)
Step 1. Colour Matching
I have created a video on how to colour from an on screen colour to a physical colour. Please watch below.
Step 2. Sealing Foam
Once your foam piece is completed, pass over the entire piece with a heat gun to close the cells of the foam.

Firstly you want to create a 'key' layer for the rest of the paint to stick to. With a 50/50 mix PVA glue and water in spray bottle saturate the suit.
Don't worry about the drips! As the water evaporates from PVA it will level itself out. You will how ever need to be on drip duty towards the end of the drying.
You will notice that once the PVA has dried in on most of the surface the lower edges will still have drips forming.
This is time for the Drip Police™ to move in. With clean rag dab the drips away.
Once the entire suit is dry, repeat this step again to add another 50/50 coat of PVA.
Once the 2ns 50/50 coat is dry brush on pure PVA onto the piece. To level out the coat while the glue is still wet, dip your brush in water brush lightly over the top. This method is called 'laying off' which is a term that all you painters out there will be familiar with.
Once the suit is dry repeat this step again.
Although this should be enough coats, try painting your colour onto a test piece and see how the paint reacts.
5mm foam has larger cells that high impact floor mats and may require additional coats.
Essentially if your entire suit has a semigloss/satin sheen, you are on the right track.
Step 3. Painting
Ensure you have a variety of brush sizes.
As there are an endless number of PVA glues and paints in the world' conduct a test of the paint on a smaller piece to ensure the paint does not react with the PVA coat. If a reaction occures an arylic primer will need to be used.
PVA (in undercoat form) is used in the UK as a primer which means you can paint directly on top of it. Apply your primary colour onto the suit first and allow to dry. Aim to apply the paint as evenly as possible.
Paint is designed to even out as it dries which helps this whole process.
If you have the odd streak don't worry, we call this Improvised Weathering™
Apply additional coats if necessary.

With your smaller brushes start to paint the accent pieces and any other details on the suit. Try to not drink too many coffees or Red Bulls for this step as a steady hand is required.
Step 4. First Stage Weathering
In a separate cup, mix a portion of your base colour with a small amount of the white house paint to create a slightly lighter shade. With a dry brush, dab the paint on all leading and high edges of the armor that would be susceptible to wear and tear. Then with a dry rag, dab and remove a portion on the paint. Allow to dry
What you are trying to create is the illusion that the painted metal has been buffer to a lighter colour
.
If you look closely at this image you can see a lighter shade of blue on the high areas of the piece.

Step 5. Resealing
Much like in step 2, the paint will be sealed under a coat of PVA.
With the 50/50 mix of PVA and water, respray the suit until you are satisfied with the gloss level.
You will have to be on drip patrol once again.


What this step does is not only remove the flat finish of the paint, but it also creates a slippery layer for the acrylic weathering paints to slide around on.
Typically when weathering on top of an acryllic paint, the acrylic will absorb the weathering too quickly with unsatisfactory results.
Oh and as a bonus, it is adding a protective layer to the paint!
Step 5. Weathering
Mix the black, raw sienna and raw umber craft paints in a cup with water. What you are trying to achieve is a black/brown colour with the consistency milk.
Section by section brush/drip the desired area with the mixture being sure to get into all the nooks and crannies. Then with a push, swirl, rub and dab as much as you trying to remove the paint.
The trick is to add weathering in small increments, thats how it would happen in real life right?
Please note that there here is no real method or trick of doing this, get messy and have some fun.
Step 6. Paint scratches
Typically when finishing the weathering on a halo suit, people will use an old brush with a metallic silver paint to brush all the high edges. This give the appearance that the armour has been grazed up against things.
However, for the suit I am working on the character has visable darker wear and tear. Which I will attempt to replicate by replacing the silver with a dark grey/silver/black mix
With a dry brush, proceed to brushing the desired areas with the wear.
Bonus Step.
If you are unhappy with the gloss level of the finished piece and want it shinier, grab your 50/50 mix of PVA/Water and give it another coat or two.
As an added benefit this will seal in any weathering you have done.
I hope this tutorial has helped you,
<3 mawrTRON
_______________________________________________________
That is my method everyone, I have tried to be as comprehensive as possible but let me know if you have any questions.
Stay tuned for more!