Greetings everyone! I've been a huge fan of the work shown here, and have followed the 405th online since 2011, but hadn't taken the leap to actually join in! Over the years, I attempted various suit and helmet builds, most of which never amounted to anything that I felt could be a substantial contribution to this site! However, as this past year has been crazy, I've found that I've had the extra time I needed to actualize a life-long dream in the making. It's nowhere near completion, but it's in a spot that I feel proud of showing!
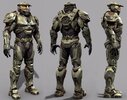
This is my Mk. IV, created using the absolutely gorgeous files made by MoeSizzlac. I truly hope I've done it justice.

I've given him Jorge 052's number, as he has always been my favorite character from the series. In my mind, this is my way of being able to tell more of his story.
The suit itself is in a good place overall, and I'm very happy with the progress I've made so far! The final pieces are on their way, and I'm determined to make this something truly special.
However, a Spartan couldn't be who they are without a good origin story! So here is an abbreviated account of the creation of the suit.
Sometime in October of 2019, I had recently moved into a new apartment, and with a little bit of extra time and cash, I decided I would finally invest in a 3D printer. The Creality CR-10s delivered what I sought for most: A massive printing area (300mm x 300mm x 400mm). Naturally, the first thing I did after calibrating and doing test prints was to start printing bits of armor. I began with the right forearm, and had some sizing issues, but eventually ended with this prototype:

The glove is from a Lacrosse set I had acquired a while ago, and it was just by happenstance that the two pieces fit together so well.
The pieces fit so well, in fact, that this ended up being the exact gauntlet I used in the final product!
Next was, of course, the Helmet. The CR-10s was large enough to fit the entire model in one go, which I took full advantage of.

I used PLA, as it was relatively strong and easy to get ahold of in my area. There were probably more efficient ways to build the supports, but the final product was well worth the excess filament.

Using Army Green and dark metallic Rust-oleum spray paint (and a fair amount of artistic liberties), I thought the metal accents highlighted the details in the helmet quite well. The visor is simply a motorcycle visor ordered from Amazon. At some point I'm planning of vacuum-forming a proper replacement, but for now it looks pretty good!
The next step (and what I considered the most important) was aligning the chest and shoulder pads to that iconic Halo Wars silhouette. Using the Lacrosse gear that the gloves were from, I arranged the chest piece and sized up the shoulders using The Armorsmith Designer program (thank you guys for suggesting that, it made everything much easier). Using the Lacrosse gear with separated shoulders meant that the plating could move independently, which would be much more accurate to the game representation.

A fresh coat of paint, and things are really looking good!

The legs remained a bit of a challenge, but inevitably worked out. Still working on good knee-pad articulation, but as is currently, they function very well. Ended up using a pair of black combat boots that doubled as a means of holding the shin-pieces in place.


This was a good marking point about two months ago. As you can see, still missing the upper arms, and several other detail pieces. Once those were printed, I decided to dive into sewing an under suit together to really complete the look. So far I've only focused on the upper chest, but I have a hex fabric that I am quite pleased with!
Once again, huge thank you to MoeSizzlac for his amazing models. I owe you a beer, man.
If you have any suggestions/questions, please let me know! I'll continue to post my progress as the suit reaches completion.
This is my Mk. IV, created using the absolutely gorgeous files made by MoeSizzlac. I truly hope I've done it justice.
I've given him Jorge 052's number, as he has always been my favorite character from the series. In my mind, this is my way of being able to tell more of his story.
The suit itself is in a good place overall, and I'm very happy with the progress I've made so far! The final pieces are on their way, and I'm determined to make this something truly special.
However, a Spartan couldn't be who they are without a good origin story! So here is an abbreviated account of the creation of the suit.
Sometime in October of 2019, I had recently moved into a new apartment, and with a little bit of extra time and cash, I decided I would finally invest in a 3D printer. The Creality CR-10s delivered what I sought for most: A massive printing area (300mm x 300mm x 400mm). Naturally, the first thing I did after calibrating and doing test prints was to start printing bits of armor. I began with the right forearm, and had some sizing issues, but eventually ended with this prototype:
The glove is from a Lacrosse set I had acquired a while ago, and it was just by happenstance that the two pieces fit together so well.
The pieces fit so well, in fact, that this ended up being the exact gauntlet I used in the final product!
Next was, of course, the Helmet. The CR-10s was large enough to fit the entire model in one go, which I took full advantage of.
I used PLA, as it was relatively strong and easy to get ahold of in my area. There were probably more efficient ways to build the supports, but the final product was well worth the excess filament.
Using Army Green and dark metallic Rust-oleum spray paint (and a fair amount of artistic liberties), I thought the metal accents highlighted the details in the helmet quite well. The visor is simply a motorcycle visor ordered from Amazon. At some point I'm planning of vacuum-forming a proper replacement, but for now it looks pretty good!
The next step (and what I considered the most important) was aligning the chest and shoulder pads to that iconic Halo Wars silhouette. Using the Lacrosse gear that the gloves were from, I arranged the chest piece and sized up the shoulders using The Armorsmith Designer program (thank you guys for suggesting that, it made everything much easier). Using the Lacrosse gear with separated shoulders meant that the plating could move independently, which would be much more accurate to the game representation.
A fresh coat of paint, and things are really looking good!
The legs remained a bit of a challenge, but inevitably worked out. Still working on good knee-pad articulation, but as is currently, they function very well. Ended up using a pair of black combat boots that doubled as a means of holding the shin-pieces in place.
This was a good marking point about two months ago. As you can see, still missing the upper arms, and several other detail pieces. Once those were printed, I decided to dive into sewing an under suit together to really complete the look. So far I've only focused on the upper chest, but I have a hex fabric that I am quite pleased with!
Once again, huge thank you to MoeSizzlac for his amazing models. I owe you a beer, man.
If you have any suggestions/questions, please let me know! I'll continue to post my progress as the suit reaches completion.
Attachments
Last edited: