My "First" Build (pic heavy)

Status
Not open for further replies.

KRI667

Jr Member
Three years ago i join the 405th and started on my first armor build of my spartan from reach.

Vanity_635171203898444160.png

However alot of time has passed and 90% of what i had completed has either last or destroyed in my many moves since then, It wasnt until recently that i finally started back up on it again this time in a whole new direction. So seeing as how this will be a different armor altogether and i didn't want to necro my old build thread, I've decided to create a new one and hopefully keep the updates rolling.

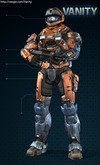
With the explaination out of the way lets get down to the bras tacks of the build. Im still sticking with reach as a reference point for the armor design purely because i had the helmet made already and i really liked the armor design of the game. I want to create a Halo/RWBY crossover armor, this was all inspired by this artist on deviant art ( http://dishwasher1910.deviantart.com/art/RWBY-x-Halo-Ruby-Rose-2-0-628514521 ).
I've got alot of ideas rattling around in my head and any other suggestions or input are more then welcome.

Helmet: CQC
Torso: Mk V
Shoulders: right- Sniper left-Recon
Legs: FJ/Para or the gungnir
Wrist: UA/Bracer
Weapons: Magnum, Assualt Rifle, Combat knife, Crescent Rose( from RWBY)

Progress
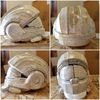
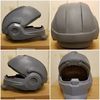
Helmet: Finished, needs visor and lighting
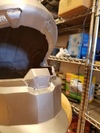
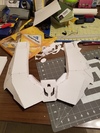
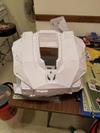
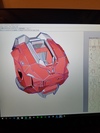
Chest: Two more layers of rondo need before shaping the outside begins
Recon Shoulder: Not Started
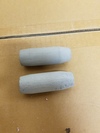
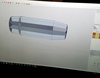
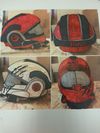
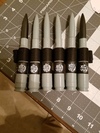
Sniper Shoulder: .50 cal rounds made
Arm: Not started
ForearmNot Started
Handplates Can't seem to track down the pep files
Belt: Scaling, prepping for print
Thigh: Not Started
Shin/Boot: Not Started
Undersuit: Collecting references
Knife: Blade is printed, prepparing molds for casting
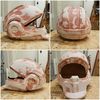
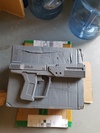
Magnum: Fully printed, needs smoothing and finishing
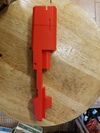
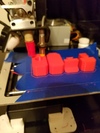
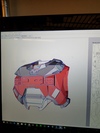
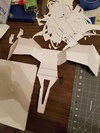
Crescent Rose: Scale proof of concept done, Creating full size patterns

I'm gonna glance over most of the helmet construction since it has already been posted in the original thread ( http://www.405th.com/showthread.php/40496-First-time-armor-build ) from here on out it will just be the most recent progress.
Any feedback or your own ideas on what might work well for the crossover or look good are more then welcome, the whole design is pretty heavily in flux at the moment and im always searching for the next idea.

Enjoy!
 

Attachments

  • Vanity_635171203898444160.png
    Vanity_635171203898444160.png
    838.9 KB · Views: 231
So the helmet was a real straight forward pep. After a few coats of resin I used a couple rondo mixes to coat the interior.

20161017_190144.jpg

Before i could begin the bondoing process, I decided to remove the canisters from the side. They are hollow and fairly flimsy. Bondo application went smoothly despite it being the first time I had ever really touched the stuff.

20161026_171751.jpg

Once the Bondo had hardened and i got it sanded down i started using spotting putty to take care of some of the smaller holes and defects, while waiting for what seemed like forever for the putty to dry. I started 3D modeling the canisters so that i could print them out and reattach them later on.

20161018_114945.jpg
20161029_122328.jpg
Here they are after being smoothed and primed.

I put the first coat of primer on once I was ok with the overall shape of the helmet. I ended up removing most of it again later with 400 grit sand paper to finally smooth it out. Also as a side note Rustoleum brand light grey automotive primer does not bond well and had cracked in a few places. after i had switched to a krylon brand things turned out much better.

20161026_171726.jpg
Rustoleum first coat
20161028_215741.jpg
Krylon final coat already for the base to be applied

In my down time when i wasn't able to work on it I started trying to figure color schemes and battle damage, i have a running story in my head about this armor and I'm trying to figuree out how to reflect it through the paint.

20161027_121355_1.jpg
 

Attachments

  • 20161029_122328.jpg
    20161029_122328.jpg
    266.5 KB · Views: 221
  • 20161018_114945.jpg
    20161018_114945.jpg
    154.4 KB · Views: 259
  • 20161026_171751.jpg
    20161026_171751.jpg
    166.9 KB · Views: 223
  • 20161017_190144.jpg
    20161017_190144.jpg
    184.2 KB · Views: 238
  • 20161027_121355_1.jpg
    20161027_121355_1.jpg
    238.4 KB · Views: 227
  • 20161028_215741.jpg
    20161028_215741.jpg
    92.9 KB · Views: 233
  • 20161026_171726.jpg
    20161026_171726.jpg
    108 KB · Views: 221
Finally the combat knife. I'm sculpting it out of pink insulation foam and will coat it in Worbla once all is said and done, I'm also thinking about making a semi-functional display piece out of 1/8" plate just because I like how the design turned out.
20161029_111305.jpg

Sorry for all the long posts just felt like there was alot I need to try and get out there. Hopefully updates will be smaller and more frequent now that my thread is caught up with my build.
 

Attachments

  • 20161029_111305.jpg
    20161029_111305.jpg
    320.7 KB · Views: 238
Wow! Just looked through your other post, it looks cool! I'd love to see what your Crescent Rose looks like, I'm a fan of RWBY myself and I'm interested in how this will turn out. I'm new to this whole thing so there isn't much I can help you with on the technical side, Sorry! One thing I am curious about though is what your plan is for Crescent Rose? Are you planning to keep the coloring the same as in the series? Or change it up to better match the armor? There's a few other things I'm curious about, but they can wait. Good luck with the build though!
 
TorturousGem Thanks I actually hadn't given any thought yet to the color of the rose. I'm thinking I will keep the colors the same but just grunge it up quite a bit.

As far as my plan for it goes, it's to make it as fully functional within my capabilities. My proof of concept went well so I'm hopefull.
 
Last edited by a moderator:
I think a slightly darker orange like from the suit would be a pretty cool, especially with a layer of grunge and battle damage, but maybe that's just me. Either way, it will be a cool combination! What did you do for a proof of concept for it? I'll admit to being curious about making some of my own RWBY weapons, they just seem so daunting that it would be difficult to start.
 
Is that a Penny sword inspired combat knife?

I built a full sized Crescent Rose two years back and can dig up the patterns if you're interested in them as a starting point.
 
TorturousGem thats kinda along my lines of thinking. For the proof of concept i mocked up the head of the scythe out of wood at at 1/6th scale and toyed with a cable system to unfold it, I'm pretty sure i have pictures somewhere I can post sometime.
TurboCharizard Yes, Yes it is. patterns would be amazing I have a feeling that the full size one is gonna have more surprise issues then the scale model did.

Progress update: I have the first base coat down and the visor and tinting for said visor ordered. I have yet to fully figure out a color scheme yet but have a pretty solid starting idea. Double checking my measurements and scaling for the chest, will start printing and pepping that soon.

Color option 1(done by a friend)

20161031_101137.jpe

Color option 2

20161031_162537.jpg
 

Attachments

  • 20161031_162537.jpg
    20161031_162537.jpg
    342.5 KB · Views: 243
  • 20161031_101137.jpe
    20161031_101137.jpe
    87.9 KB · Views: 221
Last edited by a moderator:
So quick progress update I have my chest printed out courtesy of L3X BLU3R1V3R 's Pep file and scaled thanks to HaloGoddess tutorial, that thing saved my life( which can be found here for any one curious http://www.405th.com/showthread.php?t=31627&highlight=visor ). Also got bored at work today and busted out the needle files to carve in some of the minor details. I currently have my visor ordered and with any luck it will be here this week.

For the color scheme I've decided to go with option 2 but I like what was done with the roses in one so I think I'm gonna end up borrowing that. I also got the HUL modeled and printed so thats ready to be attached once I clean up the print lines.

Now for pics or it didn't happen.

20161101_112624.jpg20161101_112612.jpg

20161101_114125.jpg
 

Attachments

  • 20161101_114125.jpg
    20161101_114125.jpg
    322.2 KB · Views: 223
  • 20161101_112612.jpg
    20161101_112612.jpg
    272.2 KB · Views: 223
  • 20161101_112624.jpg
    20161101_112624.jpg
    269.8 KB · Views: 214
Last edited by a moderator:
I went through both my desktop and the laptop that I had way back when I did the build of Crescent Rose and Myrtenaster but came up with nothing unfortunately.

The good news though is I came across something similar to what I had in terms of PDFs that could be laid out to prepare all the pieces. Sorry if I got your hopes up but I hope this at least helps you on the right path.
 
A quick update before the weekend takes over. Chest is 50 % complete. Started paint on the helmet as well as started printing the magnum.

I'll post a longer more in depth update with pictures early next week, so stay tuned and hopefully you're all enjoying the process.
 
This is looking good. Glad to see a CQC helmet being done this is one of my favorites from Reach and you don't see a lot of them being built. I'll be keeping an eye on this thread :thumbsup
 
This is looking good. Glad to see a CQC helmet being done this is one of my favorites from Reach and you don't see a lot of them being built. I'll be keeping an eye on this thread :thumbsup

Thanks it's my favorite as well, I got alot of help with references and the models from MissingSpartan7 and RYNO 666 when I intially started this build long ago.
 
Last edited by a moderator:
Update time.
Helmet
With the the metallic silver base coat in place I moved on to the application of vaseline and sand to mark of the battle damaged areas. There's a pretty fantastic tutorial on how to go about it here...
My first color layer is a satin finish colonial red made by rustoleum

20161107_112436.jpg
20161107_112443.jpg
20161107_112448.jpg

Add a little painter's tape and like magic you have a spider man helmet.

20161107_181146.jpg

Time for the black which is a semi-gloss black from rustoleum

20161107_181615.jpg
20161107_181621.jpg

You may have noticed in one of the images that either the black and red paints didnt play nicely or that I got impatient and the red didnt dry enough before adding the black. Resulting in the cracking seen below.

20161107_181612.jpg

Much to my displeasure as I started peeling the masking back the next day, the tape had decided to grab the red coat underneath and removed excessive amounts of paint.

20161108_091656.jpg
20161108_093756.jpg

After removing the tape and vaseline I have to say what was revealed wasn't all together awful. I'm still up in the air on wheter I should leave it as is or start weather. what do you wonderful people of the 405th think? Is the unintentional battle damage a decent look?

Moving on to the finer details of the helmet, there is a rose emblem on the earpiece that i decided i wanted to mold instead of just painting on. After some searching i found one that work on thingiverse ( http://www.thingiverse.com/thing:121842 ) i ballparked the scale at 40mm

20161104_021504.jpg

It was a bit larger then i liked so i printed one out at 34mm, 35mm, 36mm, 37mm, and 38mm.
20161103_100429.jpg
36mm was the magic number add a base and presto chango we have a mold positive.
20161105_010902.jpg

The silicone used to make the mold is a platinum cure silcone from smooth-on Mold Star 20T

20161104_205628.jpg

With the mold made we move on to the casting another smooth on product smooth cast 325 with a little bit of red dye added.

20161104_221836.jpg

Black paint to highlight the undesired areas, while painting i got the idea to test and led behind it.

20161105_011012.jpg

I originally just wanted to have the emblem be 3D, but after seeing how good it looks lit up I plan on drilling a hole in the helmet behind the emblem and placing an LED there. Still needs some black washing to get the crevices but so far it's the part of the helmet I'm happiest with it turned out unexpectedly well.

20161101_114125.jpg
The HUL was pulled from the archive created by WandererTJ I believe, all I did was load it into my print program, scale, and paint it.

20161107_112436.jpg


20161107_112443.jpg


20161107_112448.jpg


20161107_181146.jpg


20161107_181615.jpg


20161107_181621.jpg


20161107_181612.jpg


20161108_091656.jpg


20161108_093756.jpg


20161104_021504.jpg


20161103_100429.jpg


20161105_010902.jpg


20161104_205628.jpg


20161104_221836.jpg


20161105_011012.jpg


20161101_114125.jpg
 
Last edited by a moderator:
Magnum
All files for the magnum were pulled from www.thingiverse.com

Credit as follows
Core magnum- dan0nator http://www.thingiverse.com/thing:68620/#remixes
Sliced frame for smaller print beds- NikitaR http://www.thingiverse.com/thing:1694234
Slide w/ engravings- MTriton http://www.thingiverse.com/thing:536776
ODST Barrel- Nintenstroid http://www.thingiverse.com/thing:462842

20161105_110419.jpg
20161105_011206.jpg
20161107_112453.jpg

Chest
With my insomnia kicking massively last week I managed to get a fair amount accomplished in my 48+ hour bender before I crashed. One of those happened to be my chest piece. the pep files came from L3X BLU3R1V3R and Spacemeat according to the archive information. Instead of using hot glue like I did with my helmet I went with super glue this time so far I've used of the dollar store bottles. The build is going considerable easier than the first time I did this years ago in also taking much more time during assembly. I rushed the helmet and that left me with a lot of finishing work i probably could of avoided had i just slowed down so we'll see if time spent in pep will save time in finishing. Now the photo dump I'll try my best to keep em in chronological order. All of this was was done during my 91 hour up time so critique and criticize away if you see something I missed or botched due to lack of sleep, that way I can rectify the issue before it's too late.

20161104_001150.jpg
20161104_001156.jpg
20161103_164739.jpg
20161104_020232.jpg
20161104_001433.jpg
20161104_220325.jpg
20161105_010028.jpg

Sniper shoulder plate
Only thing i have managed to accomplish here is to get the rounds made, once again the files come from thingiverse.

.50 cal round-Pnb4ever http://www.thingiverse.com/thing:1269828

20161105_010142.jpg

That's all I got for today. Enjoy!
 

Attachments

  • 20161105_110419.jpg
    20161105_110419.jpg
    393 KB · Views: 230
  • 20161104_001150.jpg
    20161104_001150.jpg
    327.9 KB · Views: 241
  • 20161107_112453.jpg
    20161107_112453.jpg
    264.4 KB · Views: 228
  • 20161105_011206.jpg
    20161105_011206.jpg
    219.7 KB · Views: 229
  • 20161104_020232.jpg
    20161104_020232.jpg
    241.2 KB · Views: 224
  • 20161103_164739.jpg
    20161103_164739.jpg
    239.8 KB · Views: 221
  • 20161104_001156.jpg
    20161104_001156.jpg
    267.7 KB · Views: 229
  • 20161105_010142.jpg
    20161105_010142.jpg
    313.3 KB · Views: 239
  • 20161105_010028.jpg
    20161105_010028.jpg
    251.7 KB · Views: 193
  • 20161104_220325.jpg
    20161104_220325.jpg
    264.6 KB · Views: 221
  • 20161104_001433.jpg
    20161104_001433.jpg
    222.2 KB · Views: 222
Last edited by a moderator:
I love the personal touches you've done. Great work so far. I'm excited to see the suit come together.

As for the helmet, I think it looks great but it is too clean. For how scratched up it is, it needs to be dirtier. Black and brown washing should fix that or dusting model paint would be a good way to go.
Also, maybe hand painting darker greys into the silver to simulate deeper scratches.
 
PerniciousDuke Thanks, making it grimy is the next step I just have some detail painting to due before i give it a blackwash. The tip about the darker grays is a good one I'll have to use, I actually took a dremel to the scratches to give it some dimension just havent got around to uploading the photos yet.
TutlarAce06 Thanks with the time its taking I hope it continues to be
 
Last edited by a moderator:
Minor Update

I decided to use some of the battle damage I had laid into the helmet as a guide to dremel in some deeper defects, I have also nearly completed all the handpainted details. The thing I'm most excited to share is what i've decided to do with one of the earpieces ( pics to come). If i had to ball park it i would say the helmet is 95% complete, definitely in the home stretch there.

The magnum has been fully printed I just need to smooth out the print lines and start in on the painting, I scrapped my entire combat knife build in favor of a slightly different design I hope to have something to show soon. I have yet to even start on the most difficult of the weapons yet, I just keep starring at the references and it's starting to intimidate me a bit so we'll see what progress I can conjour up.

My chest is nearly pepped my work schedule has gotten in the way of finishing it the last few days. Current goal is to finish it by monday night. Ran into a snag trying to track down the pep files I used for My handplates the last time around.


That's all i got for now. I just wanna say thanks for all the help thats been provided by this community so far, there are some really amazing builds going on at the moment and I've picked up quite a few ideas just from browsing around.
 
Status
Not open for further replies.
Back
Top