Well I hope everyone had a good holiday, for the ones that celebrate atleast. With that being said I feel like i should probably make an update before the holiday season really gets into it's full swing.
Helmet
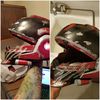
The last time we saw my helmet I had just finiished with the preliminary painting. Since then I have added in the detail paint, blackwashed, and created physical battle damage. Ill try to explain my processes and changes as bet I can, but pictures really are worth a thousand words.

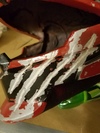
So here we have what i would consider the single most nerve wracking moment of this entire build so far. I took a stone grinding bit and my dremel and etched the physical battle damage in using the painted damage as a guide. The entire process despite how simple it appears took me 45 minutes. I did very light passes at first about an inch or half inch in length just to get the scratches laid in. Once the first couple passes were done I went deeper and pulled off more material until i was satisfied with the depth, It's down to the cardstock in a few places. I filled in the color with a silver sharpie and color matched as best I could.

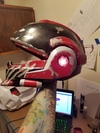
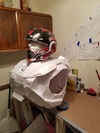
I did a test fit and lighting of my resin cast piece before gluing it into place. The backlighting provided for the test is from a mini maglight through a 1/2" hole drilled in the side of the helmet. I decided the 1/2" wasn't quite enough and opened up to a 1" diameter overall. I may have got a bit of over zealous and had to use some spotting puttin on the interior to back fill areas that got thin or allowed light to show around the edges of the emblem.

Pre detail paint

Post detail paint
Rather than doing a considerable amount of masking work to apply the light gray trim color I busted out the brushes and acyrlics and hand painted them on.
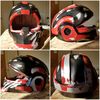
After doing all this paint work and the matte clear coat I spent a few days just starring at this piece just trying to figure out what to do with it. I had never blackwashed or weathered anything before and I was extremely apprehensive about trying it. After all the time Invested I really didn't to try it and by to weird sick twist of fate do something that I couldn't fix. A few days later and some liquid courage I said screw it and just dove into it. I have to say whatever insecurities and issues i had with the helmet before are completely gone now. I love how it turned out.
I blackwashed a couple of times with just a plain black acrylic followed up with a slightly thicker mixed wash of burnt umber to and some filth to the crevasses.


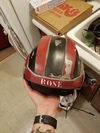
With that I'm almost ready to declare the helmet finished. I need to fill in a few spots of black on the emblem, tint and install the visor, possibly add a bit more grime to the corners, and take a little material of the inside to make the fit smoother.
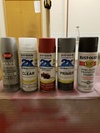
The rattle cans used thus far

Magnum
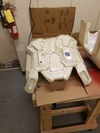
Unfortunately for this I have no new pictures. I printed the remaining pieces, those being the magazine and the handguard for the front of the grip. The magazine was a really snug fit and required quite a bit of sanding to make it removable with out the use of visegrips or super human strength. For securing the magnum to my thigh I picked up a pair of 1"x2"x1/2" N52 Neodynium magnets.
These magnets are magnificent but unless you have then secured to something, my reccomendation is to keep them 12 plus inches away from each other at all times. Once the grab each other I'm pretty sure thats how they're gonna stay. For placement in the magnum I cut a 1"x2" rectangle in the center of the magazine and just pressed one of the magnets in. No epoxy or adheshive necessary just slide the mag into the grip and you're good to go. I stuck the grip with mag to my fridge and it held my empty backpack up more the secure enough.
Currently trying to figure out what colors and how to paint the magnum. Pointers or direction to similar threads are appreciated.
Chest
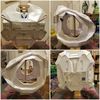
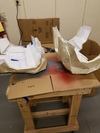
We left the chest off with it being pepped in two halves. Now we have completion (cue photo spam)


Fully pepped with a make shift stand to keep its own weight from warping it before i can hit the resin stage.

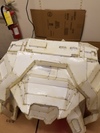
The first layer of resin applied. Had i been thinking i would have gotten more pictures, especially of the internal support structure I built. To keep the model as square and true as I could I used and internal framework or popsicle sticks and paint stir sticks. After the first coat I added some 550 cord.
With the 550 i would super glue one end to the model where it needed to be pulled in slightly, I would then take and stretch the cord to one of the various supports directly across from that spot and add tension and glue it in place. This method was kind of a last ditch effort to true it up. It worked so well that I think im going to continue using it through the course of the build to learn what its limitations are. The intial thin coat of resin was followed by two thicker coats.
With the resin cured the time had come to remove my supports and split the model. This was another multi day process where I decided where to place my cuts though not nearly as stressful as taking a dremel to my helmet. The lines drawn I pull out my trusty Dremel and began cutting.


With that I have now hit the Rondo stage again, update to come once ive finished that.
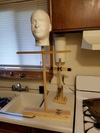
In my down time I started to make a stand so i would have a place to hang the armor as I finish it. Started by getting measure ments for my shoulders and waist as well as from the floor to my waist, waist to shoulders and shoulders to the top of my head. I cut a 2x4 to the width of my waist and a 1 1/2" x 1/2" to the width of my shoulders. After cutting them I drilled a 1" hole through the centers of both to accomodate a dowel. With my foam head in place I marked of distances and started to affix things to their new homes.

Well until next time, take it easy.
Helmet
The last time we saw my helmet I had just finiished with the preliminary painting. Since then I have added in the detail paint, blackwashed, and created physical battle damage. Ill try to explain my processes and changes as bet I can, but pictures really are worth a thousand words.

So here we have what i would consider the single most nerve wracking moment of this entire build so far. I took a stone grinding bit and my dremel and etched the physical battle damage in using the painted damage as a guide. The entire process despite how simple it appears took me 45 minutes. I did very light passes at first about an inch or half inch in length just to get the scratches laid in. Once the first couple passes were done I went deeper and pulled off more material until i was satisfied with the depth, It's down to the cardstock in a few places. I filled in the color with a silver sharpie and color matched as best I could.

I did a test fit and lighting of my resin cast piece before gluing it into place. The backlighting provided for the test is from a mini maglight through a 1/2" hole drilled in the side of the helmet. I decided the 1/2" wasn't quite enough and opened up to a 1" diameter overall. I may have got a bit of over zealous and had to use some spotting puttin on the interior to back fill areas that got thin or allowed light to show around the edges of the emblem.

Pre detail paint

Post detail paint
Rather than doing a considerable amount of masking work to apply the light gray trim color I busted out the brushes and acyrlics and hand painted them on.
After doing all this paint work and the matte clear coat I spent a few days just starring at this piece just trying to figure out what to do with it. I had never blackwashed or weathered anything before and I was extremely apprehensive about trying it. After all the time Invested I really didn't to try it and by to weird sick twist of fate do something that I couldn't fix. A few days later and some liquid courage I said screw it and just dove into it. I have to say whatever insecurities and issues i had with the helmet before are completely gone now. I love how it turned out.
I blackwashed a couple of times with just a plain black acrylic followed up with a slightly thicker mixed wash of burnt umber to and some filth to the crevasses.


With that I'm almost ready to declare the helmet finished. I need to fill in a few spots of black on the emblem, tint and install the visor, possibly add a bit more grime to the corners, and take a little material of the inside to make the fit smoother.
The rattle cans used thus far

Magnum
Unfortunately for this I have no new pictures. I printed the remaining pieces, those being the magazine and the handguard for the front of the grip. The magazine was a really snug fit and required quite a bit of sanding to make it removable with out the use of visegrips or super human strength. For securing the magnum to my thigh I picked up a pair of 1"x2"x1/2" N52 Neodynium magnets.
These magnets are magnificent but unless you have then secured to something, my reccomendation is to keep them 12 plus inches away from each other at all times. Once the grab each other I'm pretty sure thats how they're gonna stay. For placement in the magnum I cut a 1"x2" rectangle in the center of the magazine and just pressed one of the magnets in. No epoxy or adheshive necessary just slide the mag into the grip and you're good to go. I stuck the grip with mag to my fridge and it held my empty backpack up more the secure enough.
Currently trying to figure out what colors and how to paint the magnum. Pointers or direction to similar threads are appreciated.
Chest
We left the chest off with it being pepped in two halves. Now we have completion (cue photo spam)


Fully pepped with a make shift stand to keep its own weight from warping it before i can hit the resin stage.

The first layer of resin applied. Had i been thinking i would have gotten more pictures, especially of the internal support structure I built. To keep the model as square and true as I could I used and internal framework or popsicle sticks and paint stir sticks. After the first coat I added some 550 cord.
With the 550 i would super glue one end to the model where it needed to be pulled in slightly, I would then take and stretch the cord to one of the various supports directly across from that spot and add tension and glue it in place. This method was kind of a last ditch effort to true it up. It worked so well that I think im going to continue using it through the course of the build to learn what its limitations are. The intial thin coat of resin was followed by two thicker coats.
With the resin cured the time had come to remove my supports and split the model. This was another multi day process where I decided where to place my cuts though not nearly as stressful as taking a dremel to my helmet. The lines drawn I pull out my trusty Dremel and began cutting.


With that I have now hit the Rondo stage again, update to come once ive finished that.
In my down time I started to make a stand so i would have a place to hang the armor as I finish it. Started by getting measure ments for my shoulders and waist as well as from the floor to my waist, waist to shoulders and shoulders to the top of my head. I cut a 2x4 to the width of my waist and a 1 1/2" x 1/2" to the width of my shoulders. After cutting them I drilled a 1" hole through the centers of both to accomodate a dowel. With my foam head in place I marked of distances and started to affix things to their new homes.

Well until next time, take it easy.
Attachments
-
 20161109_213052.jpg256 KB · Views: 269
 -
 20161113_025349.jpg294 KB · Views: 279
 -
 20161108_093756_1.jpg167.5 KB · Views: 246
 -
 20161113_025458.jpg171.5 KB · Views: 266
 -
 20161116_024849.jpg276.2 KB · Views: 270
 -
 20161116_024905.jpg284.9 KB · Views: 270
 -
 20161116_102928.jpg144.5 KB · Views: 256
 -
 20161115_152146.jpg303.7 KB · Views: 266
 -
 20161114_182948.jpg270.7 KB · Views: 245
 -
 20161114_183007.jpg278.1 KB · Views: 280
 -
 20161114_183019.jpg281 KB · Views: 262
 -
 20161117_090246.jpg160 KB · Views: 245
 -
 20161123_153623.jpg246.3 KB · Views: 264
 -
 20161123_153630.jpg255.4 KB · Views: 264
 -
 20161123_153641.jpg230.7 KB · Views: 263
 -
 20161124_143522.jpg247.5 KB · Views: 256