Noobs first build(s) all WIP H3 MKVI Dead Eye & more

Status
Not open for further replies.

SI3RRA 117

Well-Known Member
Member DIN
S240
Hi everyone discovered this community years ago and have been amazed with everyones builds. So heres mine, kind of a mash up because its taken me roughly 3 years to get this far.
First attempt at pep took roughly 2 years to pep my first piece
IMG_0527.JPG
2 years to finally realize I scaled it way to big
IMG_0539.JPG
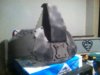
so this helmet is just resined and sitting on a shelf now. someday it will be finished as a display.
Decided to try foam and the halo 3 legendary helmet method. Yes I have a small enough head to wear the helmet.
So heres the progress as of today.
View attachment 24472IMG_0673.JPG
my organized chaos
IMG_0704.JPG
And Halloween last year
IMG_0705.JPGIMG_0706.JPG
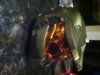
some lights and new visor
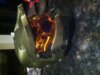
IMG_0736.JPG
IMG_0737.JPG
some new paint
IMG_0747.JPG
IMG_0744.JPG
IMG_0745.JPG
IMG_0750.JPG
some more lights and a little detail so this is all I have at the moment half an undetailed suit.
IMG_2220.JPG
so heres my start sorry I don't know why some pics uploaded horizontal and its kind of a mash up. But this is where I'm at so any suggestions, questions or criticism is welcome. I know I have scaled things a little small but id rather they be a little on the small size then too large I learned that with my first piece. But I have a lot left to do and I'm hoping to have a full more detailed armor before the end of this year and thanks to everyone on here for the inspiration.
 

Attachments

  • IMG_0543.JPG
    IMG_0543.JPG
    79.7 KB · Views: 339
Last edited:
Damn, this is looking really good. I love seeing the old style MKVI armor builds, they're my favorite of the MJOLNIR armors. I wish you luck on your journey, you already seem to have a hell of a start.
 
dem lights...
Looks great keep it up!
 
Thanks, still a long way to go..... and ya had to have the lights adds so much more to the armor. The helmet ones are very bright and definitely light the way in the dark.
 
Well figured I'd show some of the tricks I did with my helmet that could probably be applied to any helmet. I know mine is a Halo 3 legendary game case so I cheated but this was still a chore in itself to cut the supports and such from the helmet.. For my visor I used a set of dual lens snowboard goggles I cut up and resealed with hot glue to help with fogging. Not sure if you could do this with 2 motorcycle visors or not but probably worth a try because it drastically reduced my fogging. The first visor one I did was a motorcycle bubble visor it was thick and hard to bend, even after heating with a heat gun. Plus would fog up in seconds and didn't have the polarized mirror effect. Only disappointment with it was I couldn't find a polarized lens exactly the same color. The outer edges are close depending on angle but the center is a purple just like most sunglasses.
IMG_2223.JPGIMG_2224.JPGIMG_2227.JPG

sorry still don't understand why my pics are uploading horizontally any insight would be helpful

looking thru visor
IMG_2228.JPG

I would still get some flight fogging now and then but nothing like I did with the single motorcycle visor. So I had breath deflector I stole from a snowmobile helmet and cut some ventilation vents.... this seems to work quite well I no longer have any fogging problems and didn't have to install fans as space is pretty limited in this little helmet.
IMG_2226.JPG
now this one uploaded right side up I don't understand why.

my vent holes.....after it was all said and done I wish I would have just drilled a bunch of smaller holes more towards the bottom I think it would have been cleaner and less noticeable. But oh well need to make mistakes to learn from them
IMG_2230.JPG

And then my switch for the lights that lights up when on....not really game accurate but I like it.
IMG_2225.JPGIMG_2236.JPG

and then the LEDs .....4 10mm LEDs I didn't have a large enough drill bit handy and of course was impatient and ended up making the holes less then round.
IMG_2231.JPG

so overall I'm pleased with the way the helmet turned out wish I would have done a couple little things differently...

IMG_2234.JPG IMG_2235.JPG
 

Attachments

  • IMG_2223.JPG
    IMG_2223.JPG
    1.8 MB · Views: 286
  • IMG_2223.JPG
    IMG_2223.JPG
    1.8 MB · Views: 301
These look great. I'm just jumping into this whole thing and had been thinking about the fogging issue, especially since I have to wear glasses or I'm blind as a bat. I'm actually digging the lighted on/off button too, might have to steal that idea from you.Thanks for sharing and I can't wait to see more.
 
Started on my new side project last night 4ft noble 6..... Just the mock up and test fit stage but it's a start
image.jpg
 
Is your H3 MkVI armour from pep or foam.

I started on the fore arm using the files you sent me but got my scaling wrong and ended up fitting me rather than my ten year old who the armour is for. One issue I have found. Although it's scaled to me I can't get my hand through.
 
For the pic issue, I found that when using a mobile device, turn it to its side when taking the pictures. They should load in the right position then.

Helmet looks great!
 
Is your H3 MkVI armour from pep or foam.

I started on the fore arm using the files you sent me but got my scaling wrong and ended up fitting me rather than my ten year old who the armour is for. One issue I have found. Although it's scaled to me I can't get my hand through.
Mine is from the files I sent you......ya scaling is tricky you should check out halogoddess' tutorial http://www.405th.com/showthread.php?t=31627 I use my measurements from there as a baseline....usually I find I end up doing them a little larger hten what I measure. As for the fore arm piece you have to have a way to open it..... if you look closely at mine I have too large slits in mine with 1" elastic strapping from in the slits the open up a bit sliding my hand in then tighten up on my wrist....ill see if I can get a pic shortly
 
its not the prettiest....and I get some creases in the foam bot o well its what I had and it was simple...
IMG_2242.JPGIMG_2243.JPGIMG_2244.JPG

then there was a large piece I eliminated to make the piece slimmer and less bulky in this area
IMG_2246.JPG
all the creases makes me want to redo it all in pep :unsure
 
its not the prettiest....and I get some creases in the foam bot o well its what I had and it was simple...
View attachment 24677View attachment 24676View attachment 24678

then there was a large piece I eliminated to make the piece slimmer and less bulky in this area
View attachment 24679
all the creases makes me want to redo it all in pep :unsure
.
Looks like you have cut a section out the design to get it narrower. Im finding the diameter is to big.

Ill have a look at the scaling guide you mention, I think it was more me miss measuring.
 
Yes I did eliminate a piece to narrow it down a bit it somewhere in the section of that last pic..... Mine are a tight fit that's why they have creased from me putting them on and off.... Someday I'll redo them and maybe get my ambition up enough to pep them.....just with the foam it doesn't take long to start to showing wear....
 
Yes I did eliminate a piece to narrow it down a bit it somewhere in the section of that last pic..... Mine are a tight fit that's why they have creased from me putting them on and off.... Someday I'll redo them and maybe get my ambition up enough to pep them.....just with the foam it doesn't take long to start to showing wear....

Yes i see that now. Ill do something similar to narrow it a bit. Although ill need to resize to fit my son. I want to get one set of amour under the belt and then make something nice for me self.
 
So back at it a little. Ya it's been a while armors gone on the back burner with kids sports and racing season starting for me. But did manage to start on my cod piece and got enough done tonight to get a partial sense of accomplishment. Prob not really game accurate just kind of winging I with what I've got and not really using reference pics other then the pep file. Anyone else's look like an elephant?
 

Attachments

  • image.jpg
    image.jpg
    1.9 MB · Views: 262
Test fit before finishing the cod piece up. Finally nice to get some progress
image.jpgpimage.jpgimage.jpg
 
So small update: I have finally managed to grind out one more piece. Cod piece basically finished. Not really game accurate or highly detailed but done none the less. next I think I will try and tackle the thigh pieces as time allows. I envy all of you on this forum. You all seem to just knock out piece after piece of these super detailed master pieces. I'm lucky to get a very basic piece done in several months. Kudos to all and keep up the great work. So on with the pictures.
image.jpg image.jpg image.jpg

image.jpg image.jpg
image.jpg image.jpg
Sorry if some of the pics are horizontal they were upright when uploaded and up right in my post. But when I click post it turns them. Maybe is because I'm mixing horizontal and vertical pics. I'll figure it out eventually
 
Its all good. Once you open it up fully it rights itself. I know how you feel about progress......it feels like forever till the next piece is finished.......Like a go-cart in an Indy race.......I love the detail that you did put in to the cod piece. The shelf liner that's glued on the inner part and goes over the lip...like that look. Now the "rivets". How did you do these? Heat stamped? They look too uniform and exact to be done individually by hand. Great job!!! Fantastic!!!
 
  • Like
Reactions: Jme
Status
Not open for further replies.
Back
Top