Eventhough I already have an ODST cosplay but that doesn't mean there isn't anything I would like to be improved or tweaked. And that's what this thread is all about... Making new and improved version of the existing cosplay parts.
First I'm gonna focus on the helmet. What I want to be changed in the new one are the vents that are unfortunately missing on my current helmet. As well as the look of the ear pieces.

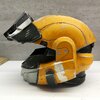
As you can see I didn't connected the dome with the rest of the helmet. That's because I'm currently waiting for the magnets to arrive. This way I will have an easier time figuring out and placing them in the correct spots.
And with those magnets I can have many attachments that I can mix and match.
 And here is the first one done. The Hardened UpLink. But there will be more on the way.
First I'm gonna focus on the helmet. What I want to be changed in the new one are the vents that are unfortunately missing on my current helmet. As well as the look of the ear pieces.
As you can see I didn't connected the dome with the rest of the helmet. That's because I'm currently waiting for the magnets to arrive. This way I will have an easier time figuring out and placing them in the correct spots.
And with those magnets I can have many attachments that I can mix and match.