1st Build Odst Foam Armour WIP

Legend 113

Member
Member DIN
S331
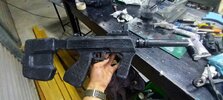
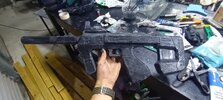
Alright, it's been a while since I last posted so I'll throw up so wip pics of my odst ranged armour. Pretty sure I've finished all the basic armour now, just have to seal and sand some of the parts before I can paint and start adding extras. Waiting on the rest of my undersuit to still arrive, but this should give me some time to make my dmr. Also plan on doing a big energy blast or slash across the main upper chest piece, but I've not quite decided which one yet. Feel free to share pics of damaged armour as I just love seeing cool half-destroyed armour and could do with some inspiration as to where to go with it.
20230218_081324.jpg
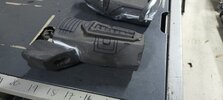
Right piece was my first attempt at making an ab piece by following a template the left is the second attempt doing it free hand and I'm much happier with it
20230218_081316.jpg
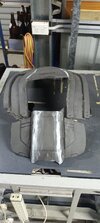
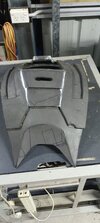
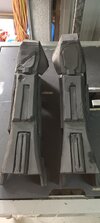
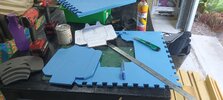
What the lower chest pieces should roughly look like on my suit. Piece at the top is one of 2 rib plates.

20230102_184506.jpg20230102_183512.jpg
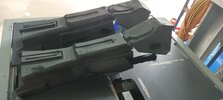
Left and right shoulders, big one goes on my left shoulder. Little bit more work to do on them, but I'm quite happy with how the big shoulder turned out as that was also all free hand. I'll probably put the blood type on the little shape on my big shoulder as romeo kinda has the same thing.
1677882124827.png

20230216_183843.jpg
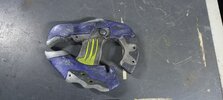
This is my partly finished left gauntlet. The open space in the middle is for my tac-pad, which is my phone with a background of a reach tac-pad. That way I can still use it in costume and connect it to music that I'll play through a speaker on my suit. Any guesses for what the theme will be?
 

Attachments

  • 20230216_183929.jpg
    20230216_183929.jpg
    2.2 MB · Views: 96
  • 20230216_183543.jpg
    20230216_183543.jpg
    848.9 KB · Views: 91
  • 20230216_183549.jpg
    20230216_183549.jpg
    824.1 KB · Views: 97
  • 20230216_183824.jpg
    20230216_183824.jpg
    1.5 MB · Views: 92
  • 20230218_080716.jpg
    20230218_080716.jpg
    1.4 MB · Views: 96
  • 20230218_080707.jpg
    20230218_080707.jpg
    809.2 KB · Views: 83
  • 20230218_080716.jpg
    20230218_080716.jpg
    1.4 MB · Views: 92
  • 20230218_080707.jpg
    20230218_080707.jpg
    809.2 KB · Views: 96
Update Time!

So I've been extra busy this week and all the foamsmithing is done now including adapting a JBL mini speaker to suit a bomb for the armor. Then I can connect the speaker via my phone that is set up to be a tacpad when I'm in the armor. All armor was heat sealed, pva sealed, and base coated with blue and Gray spray paint. Still yet to paint in other colours damage, weathering, etc. Also included WIP pics of thighs version 2.0. Left leg will have the pouch on it and right leg with hold the pistol.

At the time of posting this the last portion of my new odst helmet has just finished printing so I'll post on that too. I've found the 80, 120, 320, acetone ( yeah, I know it's not great for pla and pla+ but it actually helps to smooth pretty ok), then finally a coat... or 2... or 3 of spray paint. Let me know if there's a better a way cause I'm open to any tips, also this is my first time assembling a big print so welcome to tips on that too. DeltaAlphaZulu sent me some links that were super helpful as I'm a total newbie to the whole cosplay in general and really appreciate the help and support that the 405th is always giving out.
20230415_081601.jpg20230415_113504.jpg20230415_152753.jpg20230415_152958.jpg20230415_152940.jpg
Left thigh Right thigh
20230416_143715.jpg20230416_172719.jpg20230416_143732.jpg
This kinda looked better in life... from far off... if you squinted at it.
 

Attachments

  • 20230415_081601.jpg
    20230415_081601.jpg
    1.8 MB · Views: 70
Update Time!

So I've been extra busy this week and all the foamsmithing is done now including adapting a JBL mini speaker to suit a bomb for the armor. Then I can connect the speaker via my phone that is set up to be a tacpad when I'm in the armor. All armor was heat sealed, pva sealed, and base coated with blue and Gray spray paint. Still yet to paint in other colours damage, weathering, etc. Also included WIP pics of thighs version 2.0. Left leg will have the pouch on it and right leg with hold the pistol.

At the time of posting this the last portion of my new odst helmet has just finished printing so I'll post on that too. I've found the 80, 120, 320, acetone ( yeah, I know it's not great for pla and pla+ but it actually helps to smooth pretty ok), then finally a coat... or 2... or 3 of spray paint. Let me know if there's a better a way cause I'm open to any tips, also this is my first time assembling a big print so welcome to tips on that too. DeltaAlphaZulu sent me some links that were super helpful as I'm a total newbie to the whole cosplay in general and really appreciate the help and support that the 405th is always giving out.
View attachment 330420View attachment 330421View attachment 330422View attachment 330424View attachment 330423
Left thigh Right thigh
View attachment 330425View attachment 330426View attachment 330427
This kinda looked better in life... from far off... if you squinted at it.
Looking great! Once you get to weathering, dry brushing the hard edges with a little bit of silver spray paint and black washes make a massive difference and give your armor and props a night and day difference to the depth of your props and armor!
 
Nearly there! I've just remade my torso piece for my suit because I oversized the last one and didn't even complete it properly, just glueing on the ab peices to my shirt which has now kinda stuffed it . But I can live with it seeing that though most of the residual glue will be covered by the torso. Now onto the pictures! Here's the suit with the old torso piece and some size comparison to parts of the new one. All that's now is the helmet to finish.

20230513_091339.jpg
U can see by the draw template how much I unscaled it by.

20230521_155819.jpg
My brother test fitting the bucket (unfinished) and my new vest/torso piece

Resized_20230429_160048.jpegResized_20230429_160032(1).jpegResized_20230429_160334.jpeg
Old torso piece (and my dog )
 
It's Done!!! All components of the suit are finished and I did my first full suit up today. Think I got most of the scaling/details right, though I'm not super happy about some of the parts like the back of my legs. Still for my first ever work with foam I think it turned at pretty good. Also made some extra shoulder armor for my halo gelbal loadout, let me know what u guys think.

Also gonna check to see if I can get it deployed/assessed not sure exactly how it works though so I'll have to look into that. Thanks for all the help and support during this build guys.

IMG_20230604_144159829.jpgIMG_20230604_144203955.jpgIMG_20230604_144207436.jpgIMG_20230604_144217831.jpgIMG_20230604_144238904.jpgIMG_20230604_144246022.jpgIMG_20230604_144324096.jpgIMG_20230604_144337008.jpgIMG_20230604_144342576.jpgIMG_20230604_144347822.jpg20230604_144707.jpg
Planning on taking these as my props when I go to my first con in the suit. It's called the Fraser Pop and is about a month away from now. Not very big, but it's fun and it'll be a good test run for my suit.
20230604_135548.jpg
And here's my halo gel bal loadout
20230604_134344.jpg
The patch is from my local gel bal field.
 

Attachments

  • 20230604_144759.jpg
    20230604_144759.jpg
    977 KB · Views: 90
Looks awesome man, and good luck with deployment! I look forward to seeing some Fraser Pop photos. Are you hoping to make it to Oz Comic Con and Supanova in Brisbane later this year?
 
Looks awesome man, and good luck with deployment! I look forward to seeing some Fraser Pop photos. Are you hoping to make it to Oz Comic Con and Supanova in Brisbane later this year?
Thanks mate, I don't know yet wich one I'll go to or if I even do both. I'm looking more at Oz Comic Con right now but it's really gonna come down to pricing and what the plans are for the Aussie regiment cause id love to meet other Halo cosplayers in person. And I'm gonna have to ask my friends to take some pics for me cause my phone is my tac pad when in the suit, that way I can play music, call and text when in character. Didn't really think too much about photos when designing the gauntlets.
 
Not gonna make any promises, but I likely won't be in costume for this year's events, so I'll be free to bring my camera and equipment to do some shoots!
 
Also gonna check to see if I can get it deployed/assessed not sure exactly how it works though so I'll have to look into that. Thanks for all the help and support during this build guys.
Once you get added to your local Regiment, and I see you are requested to do so, you would normally be able to go through the Deployment Process. However, I see from your Profile that you are currently only 17 years old? We do require that folks going through the Deployment process be at least 18 years of age.

Once you are 18 and have been added to your local Regiment, you simply fill out the form found here:
 
How long would you say this took to make? It's very impressive!

Thanks man! It took me about 8-10 months, but that was on and off with up to a month between build sessions and only building for a few hours at a time. I honestly reckon I could have done it much faster, but then again it probably wouldn't look as good. I learnt a lot between the times I wasn't working on the suit and I'd just say don't rush your build if your going to do one. It's the journey to getting your suit finished that gives you the most excitement and pride when your finished.
 
This thread is more than 8 months old.

Your message may be considered spam for the following reasons:

  1. This thread hasn't been active in some time. A new post in this thread might not contribute constructively to this discussion after so long.
If you wish to reply despite these issues, check the box below before replying.
Be aware that malicious compliance may result in more severe penalties.
Back
Top