Since I’m too sick today to be able to sand things outside I’m pretty much stuck without much more building left, so I’ll do a proper update and split it over a couple of posts so the posts aren’t as huge.
For the most part I have used EVAkura’s ODST foam conversion pep files as a basis then done my own detailing work and modifications from there using screenshots from the game as reference. Working from the ground up:
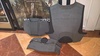
Boots:

Modified from the EVAkura converted file. Designed to be permanently attached to an old pair of black sneakers, because having them separate has been bugging me with my Reach armour.
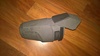
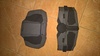
Shin armour:

JTM ODST HD shin file which I then edited a little. Still deciding whether I want to attach the knees to the shin pieces or have them separate. Still need to do a bit of sanding detail, pad them out for fitting and cut the back of the thigh out a bit to make it easier to bend my knee without armour clashing
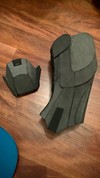
Thigh armour:

Modified from the EVAkura converted file, yay for the pile of inner thigh jigsaw pieces

These had to be heavily modified to fit my big legs
The plan, if it works, is to attach them to heavy weight spandex rather than directly fit them to the thigh armour, so that there is some flex and movement in them as I walk, sit, squat etc. I’ve learnt from my Reach build that using a black peelable paint creates a nice rubbery undersuiting look so these will be painted with a peelable paint before being attached to the material.
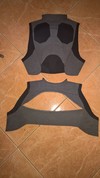
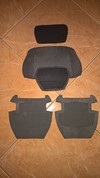
Front, side and butt plates:

Side plates are the EVAkura converted file, the front and butt plate are modified from those files. Dare’s butt plate is a bit different shaped so I literally used the file to get an idea where to start for the basic shapes, then made it all myself from there. The front plate also has a pocket in the back to hide my phone since it was the perfect size
Still a few final detail foam bits to add, and I still have to make the belt buckle.

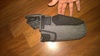
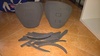
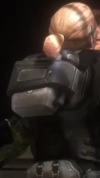
Gauntlets:

Fiddly pain in the butt things, but I am happy with how they came out
Slightly modified from the EVAkura files. Eventually I will also be doing the underarmour shoulder pieces since Dare doesn’t have shoulder armour pieces but time constraints for the upcoming event means they aren’t high on my list of priorities right now. These still need padding out and a few details sanded in.
- - - Updated - - -
Torso:


Hands down the hardest part of the build because it needed the most modding. The ONI chest plate and ab armour I could use the files available on the archive (chest armour unfolded by MissingSpartan7, ab armour modelled/ unfolded by JUICE), modify them to suit me and then add my own detailing to them, but there simply isn’t a female torso file available and I’m a bit of a busty girl so making things fit is ALWAYS an issue. I wasn’t happy with how inaccurate the available files were (partly file inaccuracy, partly because Dare’s armour is different) so it was a case of pouring over a LOT of screenshots while having the files open and deciding how best to modify what was available, and then make my own pieces to go with it. I started with the EVAkura chest file so I could get the general shape of the pieces for the back, then did a lot of modifying pieces. Almost the entire front has been made up by myself using a couple of the existing file pieces around the neckline, hence why you are probably looking at it and thinking huh? While it looks weird it serves its purpose- it fills in the empty gaps around the edges of the chest and ab armour when they are put into place to make it look like the under armour.
I used the spine armour from the lower chest EVAkura file as the general shape guide for how to do the lower torso insert. This was a really fiddly bit because I literally just had to cut, fit and glue pieces together as I built to slowly build up what I wanted. Even then it was hard to get everything front and back close to the screenshots because let’s face it, computer game characters are rarely ever ‘correctly’ proportioned to a normal human and definitely don’t match my proportions, and armour pieces and clothing love to magically move through each other. It can also be difficult to figure out what is meant to be three dimensional vs 2D texturing when all you have is a few different colours indicating different pieces. I’ve had a lot of issues (accompanied by a lot of laughs, facepalms and frustration) with this with building my Jedi outfits from the SWTOR game- anyone who has played this knows how the outfits will randomly point out flat, or can suddenly become much bigger than they were, or go through other objects.
The shoulder straps are floating around somewhere (these will be attached to the back torso piece after painting) and there are still extra pieces to add to the side and shoulders of the front and back torso pieces as both detail and the attachment for the two halves. A combination of Velcro and webbing with clips will be used to make it all sit straight and firm. While it just looks like a bunch of funny shaped foam bits at the moment I promise it will come together in the end
After making my Reach torso armour one piece I decided I wanted to make future outfits so that the front and back clipped together. This armour will be a little more complicated than that since I do want to make it so that the ab plate is detachable.
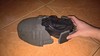
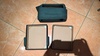
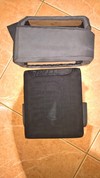
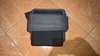
Backpack:

Modified from the ONI Operative file available in the archive (unfolded by RoadWarrior) to be more screen accurate.This is still halfway built, those three pieces are separate at the moment. I am ambitiously attempting to make a removable case which isn’t pictured, it is outside with the contact adhesive curing before I sand the foam to create the curved edges look in the game. As far as me and hubby can figure, the backpack looks like it is some kind of frame that a case locks into, so I am attempting something similar with a case that will slide up underneath and into place with a strap that will clip and lock it into place so that it can actually be used as a backpack for storage since this outfit doesn’t have much in the way of pockets. Only time will tell if that works, hopefully tomorrow I’ll feel better and up to the sanding that is needed to progress on that build further. The backpack will be semi permanently attached to the back torso piece with bolts or Chicago screws if I’ve got some long enough. The larger flat surfaces have been reinforced from behind with MDF- hence why the flat surfaces look so nice and flat
This has increased the weight however, so depending on how heavy it gets once loaded up I might have to have the back torso piece literally strapped onto me separate to the front torso piece so it doesn’t constantly pull back too much
Right now, that is an issue for later me to worry about.
I think that pretty much gets me up to date. I still have the belt buckle to go- this will be done today and won’t take much to build, thankfully Dare’s buckle is the same just backwards to the other ODSTs for some reason- as well as the final details to add to a few bits before the sealing and painting. I also have the headset to make though I have a few ideas about that, I just need to see if I can find the materials locally. I have bought a set of cheap sports earphones (the type that are earbuds but have over/ behind the ear fitment so they stay in place) that I can use as the basis for the headset and build on top of that. Eventully I will make a helmet, probably from foam to see how it goes as something different since my Reach helmet and other current helmet builds are being done in pep/ resin, and I will then go through and do full undersuit/ underarmour detailing.