Reach Torso Build round 3!

Status
Not open for further replies.

PinnacleCosplay

Member
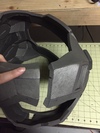
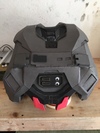
Hey guys! I already have a completed Reach armor, but for the sake of getting things perfect I am building another chest piece. Since I've been pretty terrible at posting build threads, I decided to do one for this. Hopefully it will help me be more active on here and possibly help others out in the process.

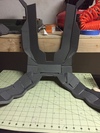
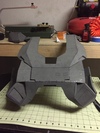
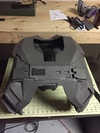
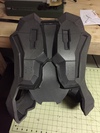
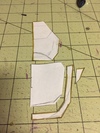
I did a lot of thinking when I was looking at the pieces in Pepakura and decided to join as many pieces together as possible to cut down build time and really utilize undercuts to make a more seamless armor. I'm using Spacemeats Reach foam unfold for this project.

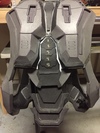
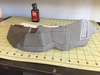
I decided to start with the side pieces. This is only 4 pieces of foam instead of the 14 or so pieces it originally was.

138b7d52a68fe7ce0114c0780dca3a6f.jpg


Also, instead of using hot glue like I normally do, I'm using contact cement. This should make the armor last much longer as my old chest piece has so much wear and tear and it's only 6 months old.


Sent from my iPhone using Tapatalk
 

Attachments

  • 138b7d52a68fe7ce0114c0780dca3a6f.jpg
    138b7d52a68fe7ce0114c0780dca3a6f.jpg
    244.7 KB · Views: 334
This was my first torso which I got signed by Master Chief himself! It is now just a display piece in my room.
958b2f801a90663709a3f62620911b36.jpg


And this is my second and current torso.
86fcdc21fc5f89cc1e2be4950a7346f5.jpg


Sent from my iPhone using Tapatalk
 

Attachments

  • 958b2f801a90663709a3f62620911b36.jpg
    958b2f801a90663709a3f62620911b36.jpg
    230.6 KB · Views: 183
  • 86fcdc21fc5f89cc1e2be4950a7346f5.jpg
    86fcdc21fc5f89cc1e2be4950a7346f5.jpg
    231.1 KB · Views: 340
Awesome! I like how you are combining multiple pieces this time around. I'm looking forward to seeing your finished torso!
 
Nice, what files did you use? I want to do a noble 6 build next and this chest seems to be good with foam

Sent from my SM-G930T using Tapatalk
 
OK thanks, hopefully he has a male version haha. Good luck on the chest plate it looks to be coming along well.

Sent from my SM-G930T using Tapatalk

He does! I would link it for you but it doesn't let me do that on mobile. It's in the file archive, just look around :) and thanks!


Sent from my iPhone using Tapatalk
 
He does! I would link it for you but it doesn't let me do that on mobile. It's in the file archive, just look around :) and thanks!


Sent from my iPhone using Tapatalk

Thanks! I'll have to see what I can do about learning how to modify the unfolds like this, or see if someone who has a full version can do it for me. :D
 
Thanks! I'll have to see what I can do about learning how to modify the unfolds like this, or see if someone who has a full version can do it for me. :D

I have Pep Designer ver3 and it was free and I can do all the things on it. When you have your file open just right click and select join/disjoin faces and select the part that you wish to join together. Just mess around with it a bit and get the feel of it. You don't want to join too many faces to the point where you have major undercuts and valleys and folds to do, but if there are pieces that can be easily joined together to make it more seamless why not? With Pepakura designer it's all about playing around with it and seeing how things work. I'm sure there are a butt load of tutorials on YouTube as well!


Sent from my iPhone using Tapatalk
 
Progress from today. This build is moving along quite nicely, I love it when that happens [emoji1]
2a08cfeae7505d0ddd9ffad68b9308a4.jpg


And the inside.

3b91c13ce13ae4c9b14bfd7e66898a12.jpg


Going to start the back section tomorrow. I did the top shoulder pieces but haven't attached them yet, I ran out of contact cement so I will need to hit the store tomorrow


Sent from my iPhone using Tapatalk
 

Attachments

  • 3b91c13ce13ae4c9b14bfd7e66898a12.jpg
    3b91c13ce13ae4c9b14bfd7e66898a12.jpg
    298.9 KB · Views: 312
  • 2a08cfeae7505d0ddd9ffad68b9308a4.jpg
    2a08cfeae7505d0ddd9ffad68b9308a4.jpg
    243 KB · Views: 323
This is great! It took 3 torsos for me to be completely satisfied with mine and I also built my wife's Kat torso twice as well before I gave it the okay, and it was insane how many more pieces there where in the female torso compared to the male. I had to simplify as well, glad to see someone made a thread about this can't wait to show my wife this! Keep up the awesome work!

Also Contact cement saved my life haha.
 
Made a bunch of progress today! Its almost done, just need to add some details.
0c6c37e8a3e9702be5189498c3664ff6.jpg

a4cc4e36f508c0f8302eed0078561b9b.jpg


I'm planning on adding lights in between the back spine pieces but I still need to finish that part up.

ea86072fd77b803ba41feb725297bef7.jpg

This is where I'm adding my buckle. It's just on one side to make it as easy as possible.

After it's painted I will be adding black cabinet liner to line the arm holes and the collar. I did that on my last one and really enjoyed the texture and look of it.


Sent from my iPhone using Tapatalk
 

Attachments

  • 0c6c37e8a3e9702be5189498c3664ff6.jpg
    0c6c37e8a3e9702be5189498c3664ff6.jpg
    241.6 KB · Views: 328
  • a4cc4e36f508c0f8302eed0078561b9b.jpg
    a4cc4e36f508c0f8302eed0078561b9b.jpg
    246.7 KB · Views: 337
  • ea86072fd77b803ba41feb725297bef7.jpg
    ea86072fd77b803ba41feb725297bef7.jpg
    221.6 KB · Views: 328
This build is done! Just need to plasti dip and paint.

I drew up my own pattern for the ab plate. I based it off of Liltyrants Kat build cause I love how her ab plate looks (and the whole armor is just incredible especially in person). I think it turned out pretty well and definitely has more dimension and a cleaner look than my other ones.
aa138987d5be556d777048f1145e4252.jpg


I used some googly eyes for those buttons, but right now I just feel like my armor is staring at me.

I also drew up my own pattern for the spine piece. I am really excited to have this as my other armors did not have this piece because they were scaled too large and there wasn't enough space to add it.
afc62a82ddf8b01d11c22faa7ec9e3d0.jpg

7e2ead3f0def49ba53e37e69813ab56d.jpg

I permanently attached it to the top and will not attach it at the bottom. It sits just under my butt plate and allows for plenty of movement. I plan on rebuilding my belt piece later so I can add a strap that connects it later if it becomes a problem.

I filled some gaps with DAP kwik seal and will start the plasti dipping tomorrow. I'm hoping to have this done for Comikaze this weekend, but if not I'm okay with that, my other chest piece is still functional.

I will also be adding lights to this one like I did my last chest piece, but I won't worry about those until paint is done.


Sent from my iPhone using Tapatalk
 

Attachments

  • aa138987d5be556d777048f1145e4252.jpg
    aa138987d5be556d777048f1145e4252.jpg
    215.5 KB · Views: 288
  • afc62a82ddf8b01d11c22faa7ec9e3d0.jpg
    afc62a82ddf8b01d11c22faa7ec9e3d0.jpg
    243.2 KB · Views: 312
  • 7e2ead3f0def49ba53e37e69813ab56d.jpg
    7e2ead3f0def49ba53e37e69813ab56d.jpg
    269.3 KB · Views: 324
Looks great! Totally forgot Comikaze was this weekend....not that my suit is ready, but just to go. Probably gonna just wait until WonderCon next year.


For some reason I reason I love seeing Reach builds in foam. Just something about the chest piece that always looks amazing. May have to do that next after I finish my Mk.VII build.
 
Status
Not open for further replies.
Back
Top