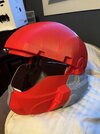
1st Build Ry’s custom ODST build

RyFISH

Member
So for this I was gonna try to have it painted by Halloween so I can wear some sick stuff to school. I was gonna skimp out on some bulky parts such as the forearm and shin guards. I have a lore explanation for this too: he’s a part of a hunter dispatch squad and because hunters can one shot a spartan he has to be faster and more nimble than a standard ODST. I was thinking I would paint it a dark blue with fluorescent orange splatter (intimidation bonus) and paint my nerf rival persies to match.

Progress 1:
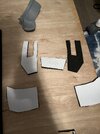
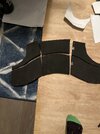
I started printing the helmet at my school and I cut out some of the plate carrier
 

Attachments

  • image.jpg
    image.jpg
    1.7 MB · Views: 88
Small update I got pieces of the helmet in the works, but the foam side of the things have hit a wall for now due to me not having proper tools to prepare for gluing. I’m going to have to buy a heat gun if I can scrounge the time to go to a hardware store.
 
So for this I was gonna try to have it painted by Halloween so I can wear some sick stuff to school. I was gonna skimp out on some bulky parts such as the forearm and shin guards. I have a lore explanation for this too: he’s a part of a hunter dispatch squad and because hunters can one shot a spartan he has to be faster and more nimble than a standard ODST. I was thinking I would paint it a dark blue with fluorescent orange splatter (intimidation bonus) and paint my nerf rival persies to match.

Progress 1:
I started printing the helmet at my school and I cut out some of the plate carrier
Excited to see this one when it's done! Gotta get my ODST fix :lol: Love that you're building it with a little backstory in mind too
 
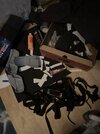
Update: I got the chest all taped up and ready to glue I would have glued today but the molding took a bit longer than I expected. I got some boots from an ex-police officer on Facebook marketplace, which I promptly nicknamed the “Flood Stompers”
 

Attachments

  • image.jpg
    image.jpg
    1.5 MB · Views: 97
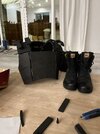
Glued all of the chest pieces in pairs and I would have glued them together but it’s raining tonight. The rain did give me some time to cut out the chest plate which is actually a hunter shoulder pad and I got some leg armor cut out and wearable and neither pieces required gluing so that’s cool. I love the flood stompers they’re so sick. The helmet frontier isn’t going great, my print failed today and I’m gonna have to double up one day to make deadlines…
 

Attachments

  • image.jpg
    image.jpg
    1.5 MB · Views: 85
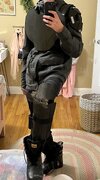
Now I get it, this is awesome. It’s not even done but I feel like the coolest person in my town. The plate isn’t glued yet but I got knee pads and the chest properly glued. I made a custom shoulder pad that can hold stuff. Tomorrow I just need to make forearms and the left shoulder which I was thinking could be larger and kinda shield-like. I can confirm the helmet won’t be done in time for Halloween but I do get to order a visor and not rush the process so that’s good! (Also I had to use my sisters mirror bc it’s the only one that shows the leg armor)
 

Attachments

  • IMG_4218.jpeg
    IMG_4218.jpeg
    1 MB · Views: 94
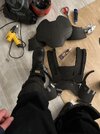
I’m ready to paint! I got all of the pieces secured and ready. Today I got a duplicate helmet part but at least it looks sick without the helmet too. All I need now is some aviators!…and some hot glue..
 

Attachments

  • IMG_4220.jpeg
    IMG_4220.jpeg
    3.4 MB · Views: 96
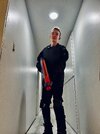
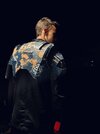
I debuted my build for the first time and man it is sweet I love wearing this and seeing all of the support for it too. I’m gonna work on it more and soon I’ll have a helmet to go with it. I got my regiment request approved and processing so that’s exiting too!IMG_2851.jpeg
IMG_2848.jpeg
IMG_2850.jpeg
IMG_2853.jpeg
 
Last edited:
I don’t like my large shoulder but I have a cool idea to replace it. I want it to slide off of the shoulder mount and onto a arm guard, and the I want some kind of thing to pop out like an umbrella to have a deployable shield thing. Is this idea illogical? Maybe.

I also need ideas for filling lower torso space but I want it to be unique so if you got something put it in the thread!

REGIMENT STATUS WOOO seriously thank everyone here who’s seen this make-shift journey of free styled armor. :)
 
Here’s what I do for gluing:

First I sand the edges of the print with 220 just to smooth out any major imperfections. It doesn’t need to be smooth though. Then I just use standard CA glue to put the pieces together. Sometimes I use painters tape to help hold it together and align things. Then I like to hit it with an accelerator to speed things up and instantly cure the glue, but that’s optional.

After I’ve glued all of the pieces together, I go on the back side and coat the seams with JB Weld plastic bonder. This is the extra little step that keeps things from popping apart if it accidentally gets hit.
 
for gluing slow and steady wins the race. I use the same method as JT. Use CA glue and carefully align the pieces, and then hit it with an activator. Using the activator really helps because you don’t have do wait for the glue to dry and don’t have to hold the pieces together for an extended period of time. But really make sure you take your time getting the piece aligned. It will save you a lot of headache later in the filling/sanding stage of the pieces are lined up properly. You can reinforce the seams after the whole helmet is glued together with more glue, epoxy, or some sort of strong adhesive.

Sometimes it’s strategic to glue certain pieces together first, but there really isn’t only one correct order. Figuring that out just comes with practice really. Best of luck!
 

Your message may be considered spam for the following reasons:

If you wish to reply despite these issues, check the box below before replying.
Be aware that malicious compliance may result in more severe penalties.
Back
Top