Spacemeat's Guide to Foam Armor

Status
Not open for further replies.
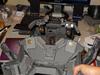
Spacemeat, I've been following the tutorials, just finished watching #4. Right around 32:45 you mention "that pretty much covers chest construction....... Ack..NO! You showed a chest piece that was all EVA foam, and then you pop up the one covered in white with all the LEDs already mounted. You missed some bits in the middle man! :) When you cover the base structure with craft foam (2mm?) do you use the same templates? Or do you just it down and cut it where you need seams? What's the process for covering the substructure with craft foam? Thanks again for the tutorials. Definitely learning. Instead of using craft foam for the torso and thigh seals I'm going to use LilTyran's example of marine vinyl. I should be posting those pics in a day or two.

Actually, I don't cover the entire piece with craft foam. I've noticed that everyone has their own take on construction, and this is how I approach it. I figured it would be helpful to give alternate ways of doing things as whenever I sit down and talk with other 405th members and we talk about how we built our suits, it usually includes "so you did it with _____?", "man, I've got to try that next" or "that's totally different than what I did!". Which also means there's no set official way to go about building a suit, and chances are as you're building yours, you'll incorporate things you see from many other people and throw in stuff you make up along the way and have your own unique take on how to build armor.

In anycase, for my particular build methods, that was the end of basic construction of the piece. After I finished putting it together, I moved on to sealing the edges and seams and then plastidip, which are the topics of the next two videos I'll be putting up later this week.
 
Ok, so it's sealed and painted white? It's very hard to tell from the video. It looks a lot like other pieces I've seen that are covered in craft foam. It looks seamless, very nice. Looking forward to the next videos.
 
Im highly considering re-wiring my entire torso just to make the front removable. (Purse clips!!!!!)
 
Spacemeat. could you post a close-up picture of each side of the magnets at the top of the chest piece? I understand the basic concept, which I used to close my Iron Man pep helmet. Is one side of the pair is surface mounted, and the other side recessed by the depth of 1 magnet (to give it a locator pin effect)? Does hot glue provide enough bonding power to allow the magnets to separate? Do you have to rough up the surface of the magnet to get the glue to stick?
 
Hey everyone, Video 5: Edge and Seam Sealing is up at the top of the thread! This one I cover using spackle to fill in the seams in the armor to cover up all the messiness and errors from the previous stage.

I really liked the chest plate video. Do you have any videos for making leg armor?

I believe I was working a bit on the thigh and shins in video 3. But I don't have any video that focuses purely on leg construction. The same principles from that video should apply to all pieces though. What information would you be looking for in a leg video?

Im highly considering re-wiring my entire torso just to make the front removable. (Purse clips!!!!!)

I just ordered a bunch in bulk from Amazon ;)

Spacemeat. could you post a close-up picture of each side of the magnets at the top of the chest piece? I understand the basic concept, which I used to close my Iron Man pep helmet. Is one side of the pair is surface mounted, and the other side recessed by the depth of 1 magnet (to give it a locator pin effect)? Does hot glue provide enough bonding power to allow the magnets to separate? Do you have to rough up the surface of the magnet to get the glue to stick?

Here's some photos of the chest plate:

DSC00464_zps086b362e.jpg

DSC00462_zpse4eaf559.jpg

And yes, one side is recessed in the foam and the other side is stuck directly to the surface. As to bonding power, the hotglue is not doing the best job, it seems to be coming off after repeated pulls, in the past I've used superglue to hold the magnets in and they worked decently, but also came off after a while. At least the ones stuck on the surface, I think at that point though it was more of a function of the foam not holding up to the force.. The recessed ones tend to stay in once they're stuck. It also has to do with the fact that I've upsized to stronger magnets with this chestplate compared to past ones. These simply have a lot more pull force behind them and I'll need to reinforce accordingly
 

Attachments

  • DSC00464_zps086b362e.jpg
    DSC00464_zps086b362e.jpg
    122.9 KB · Views: 300
  • DSC00462_zpse4eaf559.jpg
    DSC00462_zpse4eaf559.jpg
    113.7 KB · Views: 314
Thanks for the pictures. I was thinking about using some 5 minute epoxy to set the surface magnets to a pop-sickle stick, and then hot gluing the stick to the foam. The stick would allow the pulling force to be spread out along a much bigger area.
 
Hey Spacemeat i was wondering what files you use for your armor? the only foam converted reach file i could find isnt turning out well due to pieces not fitting correctly or are not the right size so am planning to remake it as soon as i can find a better file :D your tutorials have really helped me out and is making my build look better!
 
Hey Spacemeat I signed up just to tell you how helpful these videos have been. This is my first build ever of anything of this sort. I feel as through my past experience and tradeskills along with having the balls to do so, that I would begin to embark on this journey of building my own halo armor. Thanks for being meticulously detailed in your videos as they have helped tremendously. in the last 24 hours I have been able to familiarize myself with pepakura (designer of course ), get my measurements, scaled my parts that I need accordingly and pick up all the materials from my local harbor freight store (5 minutes from my house). I have started on a few pieces for the chest and it has been a few hours already so I cant imagine how many more hours I will joyfully spend on this build. Keep those videos coming!

-Will
 
Thanks for the pictures. I was thinking about using some 5 minute epoxy to set the surface magnets to a pop-sickle stick, and then hot gluing the stick to the foam. The stick would allow the pulling force to be spread out along a much bigger area.

Good idea! Can't wait to see how it works out.

Hey Spacemeat i was wondering what files you use for your armor? the only foam converted reach file i could find isnt turning out well due to pieces not fitting correctly or are not the right size so am planning to remake it as soon as i can find a better file :D your tutorials have really helped me out and is making my build look better!

The files I use come from a bunch of different sources, but each of the foam unfolds I did myself. My apologies, I've been meaning to upload them to the database, but time and my general forgetfulness has gotten in the way. Hopefully if I have the time and remember to do so, I'll try to upload them this week. If I happen to forget, you have my permission to pester me until I do ;)

Hey Spacemeat I signed up just to tell you how helpful these videos have been. This is my first build ever of anything of this sort. I feel as through my past experience and tradeskills along with having the balls to do so, that I would begin to embark on this journey of building my own halo armor. Thanks for being meticulously detailed in your videos as they have helped tremendously. in the last 24 hours I have been able to familiarize myself with pepakura (designer of course ), get my measurements, scaled my parts that I need accordingly and pick up all the materials from my local harbor freight store (5 minutes from my house). I have started on a few pieces for the chest and it has been a few hours already so I cant imagine how many more hours I will joyfully spend on this build. Keep those videos coming!

-Will

I'm really glad these videos are helpful to you! I still have a few more to finish up and I think that will cover all the basics of building armor. I can't wait to see your progress on the chestplate :)
 
Thanks for the vids man I am going to jump ship and do my build out of foam once money stables out.
 
Good idea! Can't wait to see how it works out.

Actually, it worked really well. I glued in a piece for additional support, created a little pocket for the 1" section of popsicle stick, hot-glued in the stick, then glued the magnet to the stick. It's pretty solid, and the magnets hold really well. It's not a perfect mating, but since it's on the bottom side of the chest piece, I think nobody will ever notice the gap.

20140918_220111_zpsf259c638.jpg
20140918_220002_zps60c84f11.jpg

20140918_220226_zps2da17c62.jpg


Thanks again for posting the videos. They are very helpful!
 

Attachments

  • 20140918_220002_zps60c84f11.jpg
    20140918_220002_zps60c84f11.jpg
    264.5 KB · Views: 305
  • 20140918_220226_zps2da17c62.jpg
    20140918_220226_zps2da17c62.jpg
    255 KB · Views: 321
Hey everybody!

I've posted two new videos at the top of the thread. Due to lack of foresight and the fact you can only have 5 embedded videos max in a post, I've posted them as links at top. At the very least, I can embed them here:


Last edited by a moderator:
Thank you so much, Spacemeat, for your awesome videos. It certainly is helping me wrap my brain around foam builds and allowing me to step forward in planning my own. I can't wait to get started! You certainly deserve credit for helping us little ones get on our feet.
 
Hey Ben, i appreciate the time you take to make these videos. It really adds to the copious amounts of information from this forum and helps me to integrate everything seamlessly for my first build.
 
I originally picked up this from home depot, but it seems they don't carry them anymore:

http://www.amazon.com/Weller-SP23LHPK-Marksman-Soldering-Project/dp/B000GR8NC4

There's alternate models available like this one:

http://www.amazon.com/Xacto-X73780-Precision-Soldering-Knife/dp/B000BRBZUG

or you could the attachment separately

http://www.amazon.com/Weller-HK11-Knife-SP23-Soldering/dp/B00HDSQ5TW

Fyi, I have a lot of options for hot knives and other foam construction equipment listed here: http://www.405th.com/showthread.php...pplies-Tools-and-Methods-Used-for-Foam-Builds

Also, it looks like I have some catching up to do, I'm only halfway through video #3.
 
Status
Not open for further replies.
Back
Top