Starcraft Marine

Status
Not open for further replies.

JavaLodge

New Member
Hello everyone, this is my first post on the forum. I've never done much costuming before, and never any armor building like this. However, I have a quick mind and lots of patience. I'm in the middle of making a cardboard Starcraft Marine suit, and I was just hoping for some input from anyone. I hope one day to fiberglass it and really make it well, but none of the tutorials I've seen have done it with cardboard. Would it work well to just layer the fiberglass over the cardboard? Every tutorial I've watched or read has said to fiberglass the inside, otherwise you will lose detail. However, the marine armor is so organic. It doesn't have many angles and details like Halo armor. I'm hoping that I can do a layer of fiberglass, then bondo, and do other details with 3d printed parts.

By the way the suit is custom modeled by myself. I use Blender and am an experienced modeller, so I have modeled the suit to fit me perfectly. I hope this was the right place to put this post, and I look forward to any help you can give me!

-Java
 
Hello again everyone. I'm assuming there's not much interest in this project since it's not Halo, but I would still very much appreciate your input.

I have so far just been building pieces that I am concerned with in terms of freedom of motion. Most of one arm is complete, and I am confident that I will actually be able to use my arms when wearing the suit.

2013-08-27_12-45-40_655_zps040f00bd.jpg


I said that the model was custom made by me. If anyone is interested here are some renders of that.

marine_zps2e60bf3e.png


marineflat_zps7e6a661f.png


The first is the high quality visualization model, the second is the pepakura exporting model. If anyone sees any potential problems with my plan I would love to know.

-Java
 

Attachments

  • 2013-08-27_12-45-40_655_zps040f00bd.jpg
    2013-08-27_12-45-40_655_zps040f00bd.jpg
    46.6 KB · Views: 109
  • marine_zps2e60bf3e.png
    marine_zps2e60bf3e.png
    186.7 KB · Views: 169
  • marineflat_zps7e6a661f.png
    marineflat_zps7e6a661f.png
    144.5 KB · Views: 132
Looks pretty good. Are you taping it together? I ask because if you plan on hardening it with fiber-glass and resin, the resin will eat through the tape. And welcome to the 405th.
 
Looking good. I have never seen Starcraft on the 405th, but I am still new. I will follow this, because it looks interesting. Great work so far, and welcome to the 405th.
 
I was going to make a marine from SC but decided on Spartan IV. I have all the pep files for the marine. The only real concern I had was mobility. Considering the marine suits are so big, I could see how movement would be..... restricted. Keep up the good work
Looks pretty good. Are you taping it together? I ask because if you plan on hardening it with fiber-glass and resin, the resin will eat through the tape. And welcome to the 405th.
On this note, you can go hot glue the inside of all the seams and it will hold together just fine for the hardening process
 
Hi everyone, I'm back with a little progress. So I've come into a bit of a snag, and it justified my reasoning for doing this in cardboard. I just made the left lower leg part and was trying them on for size and realized that there was zero flexibility there. I'm making everything in cardboard so that I can wear it beforehand and find problems just like this. So I cut into the back of the thigh and calf piece, which gave me satisfactory movement.

2013-08-29_12-24-42_631_zpseda7cbb6.jpg


And for a sense of scale here I am wearing it. It's going to be massive!

2013-08-29_12-28-45_760_zpsa6d4695f.jpg


Thanks everyone. If you have any advice I'd love to hear it. I am using tape to put the pieces together. Thanks so much cha0skn1ght for your suggestion, I will definitely do that.

-Java
 

Attachments

  • 2013-08-29_12-24-42_631_zpseda7cbb6.jpg
    2013-08-29_12-24-42_631_zpseda7cbb6.jpg
    39.4 KB · Views: 131
  • 2013-08-29_12-28-45_760_zpsa6d4695f.jpg
    2013-08-29_12-28-45_760_zpsa6d4695f.jpg
    50.3 KB · Views: 115
I don't see where cardboard is a bad idea for this, seeing as it's such a big suit. Mobility would certainly be an issue, but it looks like you have it figured out. My suggestion would be to test out the rondo/fiberglassing on scraps before working on the armor itself, just to get an idea of how you want to do it and how the cardboard is going to react.

Great build, btw. I've never played SC, but I have seen a few shots from the game.
 
Thanks everyone. If you have any advice I'd love to hear it. I am using tape to put the pieces together. Thanks so much cha0skn1ght for your suggestion, I will definitely do that.

-Java
No problem. It's looking really good.
 
Hello everyone, just a quick update before I go to bed. I've finished about 90% of the cardboard stage, all that's left to is the fingers, shoe parts, buttocks cover, and chest piece details. Those will be tedious, but in a different way than the big pieces. In any case, I am pleased with what I've been able to produce. At this stage though I may have to slow down a bit, because as of right now I don't have the funds to even begin the fiberglassing/rondo/bondo stages. I have the workflow mostly planned out in my head, and I have a test piece which is a suuuper simple helmet that I threw together which I will use to test the workflow.

In the mean time I will have a bit of a think as to how I will make the fingers. It is a must for me to have them articulated. In case it isn't obvious, my entire hand sits inside the palm of the marine's hand, and the suit fingers will be controlled by my fingers via some cables and springs. My original plan was to 3d print the pieces, but that turned out to be prohibitively expensive. But at this stage, articulated fingers are several dozen/hundred steps ahead, so I will just take one thing at a time.

In response to Kor, I guess I said that cardboard was justified in this case simply because I had not seen anyone do it that way before, and I was unsure if cardboard was the right way to go about it. Just my noobishness showing itself I guess.

In any case, sorry for the long post without much progress. Before I forget here's a picture:
2013-08-31_00-49-24_650_zps8196ba43.jpg


Thanks everyone for the encouragement, I'm going to need it!

-Java
 

Attachments

  • 2013-08-31_00-49-24_650_zps8196ba43.jpg
    2013-08-31_00-49-24_650_zps8196ba43.jpg
    65.9 KB · Views: 140
Hi everyone, I've got a quick update with a question. When I was putting detailing on the chest piece I realized I didn't put much thought into how the pieces would come together and there are some big gaps between the detail pieces and the main torso. My plan now is to use epoxy clay to make smooth transitions between the pieces before fiberglassing it. What do you think of that?

2013-08-31_22-45-42_573_zps4269d386.jpg


Thanks in advance

-Java
 

Attachments

  • 2013-08-31_22-45-42_573_zps4269d386.jpg
    2013-08-31_22-45-42_573_zps4269d386.jpg
    14 KB · Views: 105
Hello everyone,

It's been a while since my last update. While I've had nothing but time for the last few weeks, I haven't had an income to allow for projects like this. I was able to scrape together enough to start experimenting. This will sort of be my attempt at relaying everything I've learned about fiberglassing in the hopes that someone will find it useful. I had two test pieces that aren't part of my actual suit that I decided to practice on. First up, a simple helmet.

2013-09-12_16-05-58_59_zps45c436ce.jpg


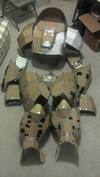
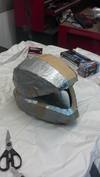
To experiment, I removed all the tape from one side. This piece used 3/4 oz woven fiberglass that I got from a repair kit. This one went pretty disastrously. I wasted a bunch of resin by making batches too large, the woven stuff was hard to work with, and I ran out of resin and cloth so I only covered about half of the helmet. The result:

2013-09-12_17-38-45_164_zpse0c640e8.jpg


It looks pretty bad, but I was able to learn from it, and that was my goal so I'm satisfied. What I learned from this is that the resin has a hard time sticking to the tape underneath. It tends to ball up and won't soak into the fiber as easily. As long as there is a little cardboard underneath it does adequately.

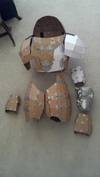
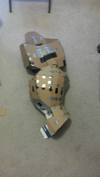
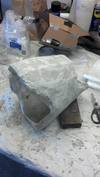
The next piece was the marine forearm that I made to practice pepakura. I made this before deciding to model my own, so this was a throwaway piece. For this, I bought 1.5 oz chopped strand mat from a boat repair shop. The second time around was much easier, as I had some experience to draw from this time. It's not perfect but a big improvement. There's no before picture, but here's the result:

2013-09-15_10-04-25_783_zpsac1166a0.jpg


As you might be able to tell the heavier cloth takes away a lot of detail from the outside. In my case this is a good thing, because of the nature of the suit. It's so curvy and organic, I was thinking I would have to use a lot of body filler to round out the edges, but I may not have to. I still made some mistakes, including wasting a few ounces of resin.

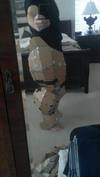
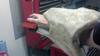
What I learned from this one is that in this heat my working time is severely reduced. It's a high of 95 pretty much every day here, and I'm working in a hot shop. The resin container says 10 drops of hardener per ounce. I was putting in 6 and still only getting the 10-12 minute working time. I also learned about how much fiberglass it will take to do the whole thing: a lot more than I expected. The model's actual surface area is about 2.35 sq ft, and I ended up using a little less than 4 sq ft. I assume this is just due to the overlap it takes to make it smooth. In any case, I'm mostly happy with this result and soon you should see updates for the actual pieces. I'll leave you with this last picture to give you a sense of scale:

2013-09-15_10-01-55_778_zps068e2475.jpg


Thanks, I appreciate any input you have.

-Java
 

Attachments

  • 2013-09-12_17-38-45_164_zpse0c640e8.jpg
    2013-09-12_17-38-45_164_zpse0c640e8.jpg
    76 KB · Views: 115
  • 2013-09-12_16-05-58_59_zps45c436ce.jpg
    2013-09-12_16-05-58_59_zps45c436ce.jpg
    50.8 KB · Views: 118
  • 2013-09-15_10-01-55_778_zps068e2475.jpg
    2013-09-15_10-01-55_778_zps068e2475.jpg
    52.2 KB · Views: 110
  • 2013-09-15_10-04-25_783_zpsac1166a0.jpg
    2013-09-15_10-04-25_783_zpsac1166a0.jpg
    67.9 KB · Views: 116
Unless you want the fiberglass texture, I really don't suggest putting the 'glass on the outside. Smoothing the tiny bumps and ripples will end up taking far more time, effort, and Bondo than if you just fiberglass the inside and bondo the outside.
 
I love Starcraft, and i've never seen someone get so far in making a marine suit. Keep up the good work!

Also, I have to agree with Kyre... Usually, you put the fiberglass cloth on the inside and put bondo on the outside. However, the cloth does seem to smooth the outside of that forearm, but you might want to go with bondo if there are too many bubbles and bumps. I think either could work, depending on the amount of work you are okay with doing.
 
Here's just a little progress, so that I can show something along with a question. My plan all along was to fiberglass and then bondo the outside, giving the surface a smooth finish. I began doing that and I am pleased with the results. I decided to experiment and use rondo on the outside to get a lot of smooth coverage. It worked, sort of. What ratios do you use to make it? I used about 3 parts body filler to 1 part resin, and then used a tad more cream hardener than if there was just body filler alone. The rondo went on easy, spread well, but then took hours to dry, rather than several minutes for straight bondo. Is this normal?

2013-09-16_18-37-36_39_zps0cfc7676.jpg


Anyway, thanks for the input everyone. It really helps.

-Java
 

Attachments

  • 2013-09-16_18-37-36_39_zps0cfc7676.jpg
    2013-09-16_18-37-36_39_zps0cfc7676.jpg
    67.5 KB · Views: 109
Hello everyone. I'm back again after a long time of not posting. I've changed cities and houses, but in the change I got a much bigger workspace which is awesome. Even though I haven't posted in a long while I haven't been idle. While my work doesn't allow me a lot of time to work, I'm still trying to get as much done as I can. My ultimate goal is to go to some sort of con with my friend wearing this costume. He wants to make one of his own, an ODST uniform. Anyway, here's what I've been working on:

2013-11-09_16-05-23_733_zpsfbb5b47f.jpg


What you're looking at is the two forearm pieces and the butt plate. I've been doing a little testing with the paint scheme, but none of the pieces I have are actually ready to be painted. Everything's still in dire need of a good sanding. Here's what I tackled for most of today, fiberglassing the torso, by far the biggest single piece that I have.

2013-11-09_16-03-09_668_zps2691e90e.jpg


I must say, the woven fiberglass picked up the curves much better than I'd hoped on the front, which is a pleasant surprise. It ended up not being strong enough, so I did a layer of matte on the inside. My current concern for this piece is how I will put the body filler layer on. I'm thinking of going with rondo for the outside, but it's difficult on the curved surface. I'm also worried about the weight. I'm afraid of it being so heavy that it can't even be comfortably worn.

Khyre and Evilmailman, my workflow normal workflow is to put a layer of fiberglass over the cardboard, then body filler, then remove the cardboard from the inside. It seems to do a good job of smoothing out the texture of the fiberglass.

Khol, thanks very much for the tip. You're right, I didn't put any resin hardener in the mix, just the cream hardener. I will make sure to get it right in the future.

Thanks for the support everyone, it really helps to have such a good community to confer with on projects.

-Java
 

Attachments

  • 2013-11-09_16-05-23_733_zpsfbb5b47f.jpg
    2013-11-09_16-05-23_733_zpsfbb5b47f.jpg
    48.4 KB · Views: 111
  • 2013-11-09_16-03-09_668_zps2691e90e.jpg
    2013-11-09_16-03-09_668_zps2691e90e.jpg
    50.1 KB · Views: 116
Status
Not open for further replies.
Back
Top