Starting my first Halo build, or sorts.

Status
Not open for further replies.

DirePanda

New Member
So I haven't posted anything since I attempted making an NCR Veteran Ranger helmet out of cardboard and posting it here. And I had had an extremely difficult time trying to modify foam templates to use with the material that I just put it aside and started looking through my growing collection of pepakura files for something that might be easy enough to get used to it as well as working on alternatives to hardening. I live in an apartment and can not use resin/fiberglass/bondo. So far I am trying to figure out a good ratio of diluting wood glue to make the first coatings and getting some cheap AF fabric from Walmart, and maybe use wood filler as an alternative to bondo. I'm kind of winging it here to be honest :D

The pattern I'm using is the Halo 3 Mjolnir MKVI medium detail hand plate file. Modeled by SirPalesAlot and RobotChicken, and unfolded by SirPalesAlot.
What do you all think?


Edit 1: So I decided this will be an attempt at a full build update post, or as much as possible.
Forewarning: I am not going to cons or groupings with this build due to multiple factors including: no way to get there, no money to get in, and basically not having any friends especially ones who cosplay/attend cons/groupings. Sad panda.

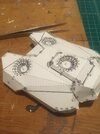
Attempt #1 - Building
317552103_806861833715932_6917928763670128269_n.jpg317640788_464166905843649_8683594438452457803_n.jpg2022-12-01 003.JPG2022-12-01 005.JPG
Didn't cut it as great as I had tried and had to "best guess" the circle bits. The CA glue mostly refused to bond with the paper so most of the tabs are either wonky at best or way wrong at worst. And a few spots I actually completely forgot to even glue! LOL But I think, for the first attempt, I did really great with the indented circle bits.

Attempt #1 - Hardening
H3MKVIhandWIP1A.jpg
I started to coating process while working on Attempt #2 because I switched to a Fast Grab Tack Glue (Aleene's) and I'm actually having better results. I'm using Titebond II premium wood glue. I started the first coat with a minimal dilution followed by a second with a Minute dilution. I was extremely exhausted yesterday so I don't remember if I put a topcoat of straight glue or not. Did the same with the underside. Ultimately, I plan to get some extremely cheap cloth from the department at Walmart, but the current attempts will be a trial of wood glue and paper towel layers underneath.

Attempt #2 - Building (while working on #1 simultaneously)
H3MKVIhandWIP2A.jpg
Two more pieces to glue on to the hand plate and a few spots left to finish shaping the piece.

Attempt #1 - Hardening step 2
318742601_804618173940053_2014717943251044254_n.jpg
I've taken those blue shop towels and made 2 layers the best I could on the inside trying to use just enough glue to make them stick as well as coat the top of the strips. Haven't figured out the right dilution of the wood glue yet, but I have realized that each step takes a very long time before I can move to the next one. Like how this step has taken almost two full days to cure with one day between layers.

So, working on this as a project in a way that would be the most productive is a no-go due to life stuffs, so it could be like a week from one step, do something minor that could be continued AND completed in the same day ... four days later.

Here are updated photos of the hand plates during the phase where I figure out just what in the blank I'm doing because I don't know :D The wood filler is a bit janky to work with / or I just don't know how to work with it. Be warned, the underside of one of the hand plate is a nightmare.
2022-12-12 003.JPG2022-12-15 008.JPG2022-12-15 009.JPG2022-12-15 010.JPG
Now! One thing I am proud of is how well those semispherical bowls turned out :D
Went to walmart today to get a few things and picked up a can of primer/paint combo to apply and then do a bit of wet sanding because why not add to the "IDKWTH I'm doing" list and tbh, right now this is the kind of puzzle I need.

Follow up progress to be coming in very soon

MOAR Progress!!
So, I've reached the point where my learning experiment with the hand plates has born fruit. I can't really do anything more to them until I remake them later and apply what I've learned. I mean, some sections I got pretty darn smooth.
2022-12-17 007.JPG2022-12-19 003.JPG

Currently am working on the left boot and gluing things together, might be a while before next update.
 
Last edited:
So I haven't posted anything since I attempted making an NCR Veteran Ranger helmet out of cardboard and posting it here. And I had had an extremely difficult time trying to modify foam templates to use with the material that I just put it aside and started looking through my growing collection of pepakura files for something that might be easy enough to get used to it as well as working on alternatives to hardening. I live in an apartment and can not use resin/fiberglass/bondo. So far I am trying to figure out a good ratio of diluting wood glue to make the first coatings and getting some cheap AF fabric from Walmart, and maybe use wood filler as an alternative to bondo. I'm kind of winging it here to be honest :D

The pattern I'm using is the Halo 3 Mjolnir MKVI medium detail hand plate file. Modeled by SirPalesAlot and RobotChicken, and unfolded by SirPalesAlot.
What do you all think?
Hey man! It looks amazing! from my time doing pepakura files (I did an EOD helmet) it is EXSTREMELY painful doing those tiny little folds for those circles, so if you can do it with such precision, I think the finished product will be GREAT! as for the wood glue, I would think there will be a point where the paper cannot absorb any more and will not become as hard as you want it to be and other layers that will be added will just simply make the surface rough, causing more sanding (but that's just my opinion). I was going to suggest doing the resin somewhere other than your apartment, like getting a plastic sheet and going to a park bench, instead of slow-curing resin try experimenting with UV resin and see how that goes since of its fast-drying nature to 'UV' rays.
 
Hey man! It looks amazing! from my time doing pepakura files (I did an EOD helmet) it is EXSTREMELY painful doing those tiny little folds for those circles, so if you can do it with such precision, I think the finished product will be GREAT! as for the wood glue, I would think there will be a point where the paper cannot absorb any more and will not become as hard as you want it to be and other layers that will be added will just simply make the surface rough, causing more sanding (but that's just my opinion). I was going to suggest doing the resin somewhere other than your apartment, like getting a plastic sheet and going to a park bench, instead of slow-curing resin try experimenting with UV resin and see how that goes since of its fast-drying nature to 'UV' rays.
So as I get towards the end of this practice piece, it turns into a complete dumpster fire. A number of flaps aren't glued correctly (a couple not at all) due to the angle/placement so I tried to work with it. Well my superglue has me going up a wall because it simply refuses at random times to even bond with the paper.
As for the park bench we luckily have one in the shared yard/public (hurray for rural towns and public housing) but the sunlight is a whole 'nother story. Currently winter and sun is spotty at best this past week, so temperature will have a huge impact on, well, anything that requires a decent working temperature. Including me! LOL
Hello Discouragement, my deepest friend. And it was starting out rather well even if it wasn't scaled at all. I think I actually did "okay" with the circle bits, maybe.
Now that I think about it, there is some "Safe"ish epoxy our local Walmart might carry or cheaper on amazon. BSI Bob Smith Industries 2 part epoxy. Have to see what I can get away with to spend after budgeting for bills and rent so I'm just spitballing ideas in my brainpan.
 

Attachments

  • 317080124_546407240231637_3117839167063392276_n.jpg
    317080124_546407240231637_3117839167063392276_n.jpg
    329.6 KB · Views: 82
So as I get towards the end of this practice piece, it turns into a complete dumpster fire. A number of flaps aren't glued correctly (a couple not at all) due to the angle/placement so I tried to work with it. Well my superglue has me going up a wall because it simply refuses at random times to even bond with the paper.
As for the park bench we luckily have one in the shared yard/public (hurray for rural towns and public housing) but the sunlight is a whole 'nother story. Currently winter and sun is spotty at best this past week, so temperature will have a huge impact on, well, anything that requires a decent working temperature. Including me! LOL
Hello Discouragement, my deepest friend. And it was starting out rather well even if it wasn't scaled at all. I think I actually did "okay" with the circle bits, maybe.
Now that I think about it, there is some "Safe"ish epoxy our local Walmart might carry or cheaper on amazon. BSI Bob Smith Industries 2 part epoxy. Have to see what I can get away with to spend after budgeting for bills and rent so I'm just spitballing ideas in my brainpan.
I can see where you're talking about with unglued tabs but even then, it looks fantastic! you can always fix it up. for UV resin you don't need the sun, you can buy a UV torch to make it harden, however, if it is raining that is highly unfortunate. You will have to ask other 405th members about doing this though since I haven't played with it myself!
 
I've been spending the past ten minutes or so browsing Amazon to try to find some non toxic indoor safe resins. Don't want to spend a bunch of money on a huge quantity but I also have zero idea what I'm doing and I don't know. Too much to think right now.
 
So as I get towards the end of this practice piece, it turns into a complete dumpster fire. A number of flaps aren't glued correctly (a couple not at all) due to the angle/placement so I tried to work with it. Well my superglue has me going up a wall because it simply refuses at random times to even bond with the paper.
As for the park bench we luckily have one in the shared yard/public (hurray for rural towns and public housing) but the sunlight is a whole 'nother story. Currently winter and sun is spotty at best this past week, so temperature will have a huge impact on, well, anything that requires a decent working temperature. Including me! LOL
Hello Discouragement, my deepest friend. And it was starting out rather well even if it wasn't scaled at all. I think I actually did "okay" with the circle bits, maybe.
Now that I think about it, there is some "Safe"ish epoxy our local Walmart might carry or cheaper on amazon. BSI Bob Smith Industries 2 part epoxy. Have to see what I can get away with to spend after budgeting for bills and rent so I'm just spitballing ideas in my brainpan.
What you have so far looks great! I've never done Pepakura before, but now I may try a bit here and there between prints. I can't wait to see how your build turns out!
 
I can't wait to see how your build turns out!
Me too! But I'm actually surprised with myself about how it turned out even though it is what it is. Also, it's not scaled AT ALL for myself, was default scale when I printed it out. Those circle bits were a PITA at THAT size, I'm not looking forward to a smaller scale hahah
Also, I think I need to buy more (different brand) of superglue because for some reason it chooses to just not bond with the paper randomly. My fingers yeah glue quickly to the paper, but paper/paper is the problem. Cheap glue or different pressing of the paper I bought versus what I normally buy or a combo of the two.
Sorry about any rambling in my posts either now or future due to my brain being manic and non-specific generalized anxiety that pops up for zero reasons (yaaay)
Props and Costumes that aren't to scale always work great as office or shop decorations! I don't know about paper but, with 3D prints made out of PLA sometimes too much super glue usually ends up causing most of my adhesion problems. Also I think most of us start to ramble and go off topic on things we are passionate about when communicating with others!
 
DeltaAlphaZulu, I've started making some measurements on a best guess basis using a foam caliper (pair of calipers?) as well as estimate guidelines from HaloGoddess' sizing post. So far I measured my head, hand, chest, and boots that I plan on using for the build. That's the easy part I think. Hard part will be seeing how long I can suck in my gut if I wear the costume LOL
I printed a different hand plate template earlier tonight and just now printed out a 3 piece template of the left boot.
Since I can't sleep at all (3:17 am for me) I guess I'll be working on base assembly.
Also figuring out my budget for extras this month, including non toxic resin for indoor usage. Think I have found a product that will give me a good idea on how to use properly without costing too much, but are small bottles and I don't know how much/how long that will last if I mix the batches small enough to minimize waste.
There are a lot of night owls in the 405th, most of the time if any of us are up we'll hang out in the crafting chat section of the 405ths discord working on projects or just hanging out. That's great you found a resin you can use indoors and won't cause lung damage!
 
Yeah, as if my lungs aren't messed up enough already LOL
I tend to shy away from discord most of the time. Social anxiety is a pita even online. I'm usually not a night owl anymore like I used to be mostly due to meds, but the rare night of insomnia rears it's ugly mug from time to time. I think I'll see if I can lie down in such a way as to not wake my wife. She has managed to cross onto my side of the bed and take up a good portion of her side. If not I'll try to snag a couple of pillows and a blanket and pass out on the loveseat we use as a couch.
I'll try to check out the discord server later today and maybe join.
 
Updated the original post.
Also, forgive me if there's a ruling about bumping posts as I had looked and either couldn't find one or completely missed it right in front of me. Barely awake yet :D
 
I updated the main post with more details on progress. DeltaAlphaZulu, what do you think? Any suggestions or advice?
I'm trying to get in with the discord but me, people, strangers, anxiety it takes a long time for me so I've only posted like a few sentences. Never really started any convos.
 
I updated the main post with more details on progress. DeltaAlphaZulu, what do you think? Any suggestions or advice?
I'm trying to get in with the discord but me, people, strangers, anxiety it takes a long time for me so I've only posted like a few sentences. Never really started any convos.
Your progress so far looks great!

I would typically recommend doing a 2in1 sandable fillable primer before your base color and sanding a least up to 400 grit, although on my 3d prints I'll usually wet sand up to 2000 grit after primer. I don't have any experience in Pepakura processes but if you're using wood glue and wood filler I wouldn't wet sand until you have epoxied the piece first. If there are any veteran members of the community please correct me if I'm wrong on this.

If you have any other questions just tag me like you did this time because even though I'm following this thread I didn't receive a notification that you updated it. Best of luck with the continuation of you build!
That's the hard part: Epoxy. I can't use standard epoxies due to multiple factors and I've been reading tons of reviews for different brands of nontoxic/"safe-ish" 2 part epoxies for indoor usages but can't seem to figure out which one would work the best besides dropping 30 bucks a piece for multiple brands...eh... Still working on that route.
Right now I've got to get higher grits of sandpaper anyway as all I've got are some 80, 120, 220, and I don't remember when I picked them up years ago p-something. P100, P220, P400, and P600. Just checked. So I think I'm covered for a good few minutes on that.
What would you suggest as a sandable filler primer? I just quickly grabbed the first flat color primer I could find at Voldemortmart yesterday since all the grays (which I normally use before base coats) were completely out except for satin and high gloss. Rustolium 2x ultra cover flat white is what I found. Not my first choice but it should work.
 
If you're in the US I know both AutoZone and Lowes carries it. This is what I'd recommend.

20221216_112356.jpg


It helps to fill in any little low spots before you paint. If you have anything deeper you want to hide I'd recommend spot putty.
 
DeltaAlphaZulu There's an auto store here in town. Can't remember if autozone or o'rielys, but I've got that jotted down. Thanks!
I actually just got in a few minutes ago after putting on a small coat of the primer I grabbed.
Me: today I'm going to work on the project some more, looking forward to it!
Weather: Yeaaah, 30 degrees with a wind chill of 21 (f) so have fun with that.
Me: *Stands out in the wind attempting to get the hand plates evenly-enough coated and waits for it to dry enough to bring inside*
 
Status
Not open for further replies.
Back
Top