- Member DIN
- S728
Hey everyone, bear with me—this is my first time writing a tutorial like this, but I wanted to share how I made my Honored Heirloom Cape for my ODST armor! I designed it so I can swap back and forth between ODST and Helldiver looks.

Here are the two key references I used:


I’m super happy with how the cape turned out! It’s been an awesome way to celebrate the crossover and add some unique flair to my ODST armor. Can’t wait to show it off at the Halo World Championships later this month.
If anyone has questions or wants templates/SVGs, I’ll try to share those in a follow-up post.
Let me know what you think or if you try to make one yourself! Happy crafting, Spartans. ️
Inspiration
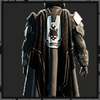
When the trailer dropped for the ODST x Helldivers crossover, I was hyped. I think a lot of us have been waiting for something like this. I didn’t have much to go on besides a few screenshots and replaying the trailer on loop.Here are the two key references I used:
- A screenshot showing the cape’s texture and logo
- The Helljumper card showing the cape’s rear stripe layout
Design Details Noticed:
- The cape’s subtle checker pattern matches the Auntie Dot matrix from Halo: Reach.
- The main difference between the standard ODST logo and the Helljumper version is the text — “ODST” becomes “HELLJUMPER”.
Designing the Cape Pattern
I used Fusion 360 (because that’s what I’m comfortable with) to overlay a back-facing photo of myself in armor, scaled to my actual height (5’10”). From there, I laid the Helljumper card and cape reference over the image to estimate scale and pattern dimensions.Bonus: if added the SVG files I made/used for this project. See the Zip file in the attachments.
Cape Dimensions
- Bottom width: 36 inches (3 feet)
- Top width: 24 inches (2 feet)
- Neck opening: Half your neck diameter (mine was just based on measuring my neck directly)
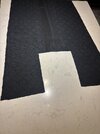
I drew the pattern on 12” wide brown packing paper, taped together to make a full-size template.If you’re around my height (5’10”), these measurements should work well for you.


Materials
I picked up my fabrics from a local big box fabric store:- Outer cape: Black cotton-blend thermal weave
- Lining + stripe: Gray one-way stretch with a bit of sheen
 Cutting & Sewing
- Pin your paper pattern to the fabric.
- Cut out the outer layer and the liner, leaving ¼ inch seam allowance.
- Sew the outer fabric and liner together (thanks to my daughter for helping—she’s better with a sewing machine than I am!).


️ Turning Drawings Into SVGs
To convert my designs from Fusion 360 into cuttable files:- I temporarily subscribed to Adobe Illustrator
- Exported the drawings as SVGs for use with a Cricut cutting machine
Vinyl Design Dimensions:
- ODST logo (white part): ~9.5 inches wide
- Black border: ~¼ inch around the emblem
- Auntie Dot squares: 2.5–3 inches corner to corner
- Fit 4 rows on a 12” x 24” Cricut mat


Painting the Pattern
- Used temporary vinyl stencils to lay out the Auntie Dot pattern on the outer cape.
- Set up a painting area in my garage with masking paper over a folding table.
- Mixed Vallejo Model Air paints:
- Black Gray + Dark Sea Gray + Thinner
- Sprayed 3 light coats for even coverage.
- Let it dry 24 hours, then peeled off the vinyl stencil.
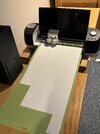
Result: A dark gray fabric with a subtle black checker pattern — just like in-game. It’s visible in bright light but fades in shadows, which is perfect!


️ Final Assembly: Logo + Stripes
I based the emblem scaling on a screenshot where the logo spans from the mid-shoulder to the bottom of the elbow. I tested this on my ODST mannequin to get the placement right.Iron-On Process:
- Cut the black vinyl background and white ODST emblem separately.
- Layered them using the Cricut (black first, white on top).
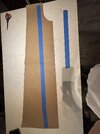
- Re-scaled the stripe pattern in Illustrator to match.
- Used the checker pattern as a guide to align and iron on the stripes symmetrically.


Attachment Method
Still testing this part! But my current plan is to:- Sew Velcro straps at the neck of the cape
- Attach them to the existing Velcro points on my ODST chest armor


Final Thoughts
I’m super happy with how the cape turned out! It’s been an awesome way to celebrate the crossover and add some unique flair to my ODST armor. Can’t wait to show it off at the Halo World Championships later this month.If anyone has questions or wants templates/SVGs, I’ll try to share those in a follow-up post.
Let me know what you think or if you try to make one yourself! Happy crafting, Spartans. ️
Attachments

Last edited:


