- Member DIN
- S511
INTRODUCTION: The Challenge
The timeless challenge that all armored cosplayers face once their stunning pieces are complete is figuring out how to put them on effectively. There are so many different sections to manage, and plenty of things to watch out for—like rotating biceps, stuff sitting in the wrong spots, or parts sliding up and down, or being too tight or too loose. With so many details to consider, it’s easy for your progress to stall out, or worse, get stuck on the shelf of shame until you can sort things out. This can even bring your build to a halt, causing you to miss the very event you’ve been working toward.
So, how do we fix this? I’ve got a solution right here! And kudos to the incredible community around us—Namely Angus314 for the base design being uniquely design on his observations of lingerie, JTF4 for the addition of fantastic magnetic buckles for the thighs for ease of don/doff, and of course gingysaurusrex for providing their sewing expertise and equipment for not only my last two harness sets but this tutorial this self. I think we’ve finally found a way that hits some key points for making this easier.
1). It's Affordable. This harness system can be fully assembled for less than $70.
2). It's Durable. Since the harness system is built on top of an existing H-Harness made from sturdy materials, your main focus during construction is sewing for tensile strength and considering where additional strain might occur.
3). It's Versatile. This build can be used on different suits because, at its core, it's designed to support your most demanding space and tension areas—your biceps and thighs. Once both sections are attached, it perfectly balances each part, so you won't lose mobility in your thighs, and you'll avoid slipping or misalignment that could ruin photos or, worse, damage your other pieces due to unintended clipping.
With all that being said; Here is the materials list of what you will need for this build. Feel free to notify me if these links ever go dead - I am happy to replace them and maintain this thread for the community.
H-Harness
Magnetic Clips
Triangle D Rings
Nylon Webbing
Zinc-Plated 1inch Ring
Quick-Release Parachute Buckles
Here is a full breakdown of what you should have, including some additional materials like a lighter, chalk pen, scissors, and measuring tape. You will need three quick release buckles, two O-Rings, two magnetic buckles, and two metal D rings.

STEP 1: The Harness Modifications.
What you will first want to do on the harness is discard/disassemble sections you will not need. There are going to be four plastic D rings hooked onto the harness itself that you can disconnect and discard. There is also a section in the middle of the harness that clips together with a standard parachute clips. Go ahead and remove the strap from the quick slides adjuster, and the whole assembly should come off the harness itself. Pictured below for reference for what you should have before and after.


STEP 2: Fabric "Mise en place" (Preparation)
Now, you'll want to start pre-preparing and cutting everything before beginning the sewing process. With this design, everything on the harness itself is meant to stay static and not be adjustable. That's because each build it's used for, and the parts, can be different, so it's easier to make the connecting sections to the armor adjustable. The measurements provided are based on this idea to make them as close to universal as possible. They were initially designed around a person who is 5'11", which mainly affects the thigh area, so feel free to adjust as needed. I always recommend pinning straps and double-checking the sizing before committing to sewing anything—it's just to save you some headaches later on.
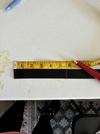
You're going to mark the following measurements with chalk. Then, you'll cut the nylon and use a lighter to heat seal the edges. It's really important to do this throughout the build to prevent fraying, which can eventually weaken your nylon over time. Below is before and after.


Here is the following measurements and cut list you will need with this in mind:
Center straps: 5.5" & 11" pieces
Shoulders (x2): 5", 5"+, & 8"+. (straps may vary depending on shoulder size, better to cut longer & adjust placement before stitching than to cut too short)
Hip/thigh (x2): 10"
Here is what you should have at the end:

Now with everything cut, here is the general assembly of your prepared strapping with its paired buckle. It is important to note that the magnetic buckles you will need the male end. The female end will be attaching to your thigh strap.

STEP 3: The Sewing (CHEST)
Remember how I mentioned this build is under $70? While that's still the case, I just want to note that a lot of this was done with a sewing machine. In our hobby, I understand not everyone has access to every tool out there, but having a good sewing machine that can handle these dense materials really makes a big difference. Plus, it's a tool you'll literally have for the rest of your life if you take the time to learn its ins and outs, just like we've seen in the 3D printer community and their printers. That said, I wouldn't recommend grabbing a sewing machine from a big box store like Walmart. Instead, try to find a local sewing dealer—they can help you choose the right machine for your projects. For our build, we used a machine in the $400-$700 range since it can handle durable materials effectively.
I highly recommend a semi-industrial, straight-stitch machine like the Juki TL series, Janome HD 9, or Bernette B08. If the budget is slim, most vintage sewing sewing machines, like the Singer 15, are functionally semi-industrials. (If you have questions about sewing machines or what to buy, feel free to reach out to gingysaurusrex on the forum or Discord!). We also recommend the use of a nylon or other "outdoor" thread to reduce the amount of breaking you may run into while sewing.
You're going to start by sewing the center chest strap replacement. This piece helps the harness pull your left and right sides out properly, so you can achieve the right tension once your biceps and thighs are attached. Most of your adjustments will be made here, and it’s the only adjustable strap connected to this section. So, be sure to leave some extra material. Keep in mind, this part is completely hidden under your chest plate, so there's no need to worry about loose straps showing. If you're concerned about that, you can always attach a speed slide to one side to help keep any loose strap snug against you.
For the Chest: Mark 1.5" from edge. Thread buckle face up & fold strap over, lining the edge up to the mark made.


Start with the side closest to the buckle, with the presser food of the machine riding beside the edge of the buckle. Do not attempt to run the foot over the buckle itself, just get as close as you can with the foot remaining level.

Sew to the edge, then reverse the machine and stitch back to where to started, then forward once more to the edge. This back & forth movement creates a stronger hold & "locks" your stitching in place


Repeat this process, lining the foot to run along the other edge of the strap, to further secure the strapping. This 2nd line of stitching acts as bracing/support for the strain placed on the strap.

Chalk showing stitched strap:

Placement of straps on harness. Use the existing straps on the harness as a guide, and repeat the back & forth locking stitch to secure the straps to the harness. Go SLOW, and use a denim or other heavy-weight needle. Thick material like this is a risk for breaking needles or snapping thread.


Sew just past the strap on either side on the harness before reversing, to better secure the strap to the harness.

If you are having issue with breaking thread, try increasing your stitch length, lowering your tension, or using a larger gauge needle. (I'd recommend using a 90/14 or larger denim needle) ((Or as we did just change machines ))
))
Using a walking foot instead of a standard foot can help give your machine a little extra power to pull material through the machine. Do not push or pull material under the foot. This causes the needle to bend while stitching and hit things it's not supposed to (like the bobbin case or stitch plate.) If the material still won't feed even with a walking foot, odds are that your sewing machine isn't strong enough to do what you're asking it today.
Once sewn, thread the male section of the buckle.

STEP 4: The Shoulders and Thighs
The overall goal with the shoulders is to create a sturdy set that will sit comfortably on the ball of your shoulder, while also preventing the bicep itself, once attached and padded, from rotating. This is achieved with a "Y" design, with an O-Ring serving as the central pivot point to allow for a full range of motion while keeping your anchored part in place. What’s nice is that this part can be customized based on the size of the ring you choose, allowing it to function as either a single strap or a two-strap attachment. Later in this tutorial, I’ll be using SkookumProps files as an example to show this full harness system in action.

Put the buckle face down, with the o ring opposite. You're going to fold both tails to overlap, creating a a loop with a single layer on the front side, and two layers on the back. There should be just enough space for the foot of your machine to ride flat in between the hard ware pieces. You can tighten or loosen it as needed to make sure it fits under the foot, so long as you are stitching through all three layers.


Do 5-6 back & forth stitches to create a secure hold. Repeat to make this piece for the other shoulder.

Make a line 2.5" in on the 6" shoulder piece, then fold in the face-down o-ring. Stitch the loop closed, using 5+ back & forth passes. Repeat with the other o-ring.


Note that the shoulder pieces are mirrored, so your longer strap will be to the left of the shorter strap on one piece, and the the right of the shorter strap on the other.

Repeat the 2.5" guideline & secure the second strap to the o-rings.


The timeless challenge that all armored cosplayers face once their stunning pieces are complete is figuring out how to put them on effectively. There are so many different sections to manage, and plenty of things to watch out for—like rotating biceps, stuff sitting in the wrong spots, or parts sliding up and down, or being too tight or too loose. With so many details to consider, it’s easy for your progress to stall out, or worse, get stuck on the shelf of shame until you can sort things out. This can even bring your build to a halt, causing you to miss the very event you’ve been working toward.
So, how do we fix this? I’ve got a solution right here! And kudos to the incredible community around us—Namely Angus314 for the base design being uniquely design on his observations of lingerie, JTF4 for the addition of fantastic magnetic buckles for the thighs for ease of don/doff, and of course gingysaurusrex for providing their sewing expertise and equipment for not only my last two harness sets but this tutorial this self. I think we’ve finally found a way that hits some key points for making this easier.
1). It's Affordable. This harness system can be fully assembled for less than $70.
2). It's Durable. Since the harness system is built on top of an existing H-Harness made from sturdy materials, your main focus during construction is sewing for tensile strength and considering where additional strain might occur.
3). It's Versatile. This build can be used on different suits because, at its core, it's designed to support your most demanding space and tension areas—your biceps and thighs. Once both sections are attached, it perfectly balances each part, so you won't lose mobility in your thighs, and you'll avoid slipping or misalignment that could ruin photos or, worse, damage your other pieces due to unintended clipping.
With all that being said; Here is the materials list of what you will need for this build. Feel free to notify me if these links ever go dead - I am happy to replace them and maintain this thread for the community.
H-Harness
Magnetic Clips
Triangle D Rings
Nylon Webbing
Zinc-Plated 1inch Ring
Quick-Release Parachute Buckles
Here is a full breakdown of what you should have, including some additional materials like a lighter, chalk pen, scissors, and measuring tape. You will need three quick release buckles, two O-Rings, two magnetic buckles, and two metal D rings.
STEP 1: The Harness Modifications.
What you will first want to do on the harness is discard/disassemble sections you will not need. There are going to be four plastic D rings hooked onto the harness itself that you can disconnect and discard. There is also a section in the middle of the harness that clips together with a standard parachute clips. Go ahead and remove the strap from the quick slides adjuster, and the whole assembly should come off the harness itself. Pictured below for reference for what you should have before and after.
STEP 2: Fabric "Mise en place" (Preparation)
Now, you'll want to start pre-preparing and cutting everything before beginning the sewing process. With this design, everything on the harness itself is meant to stay static and not be adjustable. That's because each build it's used for, and the parts, can be different, so it's easier to make the connecting sections to the armor adjustable. The measurements provided are based on this idea to make them as close to universal as possible. They were initially designed around a person who is 5'11", which mainly affects the thigh area, so feel free to adjust as needed. I always recommend pinning straps and double-checking the sizing before committing to sewing anything—it's just to save you some headaches later on.
You're going to mark the following measurements with chalk. Then, you'll cut the nylon and use a lighter to heat seal the edges. It's really important to do this throughout the build to prevent fraying, which can eventually weaken your nylon over time. Below is before and after.
Here is the following measurements and cut list you will need with this in mind:
Center straps: 5.5" & 11" pieces
Shoulders (x2): 5", 5"+, & 8"+. (straps may vary depending on shoulder size, better to cut longer & adjust placement before stitching than to cut too short)
Hip/thigh (x2): 10"
Here is what you should have at the end:
Now with everything cut, here is the general assembly of your prepared strapping with its paired buckle. It is important to note that the magnetic buckles you will need the male end. The female end will be attaching to your thigh strap.
STEP 3: The Sewing (CHEST)
Remember how I mentioned this build is under $70? While that's still the case, I just want to note that a lot of this was done with a sewing machine. In our hobby, I understand not everyone has access to every tool out there, but having a good sewing machine that can handle these dense materials really makes a big difference. Plus, it's a tool you'll literally have for the rest of your life if you take the time to learn its ins and outs, just like we've seen in the 3D printer community and their printers. That said, I wouldn't recommend grabbing a sewing machine from a big box store like Walmart. Instead, try to find a local sewing dealer—they can help you choose the right machine for your projects. For our build, we used a machine in the $400-$700 range since it can handle durable materials effectively.
I highly recommend a semi-industrial, straight-stitch machine like the Juki TL series, Janome HD 9, or Bernette B08. If the budget is slim, most vintage sewing sewing machines, like the Singer 15, are functionally semi-industrials. (If you have questions about sewing machines or what to buy, feel free to reach out to gingysaurusrex on the forum or Discord!). We also recommend the use of a nylon or other "outdoor" thread to reduce the amount of breaking you may run into while sewing.
You're going to start by sewing the center chest strap replacement. This piece helps the harness pull your left and right sides out properly, so you can achieve the right tension once your biceps and thighs are attached. Most of your adjustments will be made here, and it’s the only adjustable strap connected to this section. So, be sure to leave some extra material. Keep in mind, this part is completely hidden under your chest plate, so there's no need to worry about loose straps showing. If you're concerned about that, you can always attach a speed slide to one side to help keep any loose strap snug against you.
For the Chest: Mark 1.5" from edge. Thread buckle face up & fold strap over, lining the edge up to the mark made.
Start with the side closest to the buckle, with the presser food of the machine riding beside the edge of the buckle. Do not attempt to run the foot over the buckle itself, just get as close as you can with the foot remaining level.
Sew to the edge, then reverse the machine and stitch back to where to started, then forward once more to the edge. This back & forth movement creates a stronger hold & "locks" your stitching in place
Repeat this process, lining the foot to run along the other edge of the strap, to further secure the strapping. This 2nd line of stitching acts as bracing/support for the strain placed on the strap.
Chalk showing stitched strap:
Placement of straps on harness. Use the existing straps on the harness as a guide, and repeat the back & forth locking stitch to secure the straps to the harness. Go SLOW, and use a denim or other heavy-weight needle. Thick material like this is a risk for breaking needles or snapping thread.
Sew just past the strap on either side on the harness before reversing, to better secure the strap to the harness.
If you are having issue with breaking thread, try increasing your stitch length, lowering your tension, or using a larger gauge needle. (I'd recommend using a 90/14 or larger denim needle) ((Or as we did just change machines
))Using a walking foot instead of a standard foot can help give your machine a little extra power to pull material through the machine. Do not push or pull material under the foot. This causes the needle to bend while stitching and hit things it's not supposed to (like the bobbin case or stitch plate.) If the material still won't feed even with a walking foot, odds are that your sewing machine isn't strong enough to do what you're asking it today.
Once sewn, thread the male section of the buckle.
STEP 4: The Shoulders and Thighs
The overall goal with the shoulders is to create a sturdy set that will sit comfortably on the ball of your shoulder, while also preventing the bicep itself, once attached and padded, from rotating. This is achieved with a "Y" design, with an O-Ring serving as the central pivot point to allow for a full range of motion while keeping your anchored part in place. What’s nice is that this part can be customized based on the size of the ring you choose, allowing it to function as either a single strap or a two-strap attachment. Later in this tutorial, I’ll be using SkookumProps files as an example to show this full harness system in action.
Put the buckle face down, with the o ring opposite. You're going to fold both tails to overlap, creating a a loop with a single layer on the front side, and two layers on the back. There should be just enough space for the foot of your machine to ride flat in between the hard ware pieces. You can tighten or loosen it as needed to make sure it fits under the foot, so long as you are stitching through all three layers.
Do 5-6 back & forth stitches to create a secure hold. Repeat to make this piece for the other shoulder.
Make a line 2.5" in on the 6" shoulder piece, then fold in the face-down o-ring. Stitch the loop closed, using 5+ back & forth passes. Repeat with the other o-ring.
Note that the shoulder pieces are mirrored, so your longer strap will be to the left of the shorter strap on one piece, and the the right of the shorter strap on the other.
Repeat the 2.5" guideline & secure the second strap to the o-rings.
Attachments
Last edited: