Props UNSC Marine cosplay

Status
Not open for further replies.

ArBiTeR1400

Member
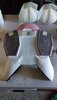
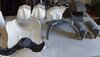
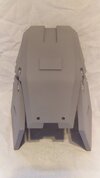
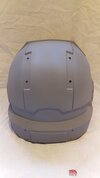
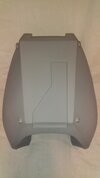
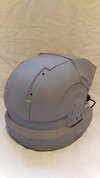
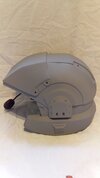
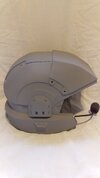
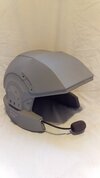
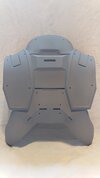
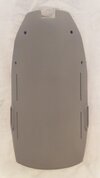
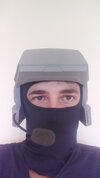
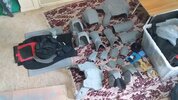
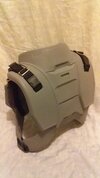
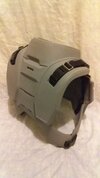
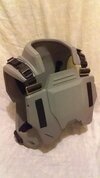
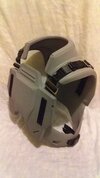
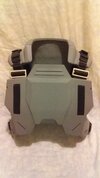
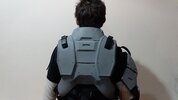
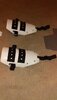
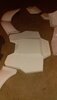
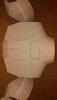
Here it is ladies & gentlemen. :cool:
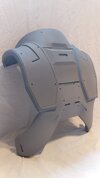
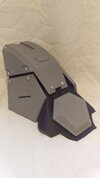
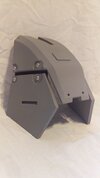
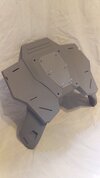
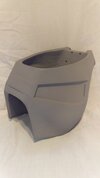
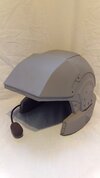
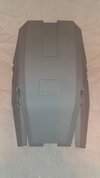
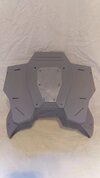
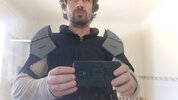
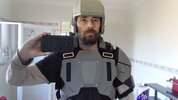
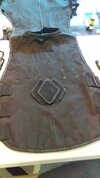
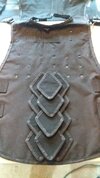
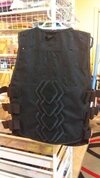
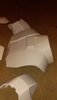
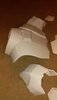
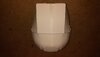
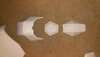
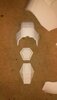
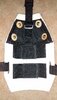
The first part of the costume is finished with 3D printing after 3 months, sorry it took this long. :oops:

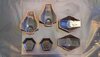
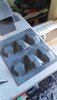
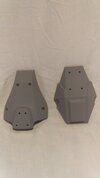
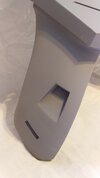
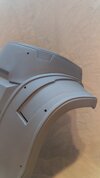
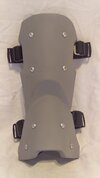
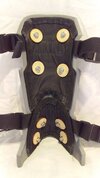
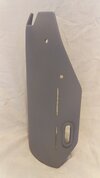
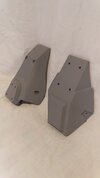
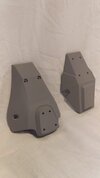
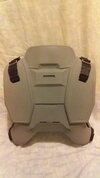
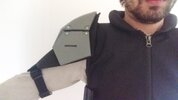
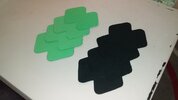
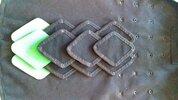
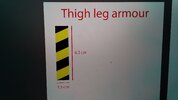
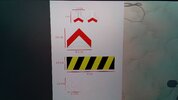
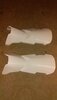
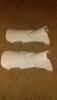
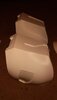
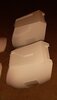
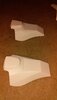
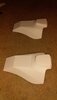
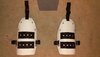
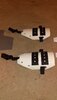
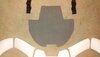
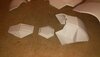
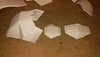
While the parts where being printed, in the mean time, I started working on the top leg armours due to the absent of them in the original files.

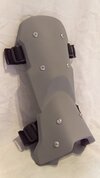
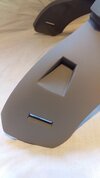
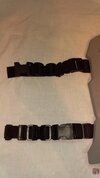
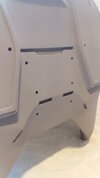
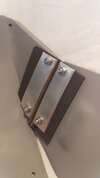
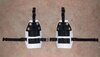
I used a 16cm/6.25 inch PVC pipe, cut into shape, heat gun to bend slightly out & to fold the top bits in a little. The top strap that connects to the belt is stitched to the pads behind, which those pads is bolted into the armour while the bottom straps that goes around the legs is through the two holes, the two middle straps are looped into the armour itself & velcro to the other side. Worked out how to make it 100% practical while remaining true to canon, this is an example of what I'll be doing to the whole set, make it where no strap is glued to the armour itself but make it where it can come apart easy with a whole strapping/modulation system if I need to repair or replace any part in the future if needed. This costume is to be made to last a century at minimum to be used at conventions, charity works with the 405th & hopefully fan made films.

Now onto prime filling & sanding for the second part, this will take months. :lol:

Credit to Maurice Sizzlac on thingiverse for the files.
 

Attachments

  • 20200729_065341.jpg
    20200729_065341.jpg
    604.5 KB · Views: 229
  • 20200729_065406.jpg
    20200729_065406.jpg
    556.6 KB · Views: 219
  • 20200729_065414.jpg
    20200729_065414.jpg
    560.3 KB · Views: 210
  • 20200729_065423.jpg
    20200729_065423.jpg
    643.3 KB · Views: 203
  • 20200729_065501.jpg
    20200729_065501.jpg
    569 KB · Views: 198
  • 20200729_065521.jpg
    20200729_065521.jpg
    482 KB · Views: 195
  • 20200729_065541.jpg
    20200729_065541.jpg
    534.6 KB · Views: 190
  • 20200729_065621.jpg
    20200729_065621.jpg
    535.4 KB · Views: 191
  • 20200729_065630.jpg
    20200729_065630.jpg
    574.9 KB · Views: 189
  • 20200729_065642.jpg
    20200729_065642.jpg
    609.9 KB · Views: 198
  • 20200729_065705.jpg
    20200729_065705.jpg
    597.1 KB · Views: 192
  • 20200729_065725.jpg
    20200729_065725.jpg
    587.6 KB · Views: 193
  • 20200729_065739.jpg
    20200729_065739.jpg
    618.7 KB · Views: 200
  • 20200729_065811.jpg
    20200729_065811.jpg
    535 KB · Views: 187
  • 20200729_065824.jpg
    20200729_065824.jpg
    511.3 KB · Views: 197
  • 20200729_065833.jpg
    20200729_065833.jpg
    490.1 KB · Views: 190
  • 20200729_065845.jpg
    20200729_065845.jpg
    472.6 KB · Views: 235
  • 20200729_065857.jpg
    20200729_065857.jpg
    542 KB · Views: 196
  • 20200729_065920.jpg
    20200729_065920.jpg
    446.3 KB · Views: 193
  • 20200729_065930.jpg
    20200729_065930.jpg
    533.3 KB · Views: 184
  • 20200729_065944.jpg
    20200729_065944.jpg
    452.9 KB · Views: 176
  • 20200729_065952.jpg
    20200729_065952.jpg
    599.2 KB · Views: 182
  • 20200729_070001.jpg
    20200729_070001.jpg
    460.4 KB · Views: 185
  • 20200729_070055.jpg
    20200729_070055.jpg
    438.2 KB · Views: 194
  • 20200729_070154.jpg
    20200729_070154.jpg
    1.3 MB · Views: 190
  • 20200729_070245.jpg
    20200729_070245.jpg
    1.5 MB · Views: 182
  • 20200729_070255.jpg
    20200729_070255.jpg
    1.5 MB · Views: 169
  • 20200729_070307.jpg
    20200729_070307.jpg
    602.9 KB · Views: 182
  • 20200729_070316.jpg
    20200729_070316.jpg
    1.6 MB · Views: 187
  • 20200729_073846.jpg
    20200729_073846.jpg
    629.7 KB · Views: 172
  • 20200729_073907.jpg
    20200729_073907.jpg
    994.4 KB · Views: 176
  • 20200729_073921.jpg
    20200729_073921.jpg
    877.4 KB · Views: 215
UPDATE:
Forgotten to upload my progress, got carried away trying to get parts done. Here's what I done so far, finished prepping elbow, knee & mid-upper arm armour pieces, just need to bolt to some custom-made pads I am going to make once all done with other pieces before the final stage of painting & seal.
Currently layering carbon fiber pieces, adding structural strength to the back-armour side pieces that I currently resin together on last night. :cool:
 

Attachments

  • 20200905_153502.jpg
    20200905_153502.jpg
    585.8 KB · Views: 176
  • 20200905_153440.jpg
    20200905_153440.jpg
    1.5 MB · Views: 187
  • 20200830_090050.jpg
    20200830_090050.jpg
    1.7 MB · Views: 176
  • 20200905_153659.jpg
    20200905_153659.jpg
    687.8 KB · Views: 191
  • 20200905_153721.jpg
    20200905_153721.jpg
    570.6 KB · Views: 173
Last edited:
MARINEGANG!
Those parts are looking swell, very crisp. I guess you'll be on to painting soon?
Not til around or after Christmas at this rate, gotta sand & prime fill shin & shoulder pieces after working on back piece that I'm doing now, just waiting on the resin to cure to add more layers of carbon fiber sheets. Have to wetsand the front chest piece yet that I had to fix up a mistake on then make soft pads with some sewing for all the pieces. Also gotta figure out how to attach the knee & shin pieces as together mechanically. Long & slow process to make it look high-tier Hollywood production, sooo much to do.
 
what's the best plastic material for a unsc marine helmet? I mean I was planning on 3d printing one. The safety manual that someone posted was confusing considering that I don't know half the stuff.
 
what's the best plastic material for a unsc marine helmet? I mean I was planning on 3d printing one. The safety manual that someone posted was confusing considering that I don't know half the stuff.
The standard is usually PLA, it's good value and prints easily enough. PLA+ sands a bit easier. There's PETG which also sands easier, is a bit stronger and takes more heat to warp. If you wanna go to the big guns, ABS is much better resistant to warping and cleans up well, but is also harder to print as it requires a higher temperature to do so.
 
Here is my latest progress.

After nearly a full year carbon fibre & resin layering the back for structural strength & adding extra detail over top by adding varies thickness of EVA foam & 1mm balsa sheets where needed for elevated areas & cut into for depth elsewhere. For the knee guards, used empty plastic marker pens for the tube shaped itself as it had the right width for a screw to go down into, giving it all that depth look which I forgot to take pictures of.

Then the hardest part, priming/prepping, then wetsanding, rise & repeat til I got a near flush finish look to paint later, their were a few times where I had to repair cracks after a piece was done either from the local weather/temperate/prssure or trapped air from the 3D printed parts themselves, despite that I filled in any & all small holes & cracks with resin prior to priming & wetsanding, the worse of that was the chest piece where I had a splint down the middle horizontally on the front from the stresses of reinforcing at the back. Filled in with resin along the line so it got inside the 3D printed chest piece, adding strength & to cover the splint up then back to prepping. Next time I'm gonna have to ask to fill in 3D prints to like 80% so I don't run into these issues again, maybe cost more upfront to get something 3D printed but then I don't have to waste more money getting more resin to fill in those hollow parts, cracking under pressure trying to reinforcing the whole thing etc.

The hard part is over, I'm surprised I have such determination & patience to last this long.

Now. I'm waiting for sewing stuff to come in the mail & airsoft military elbow & knee guards coming which I will be modifying then attaching my pieces by bolting them on. I will be making pads & strapping systems for all the armour pieces to go on my body, already did the boots/shin guards pad straps so far as a test & it's working really well like the thigh guards before. Semi-tested the body straps as well which holds on it's own, works wonders.

Sorry if the photos seem to be jumbled, some reason this site is throwing them all out of order. If you have any questions, fire away, I'll answer in much detail as I can.
 

Attachments

  • 20210322_121502.jpg
    20210322_121502.jpg
    462.3 KB · Views: 177
  • 20210322_115304.jpg
    20210322_115304.jpg
    478.9 KB · Views: 154
  • 20210322_115503.jpg
    20210322_115503.jpg
    444.2 KB · Views: 149
  • 20210322_115128.jpg
    20210322_115128.jpg
    473.3 KB · Views: 138
  • 20210322_115852.jpg
    20210322_115852.jpg
    481.3 KB · Views: 150
  • 20210322_121252.jpg
    20210322_121252.jpg
    528.6 KB · Views: 138
  • 20210322_114851.jpg
    20210322_114851.jpg
    462.1 KB · Views: 150
  • 20210322_115751.jpg
    20210322_115751.jpg
    444.5 KB · Views: 137
  • 20210322_121134.jpg
    20210322_121134.jpg
    469.8 KB · Views: 143
  • 20210322_115730.jpg
    20210322_115730.jpg
    423.7 KB · Views: 134
  • 20210322_121535.jpg
    20210322_121535.jpg
    447.9 KB · Views: 130
  • 20210322_115823.jpg
    20210322_115823.jpg
    500.9 KB · Views: 129
  • 20210322_120853.jpg
    20210322_120853.jpg
    450.4 KB · Views: 125
  • 20210322_120700.jpg
    20210322_120700.jpg
    291.5 KB · Views: 138
  • 20210322_115043.jpg
    20210322_115043.jpg
    563.6 KB · Views: 132
  • 20210322_121223.jpg
    20210322_121223.jpg
    554.2 KB · Views: 136
  • 20210322_120925.jpg
    20210322_120925.jpg
    465.4 KB · Views: 131
  • 20210322_115653.jpg
    20210322_115653.jpg
    401.4 KB · Views: 135
  • 20210322_120011.jpg
    20210322_120011.jpg
    735.4 KB · Views: 124
  • 20210322_120833.jpg
    20210322_120833.jpg
    456.3 KB · Views: 126
  • 20210322_115104.jpg
    20210322_115104.jpg
    527.4 KB · Views: 132
  • 20210322_120112.jpg
    20210322_120112.jpg
    699.5 KB · Views: 125
  • 20210322_121352.jpg
    20210322_121352.jpg
    448 KB · Views: 134
  • 20210322_120939.jpg
    20210322_120939.jpg
    454.1 KB · Views: 118
  • 20210322_120844.jpg
    20210322_120844.jpg
    457.8 KB · Views: 117
  • 20210322_115535.jpg
    20210322_115535.jpg
    475.8 KB · Views: 126
  • 20210322_121036.jpg
    20210322_121036.jpg
    453.6 KB · Views: 123
  • 20210322_121602.jpg
    20210322_121602.jpg
    463.5 KB · Views: 121
  • 20210322_120817.jpg
    20210322_120817.jpg
    446.6 KB · Views: 122
  • 20210322_121640.jpg
    20210322_121640.jpg
    454.1 KB · Views: 131
  • 20210322_115148.jpg
    20210322_115148.jpg
    579.3 KB · Views: 128
  • 20210322_120157.jpg
    20210322_120157.jpg
    1,005.9 KB · Views: 129
  • 20210322_121440.jpg
    20210322_121440.jpg
    446.5 KB · Views: 124
  • 20210322_121330.jpg
    20210322_121330.jpg
    432.9 KB · Views: 126
  • 20210322_120640.jpg
    20210322_120640.jpg
    293.1 KB · Views: 121
  • 20210322_114352.jpg
    20210322_114352.jpg
    2.2 MB · Views: 133
  • 20210322_115513.jpg
    20210322_115513.jpg
    476 KB · Views: 126
  • 20210322_120726.jpg
    20210322_120726.jpg
    271.5 KB · Views: 135
  • 20210322_114837.jpg
    20210322_114837.jpg
    448.8 KB · Views: 139
  • 20201022_021405.jpg
    20201022_021405.jpg
    602.1 KB · Views: 121
  • 20201022_021345.jpg
    20201022_021345.jpg
    604 KB · Views: 127
  • 20201022_021333.jpg
    20201022_021333.jpg
    617.9 KB · Views: 130
  • 20201022_021306.jpg
    20201022_021306.jpg
    655.6 KB · Views: 134
  • 20201022_021251.jpg
    20201022_021251.jpg
    643.7 KB · Views: 132
  • 20201022_021235.jpg
    20201022_021235.jpg
    639.8 KB · Views: 135
  • received_1259472937786434.jpeg
    received_1259472937786434.jpeg
    74.3 KB · Views: 161
Here is my latest progress.

After nearly a full year carbon fibre & resin layering the back for structural strength & adding extra detail over top by adding varies thickness of EVA foam & 1mm balsa sheets where needed for elevated areas & cut into for depth elsewhere. For the knee guards, used empty plastic marker pens for the tube shaped itself as it had the right width for a screw to go down into, giving it all that depth look which I forgot to take pictures of.

Then the hardest part, priming/prepping, then wetsanding, rise & repeat til I got a near flush finish look to paint later, their were a few times where I had to repair cracks after a piece was done either from the local weather/temperate/prssure or trapped air from the 3D printed parts themselves, despite that I filled in any & all small holes & cracks with resin prior to priming & wetsanding, the worse of that was the chest piece where I had a splint down the middle horizontally on the front from the stresses of reinforcing at the back. Filled in with resin along the line so it got inside the 3D printed chest piece, adding strength & to cover the splint up then back to prepping. Next time I'm gonna have to ask to fill in 3D prints to like 80% so I don't run into these issues again, maybe cost more upfront to get something 3D printed but then I don't have to waste more money getting more resin to fill in those hollow parts, cracking under pressure trying to reinforcing the whole thing etc.

The hard part is over, I'm surprised I have such determination & patience to last this long.

Now. I'm waiting for sewing stuff to come in the mail & airsoft military elbow & knee guards coming which I will be modifying then attaching my pieces by bolting them on. I will be making pads & strapping systems for all the armour pieces to go on my body, already did the boots/shin guards pad straps so far as a test & it's working really well like the thigh guards before. Semi-tested the body straps as well which holds on it's own, works wonders.

Sorry if the photos seem to be jumbled, some reason this site is throwing them all out of order. If you have any questions, fire away, I'll answer in much detail as I can.
Its looking great! always love seeing more boots on the ground in H3 Marine Gang!

Gang Gang
 
Very sorry for not keeping a regular update on my progress, given life circumstances & COVID, progress is slow.

The past couple of weeks I have been test fitting some parts to get it all working such as the knee & upper shin armour pieces to go over my knee pads & the shoulder pieces to work well without colliding with the front chess plate piece. Given I had over-engineered the upper shin pieces by adding extra pads inside I sewed to go with the bolted knee guard pads & BDU jeans only to find it very difficult to put on, but managed to get it working now by removing those unnecessary extra pads I wasted a month or two working on.

The shoulder pieces were originally suppose to be higher but they were colliding with the front chess piece, so I lowered them, works wonders now with full free arm movement.
 

Attachments

  • 20210329_140701.jpg
    20210329_140701.jpg
    1.3 MB · Views: 136
  • 20210329_141143.jpg
    20210329_141143.jpg
    341.1 KB · Views: 117
  • 20210721_085511.jpg
    20210721_085511.jpg
    570.9 KB · Views: 136
  • 20210721_233005.jpg
    20210721_233005.jpg
    1.2 MB · Views: 130
  • 20210721_233057.jpg
    20210721_233057.jpg
    1.1 MB · Views: 137
  • 20210721_233136.jpg
    20210721_233136.jpg
    453.3 KB · Views: 124
Spinal support thingy detail on the back of the vest, sewed on & spray painted black a bit. I ain't gonna miss a detail. :lol:
 

Attachments

  • 20210801_115042.jpg
    20210801_115042.jpg
    1.3 MB · Views: 113
  • 20210802_074206.jpg
    20210802_074206.jpg
    1.6 MB · Views: 106
  • 20210802_074239.jpg
    20210802_074239.jpg
    1.6 MB · Views: 109
  • 20210802_074930.jpg
    20210802_074930.jpg
    713 KB · Views: 105
  • 20210802_160526.jpg
    20210802_160526.jpg
    913.7 KB · Views: 115
  • 20210803_093222.jpg
    20210803_093222.jpg
    761.4 KB · Views: 115
  • 20210804_180828.jpg
    20210804_180828.jpg
    774.7 KB · Views: 111
Here are some decals to go on it, had been brainstorming & extensive researching these for months to see what would it look like in-universe, so I been trying to squeeze much lore-juice as possible making these. So I took the Marine decals from Reach at the end of game & Anniversary; the hexagon decal on the shoulder armours pieces is an Army cavalry symbol of sorts if anyone is wondering, it is not used by the Marine branch as evidence as no Marine in Anniversary has it.

Also the Landfall advertisement for Halo 3 with those decals from those Marines, one decal on the back is unkown as no clear images exist across the net other than a few frames here & there on the trailer itself which is pretty blurry. So I decided to make an educated guess their might be manufacturing & distribution stickers of sorts given theirs a tint of orange on. I use to work in the graphic design/signage industry so normally warning, manufacturing & distribution labels being used in the industrial industries mostly come in yellow or orange contrasting with white or black for an asset like a power box, tools or any heavy machinery, or at least the ones here in Australia that I was contracted to do.
 

Attachments

  • 20210806_113750.jpg
    20210806_113750.jpg
    1.5 MB · Views: 122
  • 20210806_113820.jpg
    20210806_113820.jpg
    1.7 MB · Views: 129
  • 20210806_114335.jpg
    20210806_114335.jpg
    2.5 MB · Views: 132
  • 20210806_114046.jpg
    20210806_114046.jpg
    2.1 MB · Views: 129
  • 20210806_114112.jpg
    20210806_114112.jpg
    1.5 MB · Views: 127
  • 20210806_114151.jpg
    20210806_114151.jpg
    1.5 MB · Views: 125
Knee & shine guards. The pain trying to engineer a way to get them together, their bolted into the pants to prevent from slipping. :lol: that orange you see is just filler since I accidently dent it by dropping something on it from the cupboard when it was in the way.
 

Attachments

  • 20210815_010417.jpg
    20210815_010417.jpg
    1.3 MB · Views: 117
  • 20210815_013114.jpg
    20210815_013114.jpg
    1.2 MB · Views: 125
Status
Not open for further replies.
Back
Top