Vesper’s first build: MK VB

VSPR431

New Member
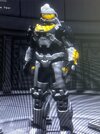
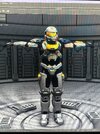
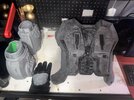
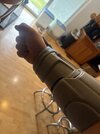
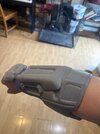
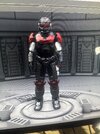
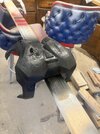
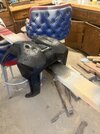
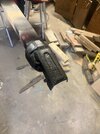
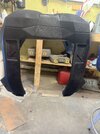
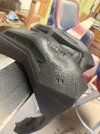
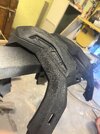
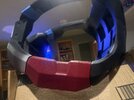
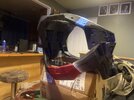
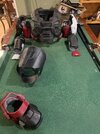
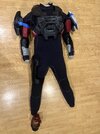
I’ve been lurking through the forums for a while through the years and been wanting to do a build and I’ve finally decided to quit procrastinating and just do it. I decided on the MK 5B because I just adore the look of halo reach’s armor.


Files:

Armor:

MK 5B by TitlewaveDesigns for the main body

UA Multi threat shoulders by TitlewaveDesigns


Attachments:

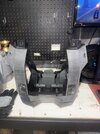
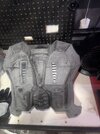
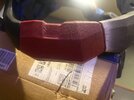
M45 Hardcase leg attachment by TitlewaveDesigns

TAAP chest attachment by TitlewaveDesigns
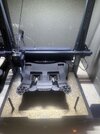
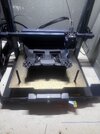
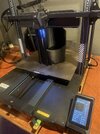


Printers:

Creality K1 Max “Spaz”

Elegoo Neptune 4 Max


Filaments

Gizmodorks HIPS

Sunlu PLA plus


I hope to have this done in a couple months or by august at the latest which I think is a pretty reasonable time frame if y’all have any tips or questions please do send them.
 

Attachments

  • IMG_5299_Original.jpeg
    IMG_5299_Original.jpeg
    2.7 MB · Views: 40
  • IMG_5298_Original.jpeg
    IMG_5298_Original.jpeg
    5.3 MB · Views: 31
UPDATE 05/19/2025:

I finally properly decided on a color scheme that i think will look great and printed nearly half of the pieces. I started with the arms since I was most worried about the fitment of those. I had a few issues with the print quality on them due to some poor tuning and incorrect filament settings but it’s all pretty easily fixed in the finishing process.

About halfway through the printing of the arms my neptune 4 max arrived (with an unfortunately broken hot end). While I finished up the arms I got to work slicing the upper body for printing on the new printer and after a week long break I started printing the back plate.

I also did some test fitment on one arm with some temporary foam to see how everything would line up. At the time of posting I’m currently printing the front plate and working on sanding the back while prepping the cod and belt for printing.
 

Attachments

  • IMG_5416.jpeg
    IMG_5416.jpeg
    1.3 MB · Views: 41
  • IMG_5415.jpeg
    IMG_5415.jpeg
    1.4 MB · Views: 37
  • IMG_5414.jpeg
    IMG_5414.jpeg
    2.1 MB · Views: 33
  • IMG_5409.jpeg
    IMG_5409.jpeg
    2.9 MB · Views: 31
  • IMG_5408.jpeg
    IMG_5408.jpeg
    2.3 MB · Views: 30
  • IMG_5324.jpeg
    IMG_5324.jpeg
    1.6 MB · Views: 32
  • IMG_5323.jpeg
    IMG_5323.jpeg
    1.3 MB · Views: 42
  • IMG_5333.jpeg
    IMG_5333.jpeg
    2.5 MB · Views: 36
Just got back into the workflow on this daunting project today. My paints finally arrived so i decided to do some tests on the pieces i currently have printed since if it doesn’t work i can always sand it back and it’ll actually help since it will fill some of those pesky little layer lines.

I took a bit of a risk and went for Montana gold paints specifically their royal red and shock black colors. I’ve never used Montana paints before but theylooked good and that had colors I liked. After a bit of testing I found that the black had a super cool texture effect due to the overspray from the high pressure that i honestly think I love. It gives this almost gritty / rough cerakote look that helps hide some of the more annoying layer lines and honestly just feels super cool. It almost looks like plastidip in the pictures so I’ll try to get some better pictures once it fully dries.
 

Attachments

  • IMG_5552.jpeg
    IMG_5552.jpeg
    2.4 MB · Views: 9
  • IMG_5550.jpeg
    IMG_5550.jpeg
    2.2 MB · Views: 7
  • IMG_5551.jpeg
    IMG_5551.jpeg
    2 MB · Views: 6
  • IMG_5556.jpeg
    IMG_5556.jpeg
    2.1 MB · Views: 6
  • IMG_5554.jpeg
    IMG_5554.jpeg
    2.5 MB · Views: 8
  • IMG_5555.jpeg
    IMG_5555.jpeg
    2.8 MB · Views: 7
Last edited:


Write your reply...

Your message may be considered spam for the following reasons:

If you wish to reply despite these issues, check the box below before replying.
Be aware that malicious compliance may result in more severe penalties.
Back
Top