[Disclaimer: sort of a long post]
Hello everyone,
It's been a while. 2017/18 I believe was the last time I had been working on something, and believe me a lot of life events and career changes occurred since then. I haven't been on the cosplay scene since 2014, and haven't build a full suit of armor since 2013 I reckon. It's led to many unfinished and unsuccessful, abandoned, projects. All you need is to check out my feed and you will see the bread crumbs. Moving several times, family emergencies, career changes, basically life taking a u-turn in the middle of the freeway kind of stuff, of and covid took a toll on the world, It felt as though I had taken my hobbies and gone into cryo-sleep...
But then....

Life slowed back down and I woke up! feeling creative and itching for making things (I promise its not just the cryo-fleas). With some money I have saved I was finally able to get myself a 3D printer. It might not be like making pepakura, but it definitely saves me time that I am spending crafting.

For those curious I bought the kit version of the MK4S. Here are some specs of the printer itself:
So far I have no complaints about the printer. It feels easy to use, and Prusa is all open source from what I gather and parts can be modified and changed via the users capabilities. My only issue I have had so far is the wireless capabilities seem to not function properly, and I don't know if it's a faulty part or something. If anyone has any clue what I'm talking about or might has had similar issues please let me know. Here is a snapshot of when I was building the thingy thing:

Anyways, All this printer construction and fuel from my love for halo led me to acquire some 3D files, and thus began my great journey...

At this point I was still learning how to position files and manipulate the settings to get the highest quality out of my printer. I also wanted to mimic the scaling of what I saw on screen for Halo infinite when chief holds Joyouse chip. The next step was to take it up a notch and print something a little larger.
With a few benchies and AI chips printed up, I felt it was time I got some files and started printing up something. I went and purchased (On sale if I remembered correctly) the MC infinite files from galactic armory, and I started to print up my next halo cosplay!


I was using armorsmith for scaling my armor which I want to say is very clunky at times, and crashes a lot for me. I am a part of the Facebook group and am currently looking into troubleshooting for myself. scaling however is and will be the bane to all of my costumes and pieces I have ever built.. I've never been able to scale things properly no matter how much time I've spent. I don't really know what I do wrong with my measurements or what I need to be looking for with the scaling factors, if there is a try and true method that works every time, please someone tell me.

I got everything prepared and started printing. I will go on to say right now that this is soooooooo much faster than building via pepakura. While I will always have a love and desire to cut and glue the paper out, this is saving my joints a significant amount of pain that occurs during the paper and glue process.


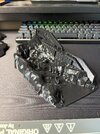
apologies for the orange sunset lighting.... but here was the final shot of the print!

From this photo above ^^^ the helmet seems a little large.

Now part of me feels so excited to see the rest of the build and how a full suit of armor will feel on my person again. I keep feeling though that this helmet is gigantic compared to my actual head. I have paused on prints recently because I am back in school to become an electrician, and I also wanted to make sure that I am scaling things correctly. maybe its all in my head, but if anyone agrees the size seems rather large please feel free to comment.
My goal for this project are simple... make something and have fun. Since it's my first project in a long time I'd rather make it and have fun making it rather than attempt to rush to the finish line for a con or premiere. I do have a vision for things I want to add to the costume, but for now I will keep the ambitions to just printing and getting all the parts together. Finishing touches with come later.
Be well, be kind, and play Halo everyone!
Hello everyone,
It's been a while. 2017/18 I believe was the last time I had been working on something, and believe me a lot of life events and career changes occurred since then. I haven't been on the cosplay scene since 2014, and haven't build a full suit of armor since 2013 I reckon. It's led to many unfinished and unsuccessful, abandoned, projects. All you need is to check out my feed and you will see the bread crumbs. Moving several times, family emergencies, career changes, basically life taking a u-turn in the middle of the freeway kind of stuff, of and covid took a toll on the world, It felt as though I had taken my hobbies and gone into cryo-sleep...
But then....
Life slowed back down and I woke up! feeling creative and itching for making things (I promise its not just the cryo-fleas). With some money I have saved I was finally able to get myself a 3D printer. It might not be like making pepakura, but it definitely saves me time that I am spending crafting.
For those curious I bought the kit version of the MK4S. Here are some specs of the printer itself:
| Build Volume | 250 x 210 x 220 mm | 9.84 x 8.3 x 8.6 in |
| Filament diameter | 1.75 mm |
| Layer height | 0.05-0.30 mm |
| Printer dimensions (without spool) | 7 kg, 500×550×400 mm; 19.6×21.6×15.7 in (X×Y×Z) |
So far I have no complaints about the printer. It feels easy to use, and Prusa is all open source from what I gather and parts can be modified and changed via the users capabilities. My only issue I have had so far is the wireless capabilities seem to not function properly, and I don't know if it's a faulty part or something. If anyone has any clue what I'm talking about or might has had similar issues please let me know. Here is a snapshot of when I was building the thingy thing:
Anyways, All this printer construction and fuel from my love for halo led me to acquire some 3D files, and thus began my great journey...
At this point I was still learning how to position files and manipulate the settings to get the highest quality out of my printer. I also wanted to mimic the scaling of what I saw on screen for Halo infinite when chief holds Joyouse chip. The next step was to take it up a notch and print something a little larger.
With a few benchies and AI chips printed up, I felt it was time I got some files and started printing up something. I went and purchased (On sale if I remembered correctly) the MC infinite files from galactic armory, and I started to print up my next halo cosplay!
I was using armorsmith for scaling my armor which I want to say is very clunky at times, and crashes a lot for me. I am a part of the Facebook group and am currently looking into troubleshooting for myself. scaling however is and will be the bane to all of my costumes and pieces I have ever built.. I've never been able to scale things properly no matter how much time I've spent. I don't really know what I do wrong with my measurements or what I need to be looking for with the scaling factors, if there is a try and true method that works every time, please someone tell me.
I got everything prepared and started printing. I will go on to say right now that this is soooooooo much faster than building via pepakura. While I will always have a love and desire to cut and glue the paper out, this is saving my joints a significant amount of pain that occurs during the paper and glue process.
apologies for the orange sunset lighting.... but here was the final shot of the print!
From this photo above ^^^ the helmet seems a little large.
Now part of me feels so excited to see the rest of the build and how a full suit of armor will feel on my person again. I keep feeling though that this helmet is gigantic compared to my actual head. I have paused on prints recently because I am back in school to become an electrician, and I also wanted to make sure that I am scaling things correctly. maybe its all in my head, but if anyone agrees the size seems rather large please feel free to comment.
My goal for this project are simple... make something and have fun. Since it's my first project in a long time I'd rather make it and have fun making it rather than attempt to rush to the finish line for a con or premiere. I do have a vision for things I want to add to the costume, but for now I will keep the ambitions to just printing and getting all the parts together. Finishing touches with come later.
Be well, be kind, and play Halo everyone!