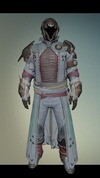
So for the longest time I have wanted to do a Destiny costume, in particular a Warlock Costume. Now with Saboten Con and The Taken King right around the corner I have finally begun work on it. Along with the costume I am working some practical effects for my costume. All of my 'Armor' pieces, aside from my helmet, will be made from Foam and the rest from a mishmash of Patterns and Fabric from the Fabric store and other items to make the costume work.
The main build will consist of
Armor-
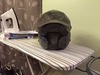
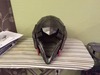
Helmet: Façade of the Hezen Lords
Arms: Gloves of the Hezen Lords
Torso: Kellbreaker's Cloak
Legs: Treads of the Hezen Lords
Warlock Bond: House of Wolves
Shader: Imogen's Fire
-----------------------------------
Not with what my armor will look like

-----------------------------------
Now along with the costume itself I am planning on adding some practical effects to the suit.
In each arm I plan on adding a Co2 jet with purple and/or red/orange LED lights, also I will add Co2 jets to the belt/cloak with white/blue LED lights.
The right hand will have a single jet under the wrist with a LED beside it and one in the palm and a trigger attached to my index finger. The goal with this is when I flex my hand it will emulate the Energy Drain/Scorch effect with the light illuminating the Co2
The left hand will have two jets set up to emulate the Orb of Light the Warlocks hold in the loading screen or a Vortex/Solar Grenade. It will have the same trigger and light setup as the right hand.
Now the belt will have three or four jets aimed down each with Ultra-bright LED lights that when turned on will give the glowing jet effect that emulates the Glide ability of the Warlocks.
-------------------------------------
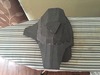
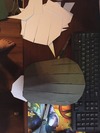
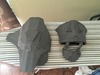
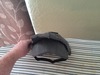
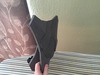
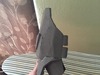
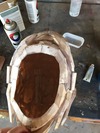
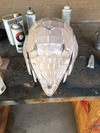
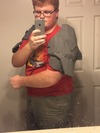
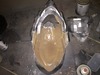
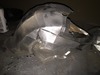
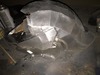
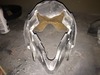
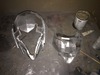
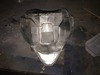
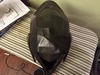
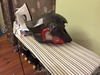
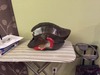
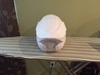
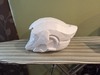
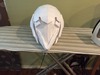
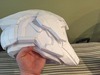
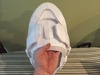
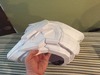
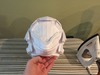
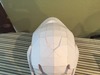
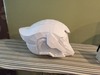
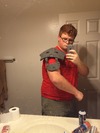
Finally on to what I have done with this project. So far I have my helmet assembled and resined I am just waiting for it to cure. Also for my helmet I sized this perfectly... a little too perfect. This helmet is too small to fit over my head, however it is good if it 'materialized' around my head. Now I do have a plan for the issue of the size, the back has a hinge that makes the back half spits and allows me to open the helmet. and in reverse clamp it around my head. Finally for tonight I have finished my left shoulder and how I just need to Detail and clean it up a bit. Next up are the right Shoulder the forearms and my 'Treads of the Hezen Lords'.


The main build will consist of
Armor-
Helmet: Façade of the Hezen Lords
Arms: Gloves of the Hezen Lords
Torso: Kellbreaker's Cloak
Legs: Treads of the Hezen Lords
Warlock Bond: House of Wolves
Shader: Imogen's Fire
-----------------------------------
Not with what my armor will look like
-----------------------------------
Now along with the costume itself I am planning on adding some practical effects to the suit.
In each arm I plan on adding a Co2 jet with purple and/or red/orange LED lights, also I will add Co2 jets to the belt/cloak with white/blue LED lights.
The right hand will have a single jet under the wrist with a LED beside it and one in the palm and a trigger attached to my index finger. The goal with this is when I flex my hand it will emulate the Energy Drain/Scorch effect with the light illuminating the Co2
The left hand will have two jets set up to emulate the Orb of Light the Warlocks hold in the loading screen or a Vortex/Solar Grenade. It will have the same trigger and light setup as the right hand.
Now the belt will have three or four jets aimed down each with Ultra-bright LED lights that when turned on will give the glowing jet effect that emulates the Glide ability of the Warlocks.
-------------------------------------
Finally on to what I have done with this project. So far I have my helmet assembled and resined I am just waiting for it to cure. Also for my helmet I sized this perfectly... a little too perfect. This helmet is too small to fit over my head, however it is good if it 'materialized' around my head. Now I do have a plan for the issue of the size, the back has a hinge that makes the back half spits and allows me to open the helmet. and in reverse clamp it around my head. Finally for tonight I have finished my left shoulder and how I just need to Detail and clean it up a bit. Next up are the right Shoulder the forearms and my 'Treads of the Hezen Lords'.
Attachments
-
 CB368099-4C47-493E-B435-0005182F8133_zpsksgk7zyy.jpg176.1 KB · Views: 393
 -
 0EC06677-29A3-4F6A-8F35-373FA41FA644_zpskq0pugrs.jpg181.9 KB · Views: 423
 -
 EB0EF75E-9846-4C2D-A598-131A0B0D8E5B_zps5zhxuyfa.jpg196.9 KB · Views: 450
 -
 449CD47E-56BB-449D-82EF-785FD906D6E2_zpssqoqo1yg.jpg105.7 KB · Views: 425
 -
 B634D7C0-4A10-4AEE-B3E2-AB0CCA2C6B98_zpsvcqfw91m.jpg174.4 KB · Views: 395
 -
 28D92524-0ED5-48B1-AD82-83CE6A36478B_zpsnkdosev2.jpg174.7 KB · Views: 401
 -
 AAB22D55-A225-42B7-93E9-2CB7F0F74F54_zpsg5qut2wd.jpg187.8 KB · Views: 370
 -
 EBB833A6-B7A9-4901-93AF-07CF6830DF90_zpsymbg0ns2.jpg184.6 KB · Views: 379
 -
 58DCD7FA-C514-4557-B618-6B52A3098745_zpshe57iaw5.jpg174.3 KB · Views: 405
 -
 6102B263-CF08-4415-98BF-9300464FD0F5_zpsofdscsio.jpg188.4 KB · Views: 401
 -
 66E85EC5-1809-4BC7-8AC6-081E5ADAE0E4_zpsbloquwml.jpg218.5 KB · Views: 403
 -
 41B0FE9A-97C4-4763-9B32-8DDF63567971_zps4xmxfroh.jpg196.5 KB · Views: 407
")