You are using an out of date browser. It may not display this or other websites correctly.
You should upgrade or use an alternative browser.
You should upgrade or use an alternative browser.
Aztlan's Halo 4 Rogue + Binary Rifle + M6H + Exo-suit WIP, PIC HEAVY!
- Thread starter EVAkura
- Start date
- Status
- Not open for further replies.
Hi EVAkura! build is looking great! quick question, what brand foam do you use?
I want to thank you all for the very kind words! Inspiring I tell you!
Nerdtron99, I use three types of foam. One is your standard EVA puzzle style floor mats. I got those from "we sell mats.com". I also use Foamies brand craft foam in both 2mm and 6mm thickness (I actually like the fact that their 2mm is not consistent in thickness). Lastly, I use Wal-Mart's craft foam they carry. It is nice because it comes in 18" length and is cheap. It has a very different texture than Foamies brand though. It seems to be squishier, whereas the Foamies brand is more dense, so it allows for more accurate cuts (especially angles).
I will be finishing up the minor detail work to the rifle either today or tomorrow. This brings me to my question.
BIG TIME QUESTION!!!!!!!!!! As I am about finished with the details, I am coming to the "hardening" stage. My plan is to use PVA as my base, and go from there. Is there any wicked advice or words of caution anyone can throw out? I would hate to have come this far, just to use a sub-par method when there may be something far better.
Last edited by a moderator:
Not sure if you knew but dont use Resin or Bondo. It will eat away at the foam. As for hardening ive heard Plastidip can be used to seal it which may point you in a direction. Platidip comes in a spraypaint can at hardware stores, ive seen it at Home Depot.
Thanks!
Today has been the fine details once again. This is taking a lot longer than I thought it would, but I have been taking my time and it seems that I measure at least 5 times before making cuts.
This is just a quick update to let y'all know I am still working hard (no less than 10 hours a day) and will keep you posted.
In addition, I realized that I had not taken a shot with me holding it for scaling purposes. Well, that is now rectified. Here you go!


Seriously.......wow!!!! That's one bfg!!
Attachments

Thanks ep82
I guess I should have been a little bit more descriptive with my intentions before I asked the question.
I tested four methods for coating my EVA foam. In each, where applicable, the process is as follows. The temperature was 71.5F with humidity at 49%. The PVA was lightly diluted with about 5 drops of water per ounce. The PVA was allowed to dry completely before each stage. I added two additional layers of PVA to each test piece with my new method of "wet sanding" in between each coat and also on the last coat. For "wet sanding" the PVA, I simply wait for the layer to dry completely (has gone clear), then take a piece of EVA and on the top side (most flat surface), I dip in water and "sand" the glued surface. It will reconstitute just the surface, allowing me to level and perfect it. When completed properly, the surface closely resembles glass. The Spray adhesive was allowed to flash for 30 minutes before coating over it. The plasti-dip was added as a light coating from approximately 12 inches distance, for three passes.
My methods were:
Just wood glue, then plasti-dip
RESULT: This is by far the best solution. The surface was absolutely perfect.
Wood glue, then Spray Adhesive, then plasti-dip
RESULT: Minus a bit of blotching with the plasti-dip, this was a clear second.
Spray Adhesive, then wood glue, then plasti-dip
RESULT: I noticed that the spray adhesive creates micro bubbles with the PVA that I can not seem to get rid of. I even waited for 30 minutes to let it flash off before adding the PVA. This resulted in an interesting effect that would be awesome if I were going for the texture similar to something that had rusted previously. Other than that, this was not the best and will tie for third.
Spray Adhesive, then wood glue, then spray adhesive, then plasti-dip
RESULT: Pretty much the same as above, but with just a fraction less texture. Still, this one ties for third and falls far behind the number one solution.
I appreciate your input for those that have given it. I know the evils of PVA is non-bendability, but it is a weapon, so it will be my bad if I ever put it under that stress! It is so bolstered with aluminum channels that the weapon now has practically zero bend or movement, so that should help I know the evils of plasti-dip coming in contact with hot glue, as it has a tendency to eat away at it, hence the PVA barrier (as well as the fact that the PVA allows me to level it out). I also know not to use chemicals such as bondo or resin. The only place those were applied was to the light boxes which were made of craft sticks and cardstock. All in all, this stage is the one I am most nervous about, but I figure if I am diligent enough with my testing, I should prevail and you all will have some solid information to read about. I also think it may have been a bit unfair of me to ask the question in the first place because that puts too much potential stress on the person answering.
The test pieces are now drying for their first go-around and I will get back to you when they are done.
I guess I should have been a little bit more descriptive with my intentions before I asked the question.
I tested four methods for coating my EVA foam. In each, where applicable, the process is as follows. The temperature was 71.5F with humidity at 49%. The PVA was lightly diluted with about 5 drops of water per ounce. The PVA was allowed to dry completely before each stage. I added two additional layers of PVA to each test piece with my new method of "wet sanding" in between each coat and also on the last coat. For "wet sanding" the PVA, I simply wait for the layer to dry completely (has gone clear), then take a piece of EVA and on the top side (most flat surface), I dip in water and "sand" the glued surface. It will reconstitute just the surface, allowing me to level and perfect it. When completed properly, the surface closely resembles glass. The Spray adhesive was allowed to flash for 30 minutes before coating over it. The plasti-dip was added as a light coating from approximately 12 inches distance, for three passes.
My methods were:
Just wood glue, then plasti-dip
RESULT: This is by far the best solution. The surface was absolutely perfect.
Wood glue, then Spray Adhesive, then plasti-dip
RESULT: Minus a bit of blotching with the plasti-dip, this was a clear second.
Spray Adhesive, then wood glue, then plasti-dip
RESULT: I noticed that the spray adhesive creates micro bubbles with the PVA that I can not seem to get rid of. I even waited for 30 minutes to let it flash off before adding the PVA. This resulted in an interesting effect that would be awesome if I were going for the texture similar to something that had rusted previously. Other than that, this was not the best and will tie for third.
Spray Adhesive, then wood glue, then spray adhesive, then plasti-dip
RESULT: Pretty much the same as above, but with just a fraction less texture. Still, this one ties for third and falls far behind the number one solution.
I appreciate your input for those that have given it. I know the evils of PVA is non-bendability, but it is a weapon, so it will be my bad if I ever put it under that stress! It is so bolstered with aluminum channels that the weapon now has practically zero bend or movement, so that should help
I know the evils of plasti-dip coming in contact with hot glue, as it has a tendency to eat away at it, hence the PVA barrier (as well as the fact that the PVA allows me to level it out). I also know not to use chemicals such as bondo or resin. The only place those were applied was to the light boxes which were made of craft sticks and cardstock. All in all, this stage is the one I am most nervous about, but I figure if I am diligent enough with my testing, I should prevail and you all will have some solid information to read about. I also think it may have been a bit unfair of me to ask the question in the first place because that puts too much potential stress on the person answering.The test pieces are now drying for their first go-around and I will get back to you when they are done.
Last edited by a moderator:
JayOneSeven
Jr Member
Sounds like you can't go wrong with all of that testing!
This is all new to me as I've always used the pepakura method, and haven't even touched a piece of foam yet. Extremely informative though, I didn't even know about the PVA barrier technique, so I'm gonna keep up to date on this so if I ever do make something with foam, I can follow your tips :] Great work so far, and that picture with you holding the rifle looks insanely good.
Good luck with the testing!
I apologize ahead of time for posting this so close to my previous one, but I wanted to make sure that everyone had a good chance to see the results of the test. They are posted on #109. I was pleasantly surprised with the results and feel much more confident continuing to the hardening after taking the time to perform the tests.
This is an amazing build. The Binary Rifle looks like a beast! Do you foresee it being hard to hold while wearing your armor?
This is an amazing build. The Binary Rifle looks like a beast! Do you foresee it being hard to hold while wearing your armor?
I don't think the weapon will be too difficult to carry while wearing the armor, but I believe that it will be impossible to aim the weapon properly since I will not be able to sink it into my shoulder, nor will be able to get a cheek weld! But, that is fine since it is just a prop I guess
Next for me is my handy, dandy sidearm with a special twist. My goal with my repurposed cell phone that I used in the Binary Rifle was to use every part of it. So far, I have used the screen, camera, and main circuit board with the battery as the scope. The back plate was used as the AA battery access panel that supplies power to the LEDs I installed. That left one part. The slider mechanism. I will incorporate this in my pistol build.
More on that after I have a portion of it built so I can demonstrate with photos.
Just a real quick video that I made demonstrating my plans for the M6H pistol I am making.
Now that I have overcome the hurdle of making a quick video and posting it, I will do one for the Binary Rifle soon. It is coming to it's closing stages! WOOHOO!!!
Now that I have overcome the hurdle of making a quick video and posting it, I will do one for the Binary Rifle soon. It is coming to it's closing stages! WOOHOO!!!
Last edited by a moderator:
You are AWESOME ! Can´t wait to see more pictures.
Pat-
Can´t wait to see more pictures.Pat-
You are AWESOME !
Pat-
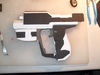
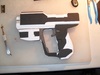
Thanks Pat! Here is a couple more pics of what I have accomplished so far today. Man, this pistol was soooo much easier than the Binary Rifle!!!! Also, I ended up deviating from the original sliced model due to the fact that it was missing most of the key contours. I am not looking for total game accuracy, but I want it to be at least a bit close!
Slide forward.

Slide back

Attachments

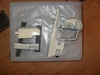
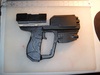
So, here we are, waiting for the Plasti-dip to cure for four hours before I can break out the paint and finish this bad boy! Sadly, this was the last piece I started and will be the first piece finished! Luckily, the binary rifle will follow shortly... then I can finally get back to the Rogue set.
A couple of progress pics for ya.
Coating the pistol in wood glue. (I found out that lightly sanding with a piece of dirty and used 220 grit makes the glue adhere perfectly)

And here is where I am now... patiently waiting

A couple of progress pics for ya.
Coating the pistol in wood glue. (I found out that lightly sanding with a piece of dirty and used 220 grit makes the glue adhere perfectly)

And here is where I am now... patiently waiting

Attachments
JayOneSeven
Jr Member
Looking great :] I've always wanted to make weapons too!!
After my Ironman I'm planning to do a storm trooper, so I'll make the rifle too. Until then, I'll have to get my fix by following your progress!! Keep it up :]
After my Ironman I'm planning to do a storm trooper, so I'll make the rifle too. Until then, I'll have to get my fix by following your progress!! Keep it up :]
- Status
- Not open for further replies.