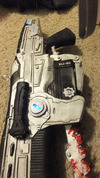
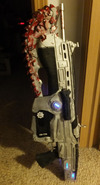
COG Armor aka First Date with EVA (Foam Build, WIP/Pic Heavy)

Status
Not open for further replies.
You might wanna put a coat of spray paint on the inside to cover up what's left of the pink XD that way you won't have anyone laughing :p sweet build I love gears of war also,and I'm surprised I missed this!
 
Figured it was time for another update. I have more pics than this because I'm 95% done at this point (with about 9 days to go until my Halloween party), but I'll share what I have uploaded for now.

The Belt!

First, a few reference shots of what I was trying to pull off:
belt.jpg

I'll be editing this piece a bit and taking a few liberties. First, I'll be omitting one of the pouches on each side... my waist just isn't as big as these guys and I actually want the pouches to functional. After a few tests I also decided to drop the hip pad things. They were butting up to the chest piece too much and didn't add what I wanted them to aesthetically, plus I've been running behind my schedule for awhile. Also, my pouches are missing a few adornments. If I get time I might get around to them, but I think they still look good and these sort of nitpicks are the reason I'm running about 3 weeks behind my original timeline.

The front:
DSCF2197.jpg

Back plate closeup:
DSCF2200.jpg

Basic belt plastidipped. I added all the pouches and other attachments later.
DSCF2205.jpg

For the pouches, I had to do them a bit differently than I did the boot pouches since I wanted these to be functional. I'm starting with a thinner piece of craft foam (still strong enough to hold items). I wanted a final product that's somewhat 'flexible' with a canvas ammo bag might be, plus if I went with the thick stuff I would have have to make the pouches twice as big to account for the extra internal depth.

DSCF2214.jpg

I created a 'form' (the white/pink piece) out of thicker foam and build around this with thinner foam for each pouch. This helped in hot gluing the thing together and retaining the shape. Once I had the shape I pulled the form out.

DSCF2212.jpg

Using duck cloth to cover.
DSCF2213.jpg

'Leather' straps.
DSCF2227.jpg

DSCF2228.jpg

DSCF2230.jpg

I have pics of the enclosures for the pouches, but they must be on the other card. I'll try to post them with the full belt update.

The belt in-game has this canister sort of thing on one side. I think it's the grenade... in the shots I took from the actual game it's not there, but I think I had no grenades at that point. Since I'm wearing this to a party I wanted to repurpose this as a beer bottle holder/koozy. I plan to add a removable topper so it will look more screen-accurate for pics as well, but that's on the tail end of priorities...

DSCF2231.jpg

DSCF2242.jpg

In my next update I'll show completed belt pics (including connectors), my gauntlet things, and the Lancer!
 

Attachments

  • belt.jpg
    belt.jpg
    119.9 KB · Views: 145
  • DSCF2197.jpg
    DSCF2197.jpg
    96 KB · Views: 131
  • DSCF2200.jpg
    DSCF2200.jpg
    84.5 KB · Views: 146
  • DSCF2205.jpg
    DSCF2205.jpg
    109.4 KB · Views: 156
  • DSCF2214.jpg
    DSCF2214.jpg
    54.2 KB · Views: 138
  • DSCF2212.jpg
    DSCF2212.jpg
    67.8 KB · Views: 140
  • DSCF2231.jpg
    DSCF2231.jpg
    54.7 KB · Views: 133
  • DSCF2230.jpg
    DSCF2230.jpg
    79.6 KB · Views: 152
  • DSCF2228.jpg
    DSCF2228.jpg
    47.9 KB · Views: 141
  • DSCF2227.jpg
    DSCF2227.jpg
    56.7 KB · Views: 134
  • DSCF2213.jpg
    DSCF2213.jpg
    75.7 KB · Views: 156
  • DSCF2242.jpg
    DSCF2242.jpg
    53.6 KB · Views: 134
Holding this thing on is a clip from a dollar store dog collar.

DSCF2908.jpg

And the pouches are all sealed with some magnetic clasp things that are for purses. Got a bunch of these for cheap on Ebay. My main regret with the pouches that I discovered after they were all done is that the pouches close sort of weirdly, so there's a visible crack there where I can see inside the pouch (and thus the unfinished colorful foam inside).

DSCF2918.jpg

Finished* belt from the front: (* Minus potentially the canister top)

DSCF2910.jpg

Belt from the back:

DSCF2915.jpg

Here's one of the arm bracers (I keep calling them gauntlets even though I know that's incorrect). I have some fingerless combat-style gloves that will go with these. I'm not posting the progress photos because there's just not that much to them. Technically, the bracers I'm referencing don't have rivets in them, but they just looked really strange when I did it without them, the least 'metal' of anything I'd done to that point. It sort of needed the rivets to sell the effect of a metal plated bracer, and since some of the other Gow3 characters had rivets on their bracer variations I figured it wasn't too much of a stretch.

DSCF2907.jpg
 

Attachments

  • DSCF2910.jpg
    DSCF2910.jpg
    65.7 KB · Views: 106
  • DSCF2915.jpg
    DSCF2915.jpg
    60.9 KB · Views: 122
  • DSCF2918.jpg
    DSCF2918.jpg
    60.1 KB · Views: 100
  • DSCF2908.jpg
    DSCF2908.jpg
    72.8 KB · Views: 112
  • DSCF2907.jpg
    DSCF2907.jpg
    48.2 KB · Views: 101
DSCF2212.jpg

DSCF2908.jpg


Your materials crack me up!

It's amazing what you're accomplishing, though. This is looking great! Keep it up!
 

Attachments

  • DSCF2908.jpg
    DSCF2908.jpg
    72.8 KB · Views: 134
  • DSCF2212.jpg
    DSCF2212.jpg
    67.8 KB · Views: 96
Disney princess EVA foam. To be honest I would have put that on the outside XD. It would be painted over anyway and would be a good joke for a while.
 
Only problem with that is there is a slight texture to the 'princess' side that wouldn't have passed as metal in any way.
 
I'll bet there's not nearly as many air bubbles in those Disney Princess floor mats as there are in the ones you buy from Harbor Freight.
 
Caprathia,
It does seem a bit smoother although there are still some in there. The biggest difference is it is way easier to cut with the hot knife, plus the princess side is smooth enough I didn't need to sand it when 'sandwiching' layers.

On to the Lancer!

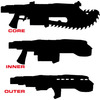
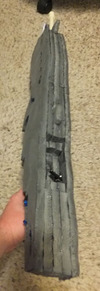
I basically started with a side view lineart drawing of the gun. I decided it needed to be 5 layers deep of the standard thickness floor mat foam (which I finally found) since the princess mats are only 11"x11" or so and I wanted the outside pieces to be continuous with no obvious seam. In Photoshop I duplicated this layer 3 times, shown here:

lancer-layers.jpg

Basically the plan was to sandwich 5 layers together, with a single 'core' layer in the center, an 'inner' layer on either side of that, and the 'outer' layers outside those.

Here is the raw result, not yet glued together.

DSCF2248.jpg

Here is my trigger in place. It doesn't do anything, but it is spring loaded and fun.

DSCF2845.jpg

Here are lights in place. Sadly I have no pics of the mess of wire canals inside this thing, probably because it was just a pain to stuff them all in in first place that once I got the thing closed I glued it all shut.

DSCF2836.jpg

All together, here's the top view to see the layers.

DSCF2848.jpg

A shot of the battery compartment. Finished shots later. Also, I had to use some foam putty filler to smooth out the top, since somewhere in the pattern cutting-tracing-foam cutting process the pieces were slightly misaligned. This made my cover pieces lumpy so I tore them off and had to smooth the surface down.

DSCF2858.jpg

Started detailing the chainsaw part.

DSCF2839.jpg

Fine detail of the forend (is that correct?) cover.

DSCF2852.jpg

I added the clip holder bar thing after the fact.

DSCF2870.jpg

With most of the detail layers applied, various heights of foam plus a few other things here and there. Light covers are off at this point because I was smart this time and plastidipped/spray painted those pieces separately to glue them on later, allowing me to paint them fully without masking issues.

DSCF2882.jpg

Plastidip time!
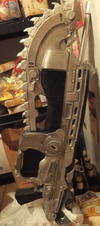
DSCF2892.jpg
 

Attachments

  • DSCF2248.jpg
    DSCF2248.jpg
    38.1 KB · Views: 101
  • lancer-layers.jpg
    lancer-layers.jpg
    46.3 KB · Views: 104
  • DSCF2845.jpg
    DSCF2845.jpg
    68.5 KB · Views: 107
  • DSCF2839.jpg
    DSCF2839.jpg
    53.4 KB · Views: 100
  • DSCF2858.jpg
    DSCF2858.jpg
    44.7 KB · Views: 105
  • DSCF2848.jpg
    DSCF2848.jpg
    36.7 KB · Views: 110
  • DSCF2836.jpg
    DSCF2836.jpg
    58.1 KB · Views: 116
  • DSCF2870.jpg
    DSCF2870.jpg
    59.2 KB · Views: 106
  • DSCF2892.jpg
    DSCF2892.jpg
    83.2 KB · Views: 94
  • DSCF2882.jpg
    DSCF2882.jpg
    47.7 KB · Views: 115
  • DSCF2852.jpg
    DSCF2852.jpg
    55.6 KB · Views: 101
I was a little dubious about that lancer in the first pics, but in that last one it looks freaking awesome man!! You definitely should have used some of that princess foam on it though LOL! Makes me crack up every time I open your thread. This look like they're coming along nicely, keep up the good work!
 
The great thing is that it's really lightweight but still has a bit of visual heft to it when I carry it, if that makes sense. It's also pretty bump resistant, aside from a few potential weak points (the sights).

I should mention I had a grander overly ambitious plan for this in the beginning. I was going to take a motorized chainsaw from a kids toy and incorporate it into the piece. Problem was the saw was so small I would have needed to really mess with the proportions to make it even sort of work, and then it would have been about a foot shorter. As it stands now it is only a few inches less than true scale (32" instead of 36"), which I did for both practical purposes (fitting within the diagonal dimensions of the foam square) and aesthetic (I'm not as huge as the guys in the game, so this scales better alongside my armor). I also had a cheap sound fx chip thing for gun sound effects, but it crapped out on me when I was ready to put this together and I didn't have time to get another ready... and since those pieces would be internal I really couldn't work on anything else until I had them in place. So I decided to scrap them.

On to more pics!

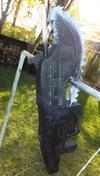
After a basic silver and black paint.

DSCF2916.jpg

The side handle they use to hold the saw in 'chainsaw position'. I used a cheap little hinge because this was sort of an 'if I have time' add-on for me. It's probably the flimsiest part of the gun when opened, but I figured I'll only extend it out a few times for pics. I put little magnets in place to hold it against the gun when not in use.

DSCF2924.jpg

DSCF2948.jpg

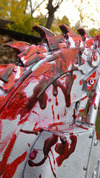
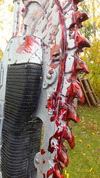
Now I wanted this bloody. I some prefer them 'clean' and I thought this over. But for me, it's a chainsaw and this is for Halloween, right? Plus I figured it would hide a few imperfections in my saw blades.

The problem I have with many blood aplications (including the official replica) is that it looks like red paint. I wanted this to have that sort of translucent, shimmery wet gory look. I also wanted it to be permanent and not something that would smear off or be sticky (like corn syrup blood). What I ended up doing was mixing Mod Podge with red food coloring and slathered it on the blades. I also spritzed some store-bought fake blood (the kind that dries nicely) on there to add a bit of a spatter effect. The Mod Podge dried perfectly into a nice shimmery shell, although I had to go over a few spots with a red magic marker because it dried a bit 'pinkish' here and there.

DSCF2937.jpg

DSCF2942.jpg

DSCF2939.jpg

DSCF2946.jpg

Completed shots, with lights on.

DSCF2970.jpg

DSCF2976.jpg

DSCF2978.jpg

DSCF2977.jpg

DSCF2981.jpg

And the finished battery compartment. I was going to use some magnets to hold it in, but it wedges in there just right so it's unnecessary.

DSCF2983.jpg
 

Attachments

  • DSCF2916.jpg
    DSCF2916.jpg
    57.6 KB · Views: 104
  • DSCF2924.jpg
    DSCF2924.jpg
    33.2 KB · Views: 107
  • DSCF2948.jpg
    DSCF2948.jpg
    48 KB · Views: 104
  • DSCF2942.jpg
    DSCF2942.jpg
    98.9 KB · Views: 95
  • DSCF2937.jpg
    DSCF2937.jpg
    108 KB · Views: 112
  • DSCF2976.jpg
    DSCF2976.jpg
    55.4 KB · Views: 99
  • DSCF2978.jpg
    DSCF2978.jpg
    45.5 KB · Views: 108
  • DSCF2946.jpg
    DSCF2946.jpg
    118.4 KB · Views: 97
  • DSCF2939.jpg
    DSCF2939.jpg
    101.8 KB · Views: 112
  • DSCF2970.jpg
    DSCF2970.jpg
    50.9 KB · Views: 113
  • DSCF2977.jpg
    DSCF2977.jpg
    77.6 KB · Views: 102
  • DSCF2981.jpg
    DSCF2981.jpg
    59.2 KB · Views: 94
  • DSCF2983.jpg
    DSCF2983.jpg
    67.2 KB · Views: 100
My gosh, this build is amazing! I have to say, even with the princess foam (lol) this is the best G.O.W build I have seen. And that lancer.... Wow, just wow. There have been some descents suits, but up until this point I had yet to see an impressive lancer. But this one looks great. This is an awesome set of armor, are you planning on going to lots of Halloween parties in it? That's sure to take people's breath away.
 
Agreed, especially because it's a foam weapon. I've seen some awesome replica weapons but the foam ones sometimes leave something to be desired. This one, however, is about as good as it gets. I would perhaps dry brush it with a little dirt to go along with that blood, just so it doesn't look quite so shiny, but hats off to you!
 
Thanks for the kind words. I'm pretty happy with the way it has all turned out, and I really learned a lot on this build. I'm already tot he point where there are things I would probably do differently if I was starting over, but that's how the learning process works. I'm already excited for my next one and I'm not even 100% done with this one yet. :)

With a few days to go until the Halloween party I have all the vital pieces done and can move on to the extraneous things... like my GloSpex hack idea.
 
Okay, so finished build pics! These were done in mostly darkness but my friend's camera is pretty amazing so they turned out very well, in my opinion. I went with a Marcus style skullcap since I felt I needed some sort of headgear (and since I'm doing a sort of amalgram of characters).

1381323_10151684125630754_338765121_n.jpg

This may be my favorite shot. My friend just happened to have some military containers he picked up at an auction, so they made a pretty good prop for my costume. He also had a fog machine going in the yard for his graveyard scene (which can be seen in the background).
579068_10151684125775754_75518925_n.jpg

Fog machine made this one look great, as well. Having seen these later I wish I would have timed a few more with the fog machine 'releases'.
1385103_10151684125315754_1641028123_n.jpg

1385882_10151684125330754_1362659542_n.jpg

1380284_10151684125365754_165658272_n.jpg

561607_10151684125710754_877442792_n.jpg

B&W looks pretty cool, too.
996662_10151684125680754_652678552_n.jpg

Just the lights.
564512_10151684125575754_1969240509_n.jpg

Also, I should this since I didn't cover it earlier... the goggles are a pair of GloSpex. I wear glasses, so I popped the lenses out of an old pair of glasses (ones with smaller lenses) and found a pair of children's sunglasses at the dollar store that they 95% fit into. I dismantled these and mounted them into the GloSpex, then I detached the GloSpex power/control box from the GloSpex arms and replaced the arms with a 'leather' strap (since I have the way the GloSpex arms look plus I wanted it to look more like something from the game). The end result sort of looks like a combo of Baird's goggles and Griffin's shades (plus the lenses in the helmets), so I think it fits into the universe.
 

Attachments

  • 579068_10151684125775754_75518925_n.jpg
    579068_10151684125775754_75518925_n.jpg
    74.2 KB · Views: 102
  • 1381323_10151684125630754_338765121_n.jpg
    1381323_10151684125630754_338765121_n.jpg
    73.2 KB · Views: 103
  • 561607_10151684125710754_877442792_n.jpg
    561607_10151684125710754_877442792_n.jpg
    96.7 KB · Views: 90
  • 1380284_10151684125365754_165658272_n.jpg
    1380284_10151684125365754_165658272_n.jpg
    94.5 KB · Views: 98
  • 1385882_10151684125330754_1362659542_n.jpg
    1385882_10151684125330754_1362659542_n.jpg
    79.1 KB · Views: 105
  • 1385103_10151684125315754_1641028123_n.jpg
    1385103_10151684125315754_1641028123_n.jpg
    58.5 KB · Views: 94
  • 996662_10151684125680754_652678552_n.jpg
    996662_10151684125680754_652678552_n.jpg
    57 KB · Views: 108
  • 564512_10151684125575754_1969240509_n.jpg
    564512_10151684125575754_1969240509_n.jpg
    13.5 KB · Views: 90
Status
Not open for further replies.
Back
Top