Constructing marine armor

Status
Not open for further replies.
It's Tuesday and I am late. Sorry but things got in the way. Now that I have the computer, allow me to update this thread.
halo_3_unsc_armor_build_11_by_gyro5-d3apg8u.jpg

This was finished Saturday. I am rather mighty proud at this for it fits me fairly well.
halo_3_unsc_armor_build_12_by_gyro5-d3apgdu.jpg

Muahahaha! Taken and finished Sunday. Amazing what 23 pages can make. I have a game plan set for how to combine all of these pieces and I want to discuss some ideas and opinions.
halo_3_unsc_armor_build_13_by_gyro5-d3apgnv.jpg

Taken late last night. This is a combo of Monday's work and the beginning of Tuesday's work on the helmet. I am doing 3 pages a day because it is beginning to get tiresome.
halo_3_unsc_armor_build_14_by_gyro5-d3apgrr.jpg

The end of today's assigned build. Pages 1-6 are done. Pages 7-11 are scored. Not much but the ear pieces fit over my ears well. Hopefully tomorrow's 3 pages, I can start to "sow" these pieces together.

I have an old cingular cell and AT&T disabled all cingular services yesterday I must get a new one ASAP. While I am at it, I can get a new mouthpiece closely resembling those used by the marines. Sweet, right?
 

Attachments

  • halo_3_unsc_armor_build_11_by_gyro5-d3apg8u.jpg
    halo_3_unsc_armor_build_11_by_gyro5-d3apg8u.jpg
    101.7 KB · Views: 107
  • halo_3_unsc_armor_build_12_by_gyro5-d3apgdu.jpg
    halo_3_unsc_armor_build_12_by_gyro5-d3apgdu.jpg
    109.6 KB · Views: 95
  • halo_3_unsc_armor_build_13_by_gyro5-d3apgnv.jpg
    halo_3_unsc_armor_build_13_by_gyro5-d3apgnv.jpg
    89 KB · Views: 84
  • halo_3_unsc_armor_build_14_by_gyro5-d3apgrr.jpg
    halo_3_unsc_armor_build_14_by_gyro5-d3apgrr.jpg
    107.9 KB · Views: 105
When it comes time of the torso, I am slightly puzzled. I will like to use this image found on gamersnook.com as a reference.
marine.jpg

This figure of the marine has packs on where I thought was exposed strap like this from the original designer, vrogy.
http://www.flickr.com/photos/vrogy/3917980143/in/set-72157621850200490/
But after seeing other images, I am going to use magnets and metal or velcro. I am planning on decking out with pouches so what is your opinion?
 

Attachments

  • marine.jpg
    marine.jpg
    16.9 KB · Views: 95
Can't help you with the strapping issue, since that's the part I'm going to be the most clueless about when I get to that point! :)

However, your progress is looking good so far. I also enjoyed seeing the other random things on your work area! (I have the same phone, use BSI Ca glues, and is that half-pipe? )
 
The pipe is my brothers and no, he does not smoke. He just has it cause it looks good and more railroadish. He is going through a british railroading craze and thank you Road Kill (cool name) and Spitfire22V (also cool name). I have a plan guys and I will discuss it here when I am done with today's update.
halo_3_unsc_armor_build_15_by_gyro5-d3argkj.jpg

halo_3_unsc_armor_build_16_by_gyro5-d3argnf.jpg

Starting on page 7-9 in the WEEEE hours of the morning like say 12:00 AM to 2:00 AM then again at 10:00 AM to 12:00 PM and went on a road trip and between 3:30 PM to almost 4:00 PM, I finished todays goal. Pages 10-15 are already scored and ready to be cut. Now I am this far, my next endeavor is weapons. Anyone with PDF's, please PM me.
 

Attachments

  • halo_3_unsc_armor_build_15_by_gyro5-d3argkj.jpg
    halo_3_unsc_armor_build_15_by_gyro5-d3argkj.jpg
    101.5 KB · Views: 98
  • halo_3_unsc_armor_build_16_by_gyro5-d3argnf.jpg
    halo_3_unsc_armor_build_16_by_gyro5-d3argnf.jpg
    90.9 KB · Views: 103
this was the first build i did before i ranked up to ODST... good choice. you should also do the naval pilot helm too just so you can fly the pelican too.... Also i know it seems stupid but you should pep those arms that attach the front plate to the back on the torso... they are in fact in game. even though they look ridiculous.
 
I did do them gakkengod. They are each two pieces per side and I am already working on a way to make them both flexible and sturdy. I just need to do my own pepakura to place the smaller shoulder pieces. Either that or a piece of leather which may be expensive. Ideas anyone?
 
Today's update. Goals completed. Pages 10-12 are done. Oh yeah.
halo_3_unsc_armor_build_17_by_gyro5-d3auycb.jpg

halo_3_unsc_armor_build_18_by_gyro5-d3auyer.jpg

And BE prepared to be spooked!
halo_3_unsc_armor_build_20_by_gyro5-d3auyow.jpg

AHHH! It's me! I need to shave. Maybe tomorrow. After pages 13-15 are done with. I was really worried that it won't fit me when I was more along but it's a rather nice fit. Yet it is too early for congrates nor credits. The show must go on!
Oh yeah. I gotten two sets of plastic buckles and each has 3 feet of strap. I just need more loops and buckles and velcro. Lots of each.
 

Attachments

  • halo_3_unsc_armor_build_17_by_gyro5-d3auycb.jpg
    halo_3_unsc_armor_build_17_by_gyro5-d3auycb.jpg
    107.3 KB · Views: 92
  • halo_3_unsc_armor_build_20_by_gyro5-d3auyow.jpg
    halo_3_unsc_armor_build_20_by_gyro5-d3auyow.jpg
    61.9 KB · Views: 91
  • halo_3_unsc_armor_build_18_by_gyro5-d3auyer.jpg
    halo_3_unsc_armor_build_18_by_gyro5-d3auyer.jpg
    83.6 KB · Views: 100
good job... wait for the small peice on the shoulders doesnt Vrogy's file have that peice... its a floating part i think.
 
I have those as well and they go on what looks like some sort of leather piece that wraps around the arm. Also, I may not be able to keep today's update because I am not feeling well my friends. I will what I can and post what I've completed but the helmet may not be done until tomorrow.
 
Well, I've done it. I have finished da helmet!
Man I need a shave.
halo_3_unsc_armor_build_20_by_gyro5-d3axehi.jpg

The ear pieces are glued on.
halo_3_unsc_armor_build_21_by_gyro5-d3axenb.jpg

And everything I have done. 64 pages. One bottle of glue. 19 days of constructing.
halo_3_unsc_armor_build_22_by_gyro5-d3axesk.jpg

halo_3_unsc_armor_build_23_by_gyro5-d3axewi.jpg

halo_3_unsc_armor_build_24_by_gyro5-d3axezk.jpg


Before fiber glassing begins and I get my hands on a respirator, mixing cups, fiberglass hardener and good weather, I am slightly confused about the knee. Is it all one piece or a series of pieces and the same for the shin? Pics would be helpful please.
 

Attachments

  • halo_3_unsc_armor_build_20_by_gyro5-d3axehi.jpg
    halo_3_unsc_armor_build_20_by_gyro5-d3axehi.jpg
    66.6 KB · Views: 100
  • halo_3_unsc_armor_build_21_by_gyro5-d3axenb.jpg
    halo_3_unsc_armor_build_21_by_gyro5-d3axenb.jpg
    79.7 KB · Views: 99
  • halo_3_unsc_armor_build_22_by_gyro5-d3axesk.jpg
    halo_3_unsc_armor_build_22_by_gyro5-d3axesk.jpg
    92.9 KB · Views: 109
  • halo_3_unsc_armor_build_23_by_gyro5-d3axewi.jpg
    halo_3_unsc_armor_build_23_by_gyro5-d3axewi.jpg
    90.4 KB · Views: 78
  • halo_3_unsc_armor_build_24_by_gyro5-d3axezk.jpg
    halo_3_unsc_armor_build_24_by_gyro5-d3axezk.jpg
    135.2 KB · Views: 93
According to the pics, the knee is a solid piece but the shin appears to be a double piece but the pepakura file has it as a single piece. I have no idea how to separate the two pieces now now after its done being fiber glassed. As for the strap that connect the back plate and the front plate, there appears to be an indentation that is missing. The same for the torso armor for four areas that are slotted. I have more fine tuning so to say before I am fully ready to fiberglass. Wish me luck.
 
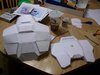
Okay. I see it now. The shin is one piece. The ... polygraming (?) of the game made it look like it was a two piece set. It has two straps but that's no problem. The knee armor still has a knee pad under that and for kneeling positions, I must make that as HARD AS A ROCK! However, I don't think fiberglass nor the underlying fiberglass sheet will hold up. Those are thin pieces. Yet I can't lay on my knees. My full weight hurts my knees too much when I am kneeling without any padding and thus I don't rest my entire weight on my knees. With that in mind, that area should hold up well. I wonder if tubing will give it the support I need?
I am going to go with a combo of buckles and velcro to keep everything all tidy up. I still have not came up how it will look but at a chosen rank of sergeant, I am leaning towards a battle worn look with some gashes, metal paint representing worn paint and a dull but clean look will be satisfying.
Take to heart all of you noobs who are watching me, I knew this wasn't easy to do when I started but because I had a somewhat game plan set for how I was going to build the armor during the pepakura phase and what I am after for a final look HAS made things easier for me. Before diving in, read, read and READ! Or in my case, Rear, read, READ ad watch and read again has again made it easier. Also, take all warnings to heart. This can be somewhat hazardous to ones health if proper precautions are not taken.
In some cases, because I have no job as of present, I stayed up late. I somewhat suffered due to me not eating as much and working several hours straight! It is also clear that I failed to shave during the last two weeks. It can also be mentally stressful if you are extremely new at this. Don't worry. Do not rush it. make every cut and fold as accurate as possible. If you cut into a piece, tape will do and don't worry about it. It gets covered up anyway in fiberglass resin.
Support of others made this build easier than thought. If you are younger than me, ask permission first as I have and if you are stuck or can't get the materials, ask.
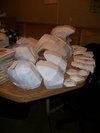
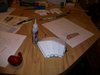
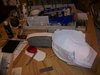
I also recommend a cutting board. Our old diner table has seen better days and now serves as our "build" table and thus already had many cuts in it. I tripled the number of cuts in my three weeks of what has taken twenty plus years to do.
Well, that is all for tonight folks. I will continue to plan out what to do about the missing folds and such and will post the end results when they are finished. But right now, good night.
 
nice work!
I'm currently building the exact same thing but for my friend. Instead of the marine helmet, we're going with the pilot helmet. Looking good :)
 
Status
Not open for further replies.
Back
Top