I think what he means by "impede" is the boot's inability to flex. A normal shoe or boot will flex, allowing your foot to bend as you walk. With a single rigid piece, your foot will not be able to bend, preventing natural walking motion. You may notice, if you ever see a video of yourself, that you walk a little robotic. Of course, if you say that you are able to walk around just fine, then good. It looks like it's coming along nicely.
You are using an out of date browser. It may not display this or other websites correctly.
You should upgrade or use an alternative browser.
You should upgrade or use an alternative browser.
GenericCola's Halo: Reach Scout/Recon Build (WIP - Pics Included)
- Thread starter GenericCola
- Start date
- Status
- Not open for further replies.
I think what he means by "impede" is the boot's inability to flex. A normal shoe or boot will flex, allowing your foot to bend as you walk. With a single rigid piece, your foot will not be able to bend, preventing natural walking motion. You may notice, if you ever see a video of yourself, that you walk a little robotic. Of course, if you say that you are able to walk around just fine, then good. It looks like it's coming along nicely.
Sorry about that, carpathiavh99 had it right though. Wasn't sure if you were planning any sort of movement mechanism or not... would be more complicated with the Reach boots I'd guess, since they do start as a single piece.
Looking forward to seeing more of the build!
GenericCola
Jr Member
Sorry about that, carpathiavh99 had it right though. Wasn't sure if you were planning any sort of movement mechanism or not... would be more complicated with the Reach boots I'd guess, since they do start as a single piece.
Looking forward to seeing more of the build!
I don't plan on doing a moving mechanism, but I do plan on fabricating a rounded sole that will at least allow the foot to rock, since it can't bend.
Update:
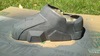
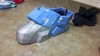
Here's a pic of the boot with a light coat of primer thrown on it. There are still plenty of areas I need to sand/clean up, but things are looking off to an okay start.
Attachments
GenericCola
Jr Member
Looks really cool, interested in seeing your method of getting passed that inability to flex.
Yeah, we'll see how that goes xD
Update:
Finished the ankle guard-- moving on to the heel guard, then paint-- and then I get to do it all over again for the second boot! (which is still only half pepped...)
Thanks for looking, hope you enjoy!
Feedback is always appreciated
Attachments
GenericCola
Jr Member
GenericCola
Jr Member
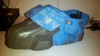
Update:
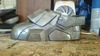
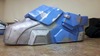
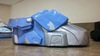
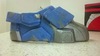
Well, here are the results of my long weekend! I learned a lot doing my first piece, so hopefully things will go more smoothly and everything will come out better, next time around. Overall, I have to say I'm pretty satisfied with my first ever (mostly) finished piece. Before this, I never went further than pepping.
I've added the blue paint, and assembled all of the pieces. Everything fits perfectly! Now I've got to distress the metal and add some more damage to the paintjob.
Any suggestions?


Thanks for looking, I hope you enjoy!
Feedback is always welcome")
Well, here are the results of my long weekend! I learned a lot doing my first piece, so hopefully things will go more smoothly and everything will come out better, next time around. Overall, I have to say I'm pretty satisfied with my first ever (mostly) finished piece. Before this, I never went further than pepping.
I've added the blue paint, and assembled all of the pieces. Everything fits perfectly! Now I've got to distress the metal and add some more damage to the paintjob.
Any suggestions?
Thanks for looking, I hope you enjoy!
Feedback is always welcome
Attachments
Awesome indeed! The metal spray really brings it all together.
For weathering, I'd recommend lightly sponging on silver paint to add chipping to the blue areas and black paint to add chipping to the silver areas, but try the technique out on a scrap piece first.
Like this, but bigger.
For weathering, I'd recommend lightly sponging on silver paint to add chipping to the blue areas and black paint to add chipping to the silver areas, but try the technique out on a scrap piece first.
Like this, but bigger.
Last edited by a moderator:
GenericCola
Jr Member
*Applause*
Looks awesome!!
Thanks! Glad you like it
Awesome indeed! The metal spray really brings it all together.
For weathering, I'd recommend lightly sponging on silver paint to add chipping to the blue areas and black paint to add chipping to the silver areas, but try the technique out on a scrap piece first.
Like this, but bigger.
-snip-
Thanks for the tip
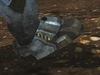
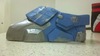
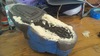
I literally JUST finished working on weathering it a bit in a different way xD I hit the blue overcoat with some 200 grit sandpaper to take away some of the gloss and to pull the metal through from underneath. Looking at the boots in Reach, you can see they're absolutely beaten to oblivion. They're almost as chipped/worn as they are painted.I'll upload some pics as soon as I get them loaded.
Edit: Here are the pics, as well as a screen from the game for comparison. I'm not sure how apparent the difference is on camera, but you can definitely tell in person.
Before:
After:
Before:
After:
These boots are surprisingly comfortable!
I feel like some of the larger areas could use more sanding. What do you think? I'll do some more painting and weathering tomorrow, but this is all I can do until daylight.
Attachments
-
 2013-09-24_16-03-32_688.jpg107.6 KB · Views: 175
 -
 Screenshot.jpg87.1 KB · Views: 158
 -
 2013-09-24_16-03-16_639.jpg113.3 KB · Views: 166
 -
 2013-09-25_05-25-38_890.jpg87 KB · Views: 167
 -
 2013-09-25_05-25-21_997.jpg86.4 KB · Views: 173
 -
 2013-09-25_05-26-02_443.jpg76.3 KB · Views: 170
 -
 2013-09-25_05-35-21_112.jpg67.1 KB · Views: 159
GenericCola
Jr Member
Looks good, I'm looking forward to more pictures.
I'm glad you like it.
To everyone out there, if you have any criticisms or feedback, I'd really appreciate it! I want this suit to be the best it can be.
GenericCola
Jr Member
Looks pretty decent, though I think it could do with a good blackwash to add a bit of depth.
Of course! The paintjob is DEFINITELY not done yet.
Edit: What would you recommend using to blackwash? All I have is black spraypaint, but I feel like that's not a great idea.
annabellector
Jr Member
Have you ever used rub n buff? would that be a viable option?
And where you would use bondo I use apoxie sculpt
it gives me about 2 hours worktime and I can get it pretty smooth with my fingers by keeping my fingers wet with water or alcohol and rubbing it. I also can do a lot of the detailing in the apoxie sculpt that bondo won't allow due to dry time. I can build up ridged, tunnel channels, and it sands just like bondo...
the pitch-->(Apoxie® Sculpt offers economy as well as performance. This 2-part product has a putty-like, smooth consistency, and is easy to mix & use. It is safe and waterproof with 0% shrinkage/cracking! Working time is 2-3 hrs. Cures hard in 24 hrs., and has a semi-gloss finish. Adheres to plastic, resin kits, wood, metal, ceramic, glass, polymers, foam, fiberglass, & more! Can be seamlessly feathered before set-up, or sanded, tapped, drilled, carved, lathed, or otherwise tooled after set-up, without chipping, cracking or flaking!)
but you are doing some great work here... your attention to each piece is pretty astounding. I think the final will be amazing.
GenericCola
Jr Member
Have you ever used rub n buff? would that be a viable option?
And where you would use bondo I use apoxie sculpt
it gives me about 2 hours worktime and I can get it pretty smooth with my fingers by keeping my fingers wet with water or alcohol and rubbing it. I also can do a lot of the detailing in the apoxie sculpt that bondo won't allow due to dry time. I can build up ridged, tunnel channels, and it sands just like bondo...
the pitch-->(Apoxie® Sculpt offers economy as well as performance. This 2-part product has a putty-like, smooth consistency, and is easy to mix & use. It is safe and waterproof with 0% shrinkage/cracking! Working time is 2-3 hrs. Cures hard in 24 hrs., and has a semi-gloss finish. Adheres to plastic, resin kits, wood, metal, ceramic, glass, polymers, foam, fiberglass, & more! Can be seamlessly feathered before set-up, or sanded, tapped, drilled, carved, lathed, or otherwise tooled after set-up, without chipping, cracking or flaking!)
but you are doing some great work here... your attention to each piece is pretty astounding. I think the final will be amazing.
I'm not sure what rub n' buff is. As for the sculpt, I actually enjoy the short working time of Bondo. I'm glad you like it so far, though-- hopefully the second boot will come out a bit nicer. I started with the boots since they won't get as much notice as the rest of the armor in the areas that I'm still learning.
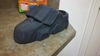
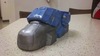
Here's an update of where it's at. I painted the front half of the boot, and I've begun working on figuring out how to mount the shoe inside the boot.
Attachments
GenericCola
Jr Member
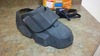
I've begun working on the soles of the boot. I'm filling the empty space inside the boot with insulation foam, then mounting soles made from EVA foam to the bottom of the boot. Afterwards, I will add details with Craft foam, then Plasti-Dip the bottom to give it all a nice rubber coat for extra traction.

Attachments
The boot looks really good, but I would be a little wary of using craft foam on the bottom. It tears really easily, and plasti-dip won't provide much protection for it. Even EVA foam soles get chewed up pretty easily by walking on any sort of rough surface like concrete or asphalt. One solution that others have taken (and I'll be using as well when I get to that point) is using a rubber vehicle floor mat as a sole. They're pretty cheap and significantly more resistant to wear than foam. You can find thin ones to add the detail to your sole, or a thicker one to give a little extra height in the armor.
GenericCola
Jr Member
The boot looks really good, but I would be a little wary of using craft foam on the bottom. It tears really easily, and plasti-dip won't provide much protection for it. Even EVA foam soles get chewed up pretty easily by walking on any sort of rough surface like concrete or asphalt. One solution that others have taken (and I'll be using as well when I get to that point) is using a rubber vehicle floor mat as a sole. They're pretty cheap and significantly more resistant to wear than foam. You can find thin ones to add the detail to your sole, or a thicker one to give a little extra height in the armor.
Thanks for the tip-- unfortunately it's too late xD I already plan on redoing parts of this in the future, anyway, as hindsight has taught me quite a few things xD I'll keep that in mind for next time, though. Realistically, I needed the foam for extra padding, anyway. I may go for some rubber to put on top of it, though.
- Status
- Not open for further replies.