You are using an out of date browser. It may not display this or other websites correctly.
You should upgrade or use an alternative browser.
You should upgrade or use an alternative browser.
GenericCola's Halo: Reach Scout/Recon Build (WIP - Pics Included)
- Thread starter GenericCola
- Start date
- Status
- Not open for further replies.
BiGHARYSCOTSMiN
Member
Oh my word...
Ok so if you can keep up the quality control with the rest of the suit, we're looking at Elite section material here.
Just don't lose your head on the way, you have big shoes to fill...
Ok so if you can keep up the quality control with the rest of the suit, we're looking at Elite section material here.
Just don't lose your head on the way, you have big shoes to fill...
GenericCola
Jr Member
Oh my word...
Ok so if you can keep up the quality control with the rest of the suit, we're looking at Elite section material here.
Just don't lose your head on the way, you have big shoes to fill...
Well, all of this so far has been a learning experience, so I can only see the quality going up! Thanks for the encouragement
")
Update:
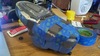
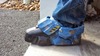
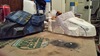
The paintjob is almost complete. A bit of blackwash is all I've got left, I think. Just painted in the caution stripe detail, and now I'm working on finishing up the soles. I need to silicon the rear section, then plasti-dip it.
Attachments
GenericCola
Jr Member
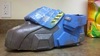
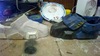
I've blackwashed the boot and the sole is in the process of drying. Are there any other features you think I should add, or criticisms you have for this boot before I move on to the next one? All feedback is appreciated! I want this to be the best it can be.


(Ignore the GIANT ugly mess sticking out beneath the shoe-- it looks much better now that it's been plasti-dipped)
(Ignore the GIANT ugly mess sticking out beneath the shoe-- it looks much better now that it's been plasti-dipped)
Attachments
Are there any other features you think I should add, or criticisms you have for this boot before I move on to the next one? All feedback is appreciated! I want this to be the best it can be.
I'd probably take a pencil (regular graphite or silver), sharpen it and run the side of the point along the edges on the armor plates and seams. This will really make the edges really stand out and give another subtle layer of weathering.
I should say that pencil edging needs to be done in moderation because too much looks over the top. Also, it only works on matt surfaces, not gloss ones.
GenericCola
Jr Member
I'd probably take a pencil (regular graphite or silver), sharpen it and run the side of the point along the edges on the armor plates and seams. This will really make the edges really stand out and give another subtle layer of weathering.
I should say that pencil edging needs to be done in moderation because too much looks over the top. Also, it only works on matt surfaces, not gloss ones.
I think I'll try achieving a similar effect with drybrushing-- good tip!
Can't wait to see this in person, oh my gosh. I'll be starting work on the undersuits for these soon.
(And just so I don't seem creepy, I will clarify that I am his girlfriend: the one who shall be wearing the Scout suit.)
Thanks, hun! You'll see it soon enough
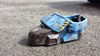
Edit: The first boot is officially done! I'll upload a picture of the boot being worn in a little bit. For now, I've updated the status infographic.
GenericCola
Jr Member
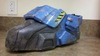
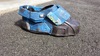
Boot is finished. Here are some shots:


Attachments
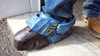
I don't know Halo Reach, but I can say from looking at your photos that you did a good job on the first boot. I get so jealous seeing all the threads with people in their bondo and painting stages and I'm just at measly pep. Do you have plans to hide the shoe top between the boot and shin pieces? If the rest of your suit turns out as nice as the boot you're going to have a nice-looking costume.
GenericCola
Jr Member
I don't know Halo Reach, but I can say from looking at your photos that you did a good job on the first boot. I get so jealous seeing all the threads with people in their bondo and painting stages and I'm just at measly pep. Do you have plans to hide the shoe top between the boot and shin pieces? If the rest of your suit turns out as nice as the boot you're going to have a nice-looking costume.
The tip of the shoe is actually mostly hidden by the ankle guard when being worn-- it's only when the boot is off that you can clearly see it. Once the suit comes together, it should hardly be noticeable.
As for you being back on pep, we all have different processes. I like to take one piece at a time from start to finish. Others like to pep everything, then resin everything, then bondo everything together. It's all in the way you divide it.
Glad you like the boot, though! This is my first attempt at a build, so the quality of the rest of the suit can only go up as I learn! and once I get a dremel.. This was all done with sand paper and files.
ShawnProblemz
New Member
Nice boot dude!
GenericCola
Jr Member
Nice boot dude!
Thanks, man! Here's hoping the rest comes out as good
Update:
I've finished fiberglassing the left boot and begun bondo sculpting.
Thanks for looking, hope you enjoy
More progress to come soon.
Attachments

ShawnProblemz
New Member
Thanks, man! Here's hoping the rest comes out as good
Update:
I've finished fiberglassing the left boot and begun bondo sculpting.

Thanks for looking, hope you enjoy
More progress to come soon.
I bet it will dude! Can't wait to see some more updates
Attachments
GenericCola
Jr Member
Arcane Illusion
New Member
Your boots are looking really great, I can't wait to see the rest of your build.
annabellector
Jr Member
rub n buff.... -->Made from imported carnauba waxes, fine metallic powders, and select pigments, Rub 'n Buff gives almost any surface a new look in minutes. This unique blend gives objects decorated with Rub 'n Buff a finish that no paint can duplicate. It can be applied to any clean, dry surface as well as over previously painted surfaces. One 1/2 oz. tube covers up to 20 square feet. It's easy to apply. Just rub onto any surface with finger or soft cloth, then buff to a lustrous finish. Rub 'n Buff is ideal for picture frames, stenciling, faux finishing, antiquing, home decor, restoration, and crafts.
when you need a nice metallic sheen it is a beautiful thing. I have painted over it, under it, rubbed it off to show the paint below. I do not know other people and their preference, but If i have anything metallic in look I run to these. I will try to post up a few pics of some of it.
--sorry for delay in getting back... I had a busy weekend. APPARENTLY... when a girlfriend asks for help at her wedding, be prepared to be the event coordinator! LOLOL It was fun on the other side of the isle.
when you need a nice metallic sheen it is a beautiful thing. I have painted over it, under it, rubbed it off to show the paint below. I do not know other people and their preference, but If i have anything metallic in look I run to these. I will try to post up a few pics of some of it.
--sorry for delay in getting back...
I had a busy weekend. APPARENTLY... when a girlfriend asks for help at her wedding, be prepared to be the event coordinator! LOLOL It was fun on the other side of the isle.annabellector
Jr Member
I agree whole heartedly. the attention and completion level with only the boots is fabulous. I wish I finished this well...
Oh my word...
Ok so if you can keep up the quality control with the rest of the suit, we're looking at Elite section material here.
Just don't lose your head on the way, you have big shoes to fill...
GenericCola
Jr Member
Your boots are looking really great, I can't wait to see the rest of your build.
Thanks for the encouragement, it means a lot
Hopefully you won't be disappointed xDrub n buff.... -->Made from imported carnauba waxes, fine metallic powders, and select pigments, Rub 'n Buff gives almost any surface a new look in minutes. This unique blend gives objects decorated with Rub 'n Buff a finish that no paint can duplicate. It can be applied to any clean, dry surface as well as over previously painted surfaces. One 1/2 oz. tube covers up to 20 square feet. It's easy to apply. Just rub onto any surface with finger or soft cloth, then buff to a lustrous finish. Rub 'n Buff is ideal for picture frames, stenciling, faux finishing, antiquing, home decor, restoration, and crafts.
when you need a nice metallic sheen it is a beautiful thing. I have painted over it, under it, rubbed it off to show the paint below. I do not know other people and their preference, but If i have anything metallic in look I run to these. I will try to post up a few pics of some of it.
--sorry for delay in getting back...
I'm deliberately keeping this metal dull and worn, but I'll keep it in mind for the future.
I agree whole heartedly. the attention and completion level with only the boots is fabulous. I wish I finished this well...
D'aww, thanks
I hope I live up to everybody's expectations xDI'll be taking a break from bondoing for the next few days, because I'm back on campus for classes and there is nowhere for me to work on it here. I've been driving home and working on everything during the weekends, which kinda sucks, but hey. I'm aiming to get the shins pepped this week. I'm just trying to figure out how to best scale them to fit they way they're intended :I
Chainsaw ninja
Jr Member
Those boots are really good man, what kind of files did you use to add detailing might I ask
Edit: also how did you do those caution stripes? They look perfect in terms of weathering
Edit: also how did you do those caution stripes? They look perfect in terms of weathering
GenericCola
Jr Member
Those boots are really good man, what kind of files did you use to add detailing might I ask
Edit: also how did you do those caution stripes? They look perfect in terms of weathering
I actually did all of the detailing with sandpaper and an icepick ._. I only use the files to get the shape down and rounded.
As for the caution stripes, I painted them. I mask out the shape of the decal with tape, then mask the areas I want to be chipped with mustard. I use a knife to spread the mustard in a way which resembles natural chipping, so as to avoid having random 'blobs' on he armor. I then lay down the lightest color (in this case, yellow). When the paint is dry, I wipe down the decal, and everything painted over the mustard comes off. I used tape to mark off the stripes, then repeated the process with black. When it's all dry I lightly sand the paint with 200 grit sandpaper to give it a natural worn look. The key is knowing where to apply your mustard, how to spread it, and then when to stop sanding. The last step is to blackwash the piece, which I do with watered-down acrylic paints. Brush it on, making sure you get in the crevices and details, then wipe it off with a dry paper towel. You can wipe more gently in areas where you wish to retain more black.
- Status
- Not open for further replies.