Halex's Iron Man Mk IV

Status
Not open for further replies.
Its all coming together nicely :)

Heh, trying! Having never made a costume with joints before there's a lot of uncharted territory, but the result feels pretty solid so overall I think it's going relatively well.

--

Didn't get much actual work done this weekend, but did manage to try some pieces on and get the spacing right.

FsNnGT9C1PKS4EiidwfvQhNMlDMSlyON9HpzAlLtLDo=w901-h1355-no.jpg


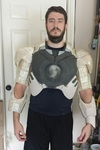
Took a lot of messing around with the spacing/slack on the shoulder joints, but it finally got to a point where I was happy with the positioning. Models are unclear on whether or not the shoulder bells should align or be slightly above/below the shoulder straps of the back armor, but it seemed to hold position the best when they were slightly above. The picture was snapped after a fair amount of arm-waving and movement, which isn't great but is about what you'd expect. I can (barely) touch my hands in front of my chest and can get them roughly parallel with the ground.

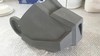
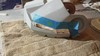
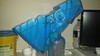
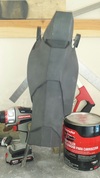
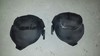
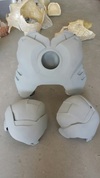
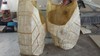
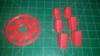
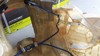
Here's the final attachment method I'll be using for the arms...

5g6BqcAMrwxs1nGlexOFySHPiMOne6EG-zLaT1haFco=w1858-h857-no.jpg


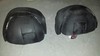
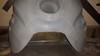
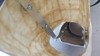
... and a view inside.

yr_ejMan21-xChXBUpdJua81XlhJelkpUvh3Q3Mqz1Y=w2048-h1152-no.jpg


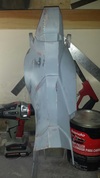
The aluminum pieces go all the way from the forearms to the shoulder attachment point, which means there's virtually no weight on my arms to hold any of the pieces in place; it's all shared across the chest brace.

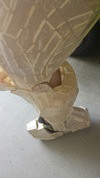
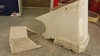
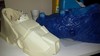
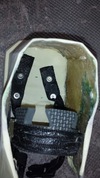
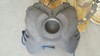
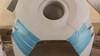
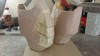
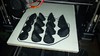
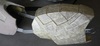
Here's a better look at the underside of the shoulder bell, showing how the pieces hold together.

UeVxWTSJDCsDeh6Jm7qsMpN4e5s7bjc1byf3zFFS-NU=w2048-h1152-no.jpg


Everything attaches to a single bungee cord on each side, keeping all the parts aligned but flexible. The u-bolt at the back is reinforced with two layers of fiberglass mat and is very strong, being the common rear attachment point. The d-ring at the top of the bicep connects via carabiner to the bungee, holding the bicep inside of the shoulder bell at all times, regardless of movement. The shoulder bell has two eye bolts that hold that piece in place, with cable clamps to keep it from shifting on the line (I think I'll move them to the outside of the eye bolts...). The biner/d-ring combo is very easy to attach and remove and the system as a whole is relatively comfortable and light. Then again, everything is light prior to bondo...

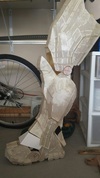
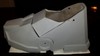
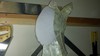
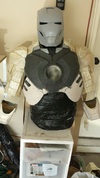
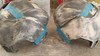
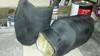
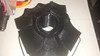
Lastly, the outside shot.

bRIYf-6DS5QDHypelXrd544rCuReu9R6_8Xwe__J8bQ=w1853-h1041-no.jpg


I can put this on solo, but that's about where it ends. I'm still struggling with how the chestplate should be attached to the brace, as a single point at the bottom (along with the arc reactor chamber) won't be enough. While magnets are an... attractive... solution, they have a habit of failing when I need them to hold on most. I'll probably resort to machine screws as I've done with most of the rest of it, but more research is required.

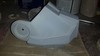
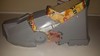
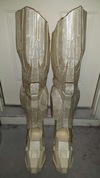
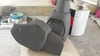
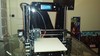
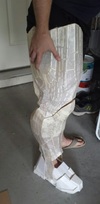
In addition to the torso fit, I slipped the leg on and even managed to get the half-resined boot on as well.

W7xpC5G3k4VnTqAb1cXysIoq6SFeLqnu842VSL8sbjg=w665-h1355-no.jpg


Looks about right, minus the shin and boot flaps/guards.

Be back with more updates eventually. Until then, comments/suggestions are appreciated, and thanks for looking!
 

Attachments

  • FsNnGT9C1PKS4EiidwfvQhNMlDMSlyON9HpzAlLtLDo=w901-h1355-no.jpg
    FsNnGT9C1PKS4EiidwfvQhNMlDMSlyON9HpzAlLtLDo=w901-h1355-no.jpg
    136 KB · Views: 197
  • 5g6BqcAMrwxs1nGlexOFySHPiMOne6EG-zLaT1haFco=w1858-h857-no.jpg
    5g6BqcAMrwxs1nGlexOFySHPiMOne6EG-zLaT1haFco=w1858-h857-no.jpg
    169.2 KB · Views: 194
  • yr_ejMan21-xChXBUpdJua81XlhJelkpUvh3Q3Mqz1Y=w2048-h1152-no.jpg
    yr_ejMan21-xChXBUpdJua81XlhJelkpUvh3Q3Mqz1Y=w2048-h1152-no.jpg
    296.6 KB · Views: 204
  • UeVxWTSJDCsDeh6Jm7qsMpN4e5s7bjc1byf3zFFS-NU=w2048-h1152-no.jpg
    UeVxWTSJDCsDeh6Jm7qsMpN4e5s7bjc1byf3zFFS-NU=w2048-h1152-no.jpg
    421.4 KB · Views: 186
  • bRIYf-6DS5QDHypelXrd544rCuReu9R6_8Xwe__J8bQ=w1853-h1041-no.jpg
    bRIYf-6DS5QDHypelXrd544rCuReu9R6_8Xwe__J8bQ=w1853-h1041-no.jpg
    238.6 KB · Views: 233
  • W7xpC5G3k4VnTqAb1cXysIoq6SFeLqnu842VSL8sbjg=w665-h1355-no.jpg
    W7xpC5G3k4VnTqAb1cXysIoq6SFeLqnu842VSL8sbjg=w665-h1355-no.jpg
    84.4 KB · Views: 187
wow man look's great

Didn't realize it had been this long since I'd been back to the thread, but thanks Noble!

--

Work has continued, despite everything else trying to steal my time away. Last weekend I was finally able to work out the attachment method I wanted for the boot and put the entire leg on at once.

ArDarnD8W6JX6UoLzAyBcIfOvKsUIYmqADx1UKdRTMY=w763-h1355-no.jpg


It's a little hard to see, but the foot is flexed upwards as if walking. Much like other pieces, I took a couple small strips of aluminum and mounted one end in the lower shin and the other onto the boot itself. As of right now it tends to fall out of place rather easily, but once I pad up the shin to keep it in a relatively stable position, I think the entire structure will solidify nicely. It should allow a little bit of movement in the foot independently of the rest of the leg, which will hopefully let me move around without too much trouble. It also means that the weight of the leg will rest mostly on the ground rather than on the upper-body armor, as it would have if i had connected the thighs to the cod instead. I also got a shot of the entire thing together, though I haven't figured out how to attach all of the various flaps and covers just yet.

3LeS1G292t37F7BrHI812iaJpN26DbdVojZgPDdl0r0=w763-h1355-no.jpg


While that was going on, I continued working on the boot, as it's the next thing I want to mold and cast. Let the sanding begin!

6EmDpgFGngnDQV3eWCJVyX548wQLT1Wrkzqo1YFqL7c=w2048-h1152-no.jpg


UISPHR_4B77j0tlThZEDyEukhkmwQgtGpFO7uLWC8yY=w2048-h1152-no.jpg


Then... disaster! The boot is made up of three distinct pieces, and I didn't do the best job cutting the interior of those pieces apart so they could be adequately reinforced. When I washed the boot for the first time, the water found exposed paper and caved in the entire side.

J36q_Q3WLk71R8g9PsUdcXW8hpL8-u_LRGj5bjI1yV8=w2048-h1152-no.jpg


After an hour or two of rebuilding, it was back to looking as expected.

e3ofWuHleBg4lxYvBJZSzD4lkbhSK58E9HOzS3dO7zA=w2048-h1152-no.jpg


A light coating of bondo over most of the rear of the boot...

B9WlDbJ4RdI6V61WYOwruPdnSGPKEiw4FsXA9h45zpk=w2048-h1152-no.jpg


... and a bunch more sanding, and we're left with this:

VscEzcCjcB0E8JdHCNlgR8DvW7XSyCqJ0TFRa-YQ588=w2048-h1152-no.jpg


The boot is ready for a final gloss clear coat, then it's time to prep for molding, currently scheduled for this weekend. The goal is to be able to wear both legs and walk around by Sunday. The left leg has been reinforced but hasn't yet had hardware added, so there's still a bit of time to go on that one as well. Plus I need to find a way to make them less... prickly; the fiberglass cloth cuts me up every time I try the legs on. Thinking that a coat or two of SmoothCast may take care of it while adding some more strength too. Fiberglass mat may also do the trick, but I'm becoming less enthused with ploy resin as time goes on. If anyone has used SmoothCast for this before, or has other suggestions, I'd love to hear about your methods/results!

Looks like another busy weekend, but hopefully productive. Just told my manager I'll be taking half days every Friday from now until Halloween, so hooray for extra suit time!

Thanks for looking!
 

Attachments

  • ArDarnD8W6JX6UoLzAyBcIfOvKsUIYmqADx1UKdRTMY=w763-h1355-no.jpg
    ArDarnD8W6JX6UoLzAyBcIfOvKsUIYmqADx1UKdRTMY=w763-h1355-no.jpg
    88.4 KB · Views: 196
  • 3LeS1G292t37F7BrHI812iaJpN26DbdVojZgPDdl0r0=w763-h1355-no.jpg
    3LeS1G292t37F7BrHI812iaJpN26DbdVojZgPDdl0r0=w763-h1355-no.jpg
    125 KB · Views: 185
  • 6EmDpgFGngnDQV3eWCJVyX548wQLT1Wrkzqo1YFqL7c=w2048-h1152-no.jpg
    6EmDpgFGngnDQV3eWCJVyX548wQLT1Wrkzqo1YFqL7c=w2048-h1152-no.jpg
    341.3 KB · Views: 182
  • UISPHR_4B77j0tlThZEDyEukhkmwQgtGpFO7uLWC8yY=w2048-h1152-no.jpg
    UISPHR_4B77j0tlThZEDyEukhkmwQgtGpFO7uLWC8yY=w2048-h1152-no.jpg
    340.9 KB · Views: 186
  • J36q_Q3WLk71R8g9PsUdcXW8hpL8-u_LRGj5bjI1yV8=w2048-h1152-no.jpg
    J36q_Q3WLk71R8g9PsUdcXW8hpL8-u_LRGj5bjI1yV8=w2048-h1152-no.jpg
    535.7 KB · Views: 197
  • e3ofWuHleBg4lxYvBJZSzD4lkbhSK58E9HOzS3dO7zA=w2048-h1152-no.jpg
    e3ofWuHleBg4lxYvBJZSzD4lkbhSK58E9HOzS3dO7zA=w2048-h1152-no.jpg
    351.1 KB · Views: 201
  • B9WlDbJ4RdI6V61WYOwruPdnSGPKEiw4FsXA9h45zpk=w2048-h1152-no.jpg
    B9WlDbJ4RdI6V61WYOwruPdnSGPKEiw4FsXA9h45zpk=w2048-h1152-no.jpg
    406.5 KB · Views: 185
  • VscEzcCjcB0E8JdHCNlgR8DvW7XSyCqJ0TFRa-YQ588=w2048-h1152-no.jpg
    VscEzcCjcB0E8JdHCNlgR8DvW7XSyCqJ0TFRa-YQ588=w2048-h1152-no.jpg
    217.9 KB · Views: 180
Good to finally see the iron man you were talking abotu in the PM lol. Cant believe i have missed it so far. Looking good bro. Keep up the good work :)
 
Good to finally see the iron man you were talking abotu in the PM lol. Cant believe i have missed it so far. Looking good bro. Keep up the good work :)

Hah, thanks man! Good to see that trooper build of yours too!

--

Small update, but got some good work done last weekend. Both legs are now reinforced and jointed, just waiting on the boots to be finished so I can do a suit-up. Speaking of the boots, most of the weekend was spent on the mold for them. It appears to take about 12 hours to create a mold even once I know the process, mostly because the thickened silicone takes forever to set. However, after last night it was well worth it. I did grab a few shots along the way, and am much happier with the results this time than I was with the helmet.

First, when making a multiple-piece mold, it helps to keep them all together! Using the same cereal box cardboard and hot glue as the first time around, I built the sleeve to keep the parts separated but together as a unit. If you're wondering about the un-primed area of the boot, I was originally planning to have small metal inserts that would tie the heel and toe pieces together, but realized at the last minute that was a silly idea when I could simply build it into the boot and make it much stronger.

ZYqTr5qY7eKdb0AXH6fVMD34Bs1tZUERByo8rSjSKtA=w2048-h1152-no.jpg


Next, I found a stand and started applying the silicone. The bottle of coke in the background was half full when I started... took a lot to keep going until about 3 am!

56g5EluhhFSON5U3vyd7PnVXhfKpbnEeAn314XsZyTc=w2048-h1152-no.jpg


I built the mother mold the next day using fiberglass again. Nothing too special about it, other than it probably could have been a bit stronger as I only did 2-3 layers of cloth. If I do more molding, I'll probably consider using Plasti-Paste. I really hate fiberglass.

Last night I was able to do the actual castings. DragonSkin is an amazing material; I thought I'd have to cut the mold down the back to get the entire boot master out of the silicone, but it was stretchy (and layered thick enough) that it came right off. Glove (sock?) molds are awesome.

VY8Ed7928zizTRyZjyrL-08jNMc74xgz7OQ92eWl3Y0=w2048-h1152-no.jpg


Finally, a matching pair!

KDqbDtEvxs9eMSoG_QH6oVcGZdedtdX-_4qUAprW7u0=w2048-h1152-no.jpg


I'll clean then up tonight and add some fiberglass mat for reinforcement, as the heel sections are a bit thin for my liking. The shin will be connected to that piece and I don't want it to shatter from the stress of weight and movement. Otherwise, I'm extremely happy with how they came out.

That's it for now, but more to come. Thanks for looking!
 

Attachments

  • ZYqTr5qY7eKdb0AXH6fVMD34Bs1tZUERByo8rSjSKtA=w2048-h1152-no.jpg
    ZYqTr5qY7eKdb0AXH6fVMD34Bs1tZUERByo8rSjSKtA=w2048-h1152-no.jpg
    285.8 KB · Views: 182
  • 56g5EluhhFSON5U3vyd7PnVXhfKpbnEeAn314XsZyTc=w2048-h1152-no.jpg
    56g5EluhhFSON5U3vyd7PnVXhfKpbnEeAn314XsZyTc=w2048-h1152-no.jpg
    300 KB · Views: 195
  • VY8Ed7928zizTRyZjyrL-08jNMc74xgz7OQ92eWl3Y0=w2048-h1152-no.jpg
    VY8Ed7928zizTRyZjyrL-08jNMc74xgz7OQ92eWl3Y0=w2048-h1152-no.jpg
    272.6 KB · Views: 184
  • KDqbDtEvxs9eMSoG_QH6oVcGZdedtdX-_4qUAprW7u0=w2048-h1152-no.jpg
    KDqbDtEvxs9eMSoG_QH6oVcGZdedtdX-_4qUAprW7u0=w2048-h1152-no.jpg
    218.4 KB · Views: 188
righteous bro, good looking pair of boot. :)

Thanks man! They say you've gotta start at the bottom...

So I thought I'd posted an update last week, but apparently I wrote it and closed my browser before hitting "Submit Reply". Oops!

Regardless, I have a few more pictures and tidbits to add to the update. Been working on the shins a lot, literally going from the boots up. Here are the legs sitting atop the boots, prior to me going in there and modifying the boots to work with my configuration.

Gtg6sIa6GVrdxoe3WUX_9MXOYHU_PyZiGWiw0lhfu1cIXHTKWj6zgN4bS1ZDsQUf2_3E7mrTPaBruxvOyQ=w763-h1355-no.jpg


Shins gettin' some love, finally.

esO0TzPxyXofifgC1BLsDfGLgf453QeW90OHJ1qy9FlQdo9ASrexyPcf8WQ5OAczTUOfvhs0m6av0sW2A=w2048-h1152-no.jpg


IHcRHXLHN90lQRApgtP8VJi9RGQ7RPNmrcpEuUEGwEDMzm_2Tyqex4vQGELB8iCUphaFg7zPXyIli5ZDDg=w763-h1355-no.jpg


kDg5y_UWbhKoYYPSkpaAmWuq2qf4UOxlEP9sk8O8JacvNgf59GaxOK7xO1-zaHuw5xLhTtU5ht8WWlkPvw=w763-h1355-no.jpg


The front and back guards/flaps are modeled as separate pieces in the pep, but I found it easiest to attach them directly. They didn't need to flex in my case, so it simplified things a lot having them fastened in place. I'm leaving both shins minus the last layer of primer and sanding until they're ready for paint, as there's a good chance of scuffing and whatnot between now and then... no sense in having to do that final layer all over again.

After the shins (no pics of the left but it's at roughly the same point), I moved onto fixing the boots. No matter what I did, I couldn't get all of the flaps to play nicely with each other, or with the front piece on the shin. Eventually, I did to the offending flaps what I do to all things that stand in my way of completing a costume... I destroyed them. Removing the top of the smallest boot piece entirely, I attached the sides directly to the boots to cover the gaps, leaving only what was necessary to minimize see-through between the pieces. This configuration lets me walk a bit more easily with less rubbing, and once the final flap is added to the rear of the toe there shouldn't be much (if any) external difference. The strap is screwed directly into the sole of the boot, so I'm confident that the binding will hold up for a fair amount of walking.

2a6FTaucctJYs7waWD8k8CRAipJgyY2irzlzU1sImkL3kOS3ccjXcop8eM3Jj5kV1_ndAPRoeUrIUn_8fw=w763-h1355-no.jpg


BzBXoB9K33GpBxFY6a_TzdnOTLLYqMLdXwOj2a--MRQOJUL-s_0-wMUoEIw6kUd_fw17M9zse0nWbJZ39o=w763-h1355-no.jpg


Having reached a good stopping point with the shins but without the thighs fully reinforced, I decided to put the upper body together and see how it was coming along.

ikLinwXD4avxmuzVgABh1I01I5bqEreyvLZORczoQfQIMTTrSKUFWhkHDPI8-mwFZ5w1wqTNJL8qTCIpyg=w763-h1355-no.jpg


Of course, seeing that prompted me to want to work on those pieces... so I did a bit more sanding on the chestplate...

arMOBSKcFn5uHrXH1VDZ6kEVZdgCsitjTB8B5gLRHv9rwe70D8qZG8KT4gXgkbJjgi55ieM0lQqEykTTE=w2048-h1152-no.jpg


... and the shoulder bells.

frylRla8aEg54UDbNnG4ojAQD4HtaPav85FDul3ZGjnrEC5YUkxJv9_H566-cH9Rj5t4f4dmmibJt29uk=w2048-h1152-no.jpg


h8eM-6EW7w-6S73LgNRtPSfvhfqDftn1Uwzl88lPkROFPDkmvaT4AI-F5EwtrSgCEOWMfz6_OMZtlLbMA=w2048-h1152-no.jpg


All in all, it's coming along. The shoulder bells went from bare to primed in about six hours of work, so I'm confident the smaller pieces will be a lot faster than the shins have been. Still a few major hurdles to cross (*cough*Helmet motorization*cough*) but overall I should still be on schedule for Halloween.

Thanks for looking!
 

Attachments

  • Gtg6sIa6GVrdxoe3WUX_9MXOYHU_PyZiGWiw0lhfu1cIXHTKWj6zgN4bS1ZDsQUf2_3E7mrTPaBruxvOyQ=w763-h1355-no.jpg
    Gtg6sIa6GVrdxoe3WUX_9MXOYHU_PyZiGWiw0lhfu1cIXHTKWj6zgN4bS1ZDsQUf2_3E7mrTPaBruxvOyQ=w763-h1355-no.jpg
    132.6 KB · Views: 221
  • esO0TzPxyXofifgC1BLsDfGLgf453QeW90OHJ1qy9FlQdo9ASrexyPcf8WQ5OAczTUOfvhs0m6av0sW2A=w2048-h1152-no.jpg
    esO0TzPxyXofifgC1BLsDfGLgf453QeW90OHJ1qy9FlQdo9ASrexyPcf8WQ5OAczTUOfvhs0m6av0sW2A=w2048-h1152-no.jpg
    258.3 KB · Views: 266
  • IHcRHXLHN90lQRApgtP8VJi9RGQ7RPNmrcpEuUEGwEDMzm_2Tyqex4vQGELB8iCUphaFg7zPXyIli5ZDDg=w763-h1355-no.jpg
    IHcRHXLHN90lQRApgtP8VJi9RGQ7RPNmrcpEuUEGwEDMzm_2Tyqex4vQGELB8iCUphaFg7zPXyIli5ZDDg=w763-h1355-no.jpg
    142.1 KB · Views: 192
  • kDg5y_UWbhKoYYPSkpaAmWuq2qf4UOxlEP9sk8O8JacvNgf59GaxOK7xO1-zaHuw5xLhTtU5ht8WWlkPvw=w763-h1355-no.jpg
    kDg5y_UWbhKoYYPSkpaAmWuq2qf4UOxlEP9sk8O8JacvNgf59GaxOK7xO1-zaHuw5xLhTtU5ht8WWlkPvw=w763-h1355-no.jpg
    118.8 KB · Views: 194
  • 2a6FTaucctJYs7waWD8k8CRAipJgyY2irzlzU1sImkL3kOS3ccjXcop8eM3Jj5kV1_ndAPRoeUrIUn_8fw=w763-h1355-no.jpg
    2a6FTaucctJYs7waWD8k8CRAipJgyY2irzlzU1sImkL3kOS3ccjXcop8eM3Jj5kV1_ndAPRoeUrIUn_8fw=w763-h1355-no.jpg
    173.7 KB · Views: 218
  • BzBXoB9K33GpBxFY6a_TzdnOTLLYqMLdXwOj2a--MRQOJUL-s_0-wMUoEIw6kUd_fw17M9zse0nWbJZ39o=w763-h1355-no.jpg
    BzBXoB9K33GpBxFY6a_TzdnOTLLYqMLdXwOj2a--MRQOJUL-s_0-wMUoEIw6kUd_fw17M9zse0nWbJZ39o=w763-h1355-no.jpg
    192.1 KB · Views: 209
  • ikLinwXD4avxmuzVgABh1I01I5bqEreyvLZORczoQfQIMTTrSKUFWhkHDPI8-mwFZ5w1wqTNJL8qTCIpyg=w763-h1355-no.jpg
    ikLinwXD4avxmuzVgABh1I01I5bqEreyvLZORczoQfQIMTTrSKUFWhkHDPI8-mwFZ5w1wqTNJL8qTCIpyg=w763-h1355-no.jpg
    146.3 KB · Views: 194
  • arMOBSKcFn5uHrXH1VDZ6kEVZdgCsitjTB8B5gLRHv9rwe70D8qZG8KT4gXgkbJjgi55ieM0lQqEykTTE=w2048-h1152-no.jpg
    arMOBSKcFn5uHrXH1VDZ6kEVZdgCsitjTB8B5gLRHv9rwe70D8qZG8KT4gXgkbJjgi55ieM0lQqEykTTE=w2048-h1152-no.jpg
    289.1 KB · Views: 200
  • frylRla8aEg54UDbNnG4ojAQD4HtaPav85FDul3ZGjnrEC5YUkxJv9_H566-cH9Rj5t4f4dmmibJt29uk=w2048-h1152-no.jpg
    frylRla8aEg54UDbNnG4ojAQD4HtaPav85FDul3ZGjnrEC5YUkxJv9_H566-cH9Rj5t4f4dmmibJt29uk=w2048-h1152-no.jpg
    385.1 KB · Views: 194
  • h8eM-6EW7w-6S73LgNRtPSfvhfqDftn1Uwzl88lPkROFPDkmvaT4AI-F5EwtrSgCEOWMfz6_OMZtlLbMA=w2048-h1152-no.jpg
    h8eM-6EW7w-6S73LgNRtPSfvhfqDftn1Uwzl88lPkROFPDkmvaT4AI-F5EwtrSgCEOWMfz6_OMZtlLbMA=w2048-h1152-no.jpg
    365.1 KB · Views: 200
Awesome work Halex! Meatwad, it must be your browser. They are showing up in Google Chrome fine for me.
 
Last edited by a moderator:
I can't see the pictures :(

Did vshore's suggestion work for you? Nobody else has mentioned having issues viewing the pictures and I haven't changed storage methods recently.

Awesome work Halex! Meatwad, it must be your browser. They are showing up in Google Chrome fine for me.

Thanks vshore! I'm not sure I ever properly expressed my gratitude for your help getting me on the right path for molding; your suggestions and input were invaluable in making a lot of the initial decisions, and I really appreciate it!

holy mother of update lol. looking good :)

Yeah, I procrastinate in doing them sometimes, but in the end it's all the readers/viewers who have to feel the pain of a two-week update...

But not this time!

After taking a long weekend (of which there will be several more coming up, since I never use vacation days), I've got a good bit more progress on the upper body pieces. I decided I wanted to add/raise some of the details on the shoulders after the initial primer pass, so I did a bit of masking to make the bondo application easier.

rbd_rv5IdKWP0LQ32uc8PgGuf6HXUVFk6HcXKN8YdTtTMhLkEKDN2_61eMjl4uUNCf37HfM9hn-P7OEm0=w2048-h1152-no.jpg


Once the filler was added, the shoulders were sanded/filled/sanded/filled/etc over the course of a couple days, along with the chestplate. Results were good; you can see the sections where I raised the detail, though the one towards the front circle is less clear.

DHWGoJZt4gFdp_eqy9p28ucr0X7HpIkguemPLBfCS2DczUWcsK_lFdXgJyWR7gLJLtsEq27zQEf7g-PyyA=w763-h1355-no.jpg


With the focus on cleaning up the shoulders, I did another pass of sanding and spot putty on those, then left them to dry/cure overnight. The chestplate needed a bit more detailing, so I started in on that next. In the previous shot with the black primer, you can see that there's not a lot of distinction where the pieces of "metal" would fit together; the center reactor housing merges into the pieces that cover the pecs, which flows right into the sides, etc. After checking out some more reference photos, I noticed that these were clearly-defined lines in the suit and I was missing them entirely. Also, there were small lines in the sides I was missing, so I masked those off and prepared to cut them in.

oWK2nctQDNsyPMkQkMgsab9zQda1y3DEy1pySoQg70eZhnkEARCBlKTW1t1N-SXTEMbr-5aEzNyJvwwgI=w2048-h1152-no.jpg


The masking did help keep the lines straight, much to my delight. You can also see some additional cuts around the reactor hub where the pectoral plates meet up, and also where those same plates meet the sides. It's also gotten another round of sanding since the previous pic and is starting to shine just a bit.

40sa5LBEeMbgFA9ASHTWTgS0ZuF6sfa57Z5-VZPc2woD2SuXhudDhvwd78Ac1X_us6qMgTei-0GekJwqg=w2048-h1152-no.jpg


That's it for now, but I hope to keep up the pace with this and still be on schedule. While looking through reference photos I did realize that the arc reactor isn't actually visible in the Mk IV... it's just a bright light. I'd love to have the reactor, but I think it may have to wait until the upgrade pass to be built; not sure how I'd have time to do it otherwise. Will have to wait and see though, never know what might be possible!

Thanks for looking!
 

Attachments

  • rbd_rv5IdKWP0LQ32uc8PgGuf6HXUVFk6HcXKN8YdTtTMhLkEKDN2_61eMjl4uUNCf37HfM9hn-P7OEm0=w2048-h1152-no.jpg
    rbd_rv5IdKWP0LQ32uc8PgGuf6HXUVFk6HcXKN8YdTtTMhLkEKDN2_61eMjl4uUNCf37HfM9hn-P7OEm0=w2048-h1152-no.jpg
    500.1 KB · Views: 202
  • DHWGoJZt4gFdp_eqy9p28ucr0X7HpIkguemPLBfCS2DczUWcsK_lFdXgJyWR7gLJLtsEq27zQEf7g-PyyA=w763-h1355-no.jpg
    DHWGoJZt4gFdp_eqy9p28ucr0X7HpIkguemPLBfCS2DczUWcsK_lFdXgJyWR7gLJLtsEq27zQEf7g-PyyA=w763-h1355-no.jpg
    82 KB · Views: 196
  • oWK2nctQDNsyPMkQkMgsab9zQda1y3DEy1pySoQg70eZhnkEARCBlKTW1t1N-SXTEMbr-5aEzNyJvwwgI=w2048-h1152-no.jpg
    oWK2nctQDNsyPMkQkMgsab9zQda1y3DEy1pySoQg70eZhnkEARCBlKTW1t1N-SXTEMbr-5aEzNyJvwwgI=w2048-h1152-no.jpg
    301.5 KB · Views: 263
  • 40sa5LBEeMbgFA9ASHTWTgS0ZuF6sfa57Z5-VZPc2woD2SuXhudDhvwd78Ac1X_us6qMgTei-0GekJwqg=w2048-h1152-no.jpg
    40sa5LBEeMbgFA9ASHTWTgS0ZuF6sfa57Z5-VZPc2woD2SuXhudDhvwd78Ac1X_us6qMgTei-0GekJwqg=w2048-h1152-no.jpg
    299.6 KB · Views: 207
Last edited by a moderator:
Looks amazing as always man. And aslo, i user chrome both my on phone and desktop. For whatever reason they randomly showed up the day after your post. Can't wait to see more progress.
 
Looks amazing as always man. And aslo, i user chrome both my on phone and desktop. For whatever reason they randomly showed up the day after your post. Can't wait to see more progress.

Thanks man, glad they finally showed up.

Been hammering out some more parts on the arms lately and managed to get the first round of bondo/sanding/primer onto the forearms (hated the lack of symmetry with one being bondo'd and the other not!).

LnrcLcJJJ6QhHcZSQX2_Ois6AkxaXnQjAa502SQI2vU1iJCv4qwTXJQA6m3HZ2AWZj_8FMO7BiZRomaro=w2048-h1152-no.jpg


Also started on the biceps and got them to the same point. You can see a lot of the customization in the early shots where I had to expand the back and widen the cutout on the side. The top is a bit large but the area around my elbow is still a bit tight if anything.

WrC0f0cpudsKqAlOOGwOa2AmB9nxR0LXNJ38Ic1ap7fjpltwXjOgWgKPmvmp7kxQuLX0oB7AK4O50MD9Q=w2048-h1152-no.jpg


pPlNqE3I2UQtQAkxBU8D_IH8sV6lCKes-S_zb3KWTcpqzs8Tojsh22X5NJpbk8QjGGh2D0Csqv2HtXHcY=w2048-h1152-no.jpg


I usually try to avoid the "BONDO EVERYTHING!" approach as it's typically wasteful and adds difficulty, but in this case there was so much smoothing necessary that I didn't really have an alternative. In the end it wasn't too bad and only took a few hours and some pretty scuffed fingers to sand it down to the basic shape. I own a Mouse power sander but tbh I don't really like using it. Rasps, files, and sandpaper all the way!

VwNx_x3UhclWlODHZc5_hTAR9RYyS44nJY6rIfU_IydpQUmSTsb_rUzvH4piQ0iWNJt4-FpaXk6b_MQLY=w2048-h1152-no.jpg


Everything was going well, until about midway through the process I realized it was still missing the elbows... whoops. I'd had to do so much customization on the biceps that the original pieces didn't fit anymore, so I'd put them off to the side and basically forgotten about them for awhile. It looks like I may have to custom-build some now that I've gotten the arms fitted and primed, though it's still possible I could salvage some of the originals and alter them.

Still a lot to do before Halloween, so I've had to bring in reinforcements... more on that later, but for now I should get back to my actual job.

Hope to be back with more soon!
 

Attachments

  • LnrcLcJJJ6QhHcZSQX2_Ois6AkxaXnQjAa502SQI2vU1iJCv4qwTXJQA6m3HZ2AWZj_8FMO7BiZRomaro=w2048-h1152-no.jpg
    LnrcLcJJJ6QhHcZSQX2_Ois6AkxaXnQjAa502SQI2vU1iJCv4qwTXJQA6m3HZ2AWZj_8FMO7BiZRomaro=w2048-h1152-no.jpg
    366.6 KB · Views: 195
  • WrC0f0cpudsKqAlOOGwOa2AmB9nxR0LXNJ38Ic1ap7fjpltwXjOgWgKPmvmp7kxQuLX0oB7AK4O50MD9Q=w2048-h1152-no.jpg
    WrC0f0cpudsKqAlOOGwOa2AmB9nxR0LXNJ38Ic1ap7fjpltwXjOgWgKPmvmp7kxQuLX0oB7AK4O50MD9Q=w2048-h1152-no.jpg
    428.8 KB · Views: 193
  • pPlNqE3I2UQtQAkxBU8D_IH8sV6lCKes-S_zb3KWTcpqzs8Tojsh22X5NJpbk8QjGGh2D0Csqv2HtXHcY=w2048-h1152-no.jpg
    pPlNqE3I2UQtQAkxBU8D_IH8sV6lCKes-S_zb3KWTcpqzs8Tojsh22X5NJpbk8QjGGh2D0Csqv2HtXHcY=w2048-h1152-no.jpg
    425.4 KB · Views: 181
  • VwNx_x3UhclWlODHZc5_hTAR9RYyS44nJY6rIfU_IydpQUmSTsb_rUzvH4piQ0iWNJt4-FpaXk6b_MQLY=w2048-h1152-no.jpg
    VwNx_x3UhclWlODHZc5_hTAR9RYyS44nJY6rIfU_IydpQUmSTsb_rUzvH4piQ0iWNJt4-FpaXk6b_MQLY=w2048-h1152-no.jpg
    425.9 KB · Views: 184
Unfortunately work got a bit overwhelming and I had to put the suit on hold, missing the holiday. On the plus side, I won't have to compromise quality this way! I wasn't entirely happy with having to say parts were "good enough" to be painted by a deadline, even if I wasn't truly satisfied with the finish.

With that said, I should be getting back to it this coming week. As mentioned in my previous post, I did get to a point where I needed some help as there were parts of the suit I really wasn't excited to work on (hands, helmet hinges, etc). Since I have an incredibly hard time actually asking for help, I did what a lot of us here would do... I built (a good portion of) it.

KZNycn-BKcgZz5usVF23jHK08iOQE_ccskRdh5-q1Gm837Cl0pTmb0mJZPJSB58KiQnuPw5rTjAPrh8bE=w2048-h1152-no.jpg


Got a Prusa i3 kit from Amazon for a pretty reasonable price. Assembled it and fought through some early issues, getting some pretty good results. Printed each of the red finger pieces individually, before getting gutsy and printing the entire hand in one go, soon followed by the palm/back portions of the glove.

UGpihYBmcjNDmC-Tpe7qzH6yIxvMJ_yPFVBWXIARQJUmySWJRZXbcRcp-RsTVupkidifQ-iV3Jfq-erEQ=w2048-h1152-no.jpg


ToCYNCqbXvi7P7FbJNuN0ADFFw91UmOFCinbtJnKlEMD7i1JQg6cxjPRFyQkSD-uQP66D1iu9O3XtB0qY=w2048-h1152-no.jpg


lpBYYRCF1x325MH4mc_f7CGRYLYyO2SDG6mYv_aJZKDWsMOIsJ_hAjvICaJNLRmRHWutA1BSnof1j8dcU=w2048-h1152-no.jpg


Unfortunately, the fan went out and the extruder warped from excessive heat while printing the palm for the second hand. I got some replacement parts in last night, so if all goes well I should be up and running again next week. Overall I love the printer and am anxious to get back into it. It's almost mesmerizing watching it lay down the layers... frequently lose 10-15 minutes at the start of each print just sitting there staring.

On the other side of the build, I managed to get the thighs fairly far along. Since I have some extra time, I'll be making another pass over the entire thing for more smoothing, as I'm not yet satisfied with the finish.

vaOl-7Bc-w_KlXGU_mbTqIF094-vnfvxYFRJjAfV3kFXoFFgLyIY2VBu3rfMKVM8D6SEEdyr4xzCnK9I8=w2048-h1152-no.jpg


The joints with the shins don't fit as well anymore with the finish layers, so that'll also need another look. Once that fits correctly, I should be able to put the unpainted legs together and hobble around, which I've only managed with one leg so far.

The break was nice, but I'm anxious to get back to it. I don't foresee any major impediments, although I do have a couple friends who want to get into costuming for Mass Effect, so I may get distracted by that somewhere along the way.

'Till next time!
 

Attachments

  • KZNycn-BKcgZz5usVF23jHK08iOQE_ccskRdh5-q1Gm837Cl0pTmb0mJZPJSB58KiQnuPw5rTjAPrh8bE=w2048-h1152-no.jpg
    KZNycn-BKcgZz5usVF23jHK08iOQE_ccskRdh5-q1Gm837Cl0pTmb0mJZPJSB58KiQnuPw5rTjAPrh8bE=w2048-h1152-no.jpg
    397.8 KB · Views: 173
  • UGpihYBmcjNDmC-Tpe7qzH6yIxvMJ_yPFVBWXIARQJUmySWJRZXbcRcp-RsTVupkidifQ-iV3Jfq-erEQ=w2048-h1152-no.jpg
    UGpihYBmcjNDmC-Tpe7qzH6yIxvMJ_yPFVBWXIARQJUmySWJRZXbcRcp-RsTVupkidifQ-iV3Jfq-erEQ=w2048-h1152-no.jpg
    460 KB · Views: 195
  • ToCYNCqbXvi7P7FbJNuN0ADFFw91UmOFCinbtJnKlEMD7i1JQg6cxjPRFyQkSD-uQP66D1iu9O3XtB0qY=w2048-h1152-no.jpg
    ToCYNCqbXvi7P7FbJNuN0ADFFw91UmOFCinbtJnKlEMD7i1JQg6cxjPRFyQkSD-uQP66D1iu9O3XtB0qY=w2048-h1152-no.jpg
    394 KB · Views: 198
  • lpBYYRCF1x325MH4mc_f7CGRYLYyO2SDG6mYv_aJZKDWsMOIsJ_hAjvICaJNLRmRHWutA1BSnof1j8dcU=w2048-h1152-no.jpg
    lpBYYRCF1x325MH4mc_f7CGRYLYyO2SDG6mYv_aJZKDWsMOIsJ_hAjvICaJNLRmRHWutA1BSnof1j8dcU=w2048-h1152-no.jpg
    380.3 KB · Views: 195
  • vaOl-7Bc-w_KlXGU_mbTqIF094-vnfvxYFRJjAfV3kFXoFFgLyIY2VBu3rfMKVM8D6SEEdyr4xzCnK9I8=w2048-h1152-no.jpg
    vaOl-7Bc-w_KlXGU_mbTqIF094-vnfvxYFRJjAfV3kFXoFFgLyIY2VBu3rfMKVM8D6SEEdyr4xzCnK9I8=w2048-h1152-no.jpg
    299.9 KB · Views: 182
Status
Not open for further replies.
Back
Top