Open Blender. Once your in your starting scene hit the (A) key on your keyboard to select everything in the scene. You may have to hit (A) key twice in order to get everything selected. Usually the cube is always highlighted/selected upon opening up Blender. Then hit the (X) key. You should get a pop up box after hitting the (X) key, select delete. (See pic below)
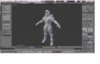
Scene should now be clear of objects, except for the grid. Now go up to the File in the Left hand corner of your screen, and click on it. You'll get a drop down box with some options. Scroll down to Import, and click on that. If you know where you saved your model, go ahead and add it, and open it. Model is now in the scene. (See pic below)
Model is now imported into the scene, I have everything deselected. Just a side note, it looks to be one object but Spartan Locke is actually a bunch of objects. You'll know this when you start clicking on different parts of the model. For now I'm gonna go ahead, and select his chest armor. Chest is highlighted bright orange because it is now my active selection. (See pic below)
Ok, now that you have the chest armor selected in Object mode, you now need to switch over to Edit mode. Either hit the (Tab) button for the shortcut, or click on Object mode on the bottom left to get the pop up box. From there you can select Edit mode also. (See pic below)
Now that your in Edit Mode, you can see that chest armor is highlighted orange. This is good, that means it's still your active selection. (See pic below)
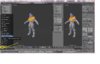
So, now what you'll need to do is split the 3d view window into 2. Take a look at where it is circled yellow at the top right hand corner. See the slanted lines just above the (+) tab. Left click on your mouse, and drag it to the left. (See pic below)
This is what your screen should look like now.
Click the button that I have circled, then scroll up to the UV image editor. Then select the UV image editor.(See pic below)
Check the yellow arrow at the bottom left, then click on the folder, and then find the texture maps that go with the model. I'm gonna go ahead, and find my diffuse map and apply it. (See pic below)
Take a deep breath! Don't freak out! You might be thinking well my model looks the same. Not necessarily. Go back on the right side of the screen with you model. Switch back to Object mode, then change you model from wire frame, to textured. Then Voila!
Hope this helps. Anyone can chime in, and let me know if I missed anything. I wanna make note, the same can be done with the normal map, and not just with the diffuse map. To have them both applied at the same time, I'm not sure.(That's why I use DAZstudio) Hopefully someone with the knowledge to do so, will add to this Tutorial. To have more than one map applied would be good for renders, and animations. To have just one map would be good for references, and adding details to the models that aren't already present on the model. Enjoy!