HoundinAbout
New Member
Looks awesome! Great job!
Thank you!Looks awesome! Great job!
Thank you! I am! I'll eventually drybrush for some edge highlights and some chipping effect and also to somewhat hide (or highlight/blend) some of the imperfections with the paint job. I have a few different colors that I am using on my test pieces to try and figure out which one is going to be the best fit.Your build is looking fantastic!!
Great job on the airbrushing. Are you planning on dry brushing some paint chips in?
A bit of a throwback to an earlier discussion in your thread, I also use a full wrap torso piece and neck seal for my MK7 and it's totally worth it.
Looks good. Going with EVA foam as part of your undersuit will be hot to wear. Invest in a motorcycle cool suit will help.Hey guys! Got the bug to build a full set of armor and joined the community a couple of weeks ago to get some ideas and inspiration. I downloaded the 3d print files from the wonderful Moesizzlac and began my print. I've gotten a bit into the process over the last couple of weeks, but decided I wanted to document my progress here for you guys.
When I initially started the build, I attempted to print the files as is. After printing a couple of sections of the torso, I realized very quickly that the scaling wasn't exactly meant for a man of my.....proportions. I decided to import the files into Armorsmith and scale them out to my size.
View attachment 342572
After exporting the files, it was time to start the long process and printing. I decided to start with the torso. I took the scaled torso object and exported it from Armorsmith and loaded it into Bambu Studio. There, I cut the file into 8 seperate objects and began printing. The Bambu X1C does an amazing job with these pieces. So far I have experienced very minimal flaws, and those that I have experienced are due to my settings within the slicer more so than anything.
View attachment 342573
View attachment 342574
I made a slight mistake with cutting the files that I noticed once I started assembling the pieces. I meant to slice the print at the seam between the chest and back clip. Absent mindidly, I just cut it down the center. This caused a bit more work for me further down the line. I used my rotary tool to cut the piece at the appropriate spot and attached the cut piece to the backplate to create the connection point I initially wanted.
I also ran into a few small issues when connecting the pieces that can be seen in the images below. Initially, I wanted to connect the pieces with quick set epoxy. I've always had trouble with this so I have no idea why I made this decision..... I made a rather larges mess of the epoxy of the front of the pieces that I am in the process of cleaning up/sanding down in the processing stages post print. With the back piece, I decided to instead use super glue for the initial connection, and then add the epoxy to the seams on the rear for some additional strength.
Being a bit impatient, I decided to run a coat of Rustoleum Camo across the top of the chest piece to test color. More so, just curious on how the color would look. It came out quite a bit darker than I expected and so I sanded it back down and began the process of filling seams between pieces with bondo spot putty and spraying filler primer.
View attachment 342576View attachment 342578View attachment 342579
While waiting on bondo and filler to dry, I've started working on a couple of different parts of the suit. First off, I took one of the failed pieces from earlier in the process and decided to color test a bit more. I ran a base layer of Behr Luck of the Irish. I then spot covered with the rustoleum camo, followed by a light dusting of the Luck of the Irish once more. I then went back over the piece with a simple black wash to add a bit of grime and detail to the piece. While this came out ok, I think in the future I am going to change a few things with the paint to achieve exactly what I am looking for with the color.
View attachment 342580
I also decided to use the waiting time to start working on the abdominal piece for the undersuit. I am using EVA foam for the detail pieces, but I am not quite sure what I will use under this. I plan to at least have an H harness, but haven't settled yet on wether I will simply wear a breathable morphsuit as a gap filler or look for something that incorporates both the harness and clothing into one.
With the EVA foam abominal pieces, so far I have laid out a simple design based on images I have pulled from game samples. I then cut these designs into 2mm EVA foam and layered it. I intentionally left the foam a bit tall at the top portion. Eventually, I want to add velcro strips to the front and back of the piece to ensure it stays connected to my body as well of the chest portion of the armor. I think this will give the midsection a much more jointed feeling. I did a bit of work with the dremel to the mid section to get the grid effect that is on the in game armor but I am not entirely happy with it. Eventually, I would like to print and cast the midsection and gap pieces in polyurethan rubber, but this will do for now until I get around to it. I still plan to coat the foam with plastidip and then add some highlight paint to get a more realistic look.
View attachment 342581
Currently, I am waiting on bicep pieces to print and filler to dry for an adequate time as to not gum up my sandpaper too much. I'll keep you guys posted of the progress!
Your shadowing turned out well, good jobFinished out the forearm pieces today. Hard to believe I am nearing halfway done with at least the core pieces. Still quite a bit of work on the undersuit once I have finished the printed stuff. View attachment 343704
Invest in a good motorcycle cool suit will help as long as you can get some air flow in that area.I’m gonna speak from experience here; having a non-breathable material around your torso like that is a TERRIBLE experience. I had a pseudo-wrap I made with pleather and I was sooooo sweaty on my abdomen while wearing it. Not a pleasant experience. I can’t even imagine a solid sheet of silicone.
Yeah I'm actually using some Under Armor Heat Gear that I have around. I just haven't 100% incorporated it yet. I've been back and forth on how to do all of the gasket pieces between the large printed parts. I'll end up re-casting the ab section in PU once it comes in. I'm thinking of different ways to handle a bit of airflow but haven't nailed down what I want to do yet.Invest in a good motorcycle cool suit will help as long as you can get some air flow in that area.
I am! I still have some dry brushing to do to add some chipping effect as well as a bit of "natural" scratches to highlight a bit.It's definitely trial and error with undersuits, I'm on my fourth version myself. Looks good, are you planning to dirty the armor?
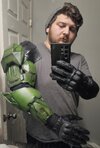
I know right? I thought they fit the suit perfectly and think they'll look even better with the plate attached.I love those tac gloves! Might have to use them for my MKVII build. Just found this build thread I love all the undersuit work you are doing!
Thank you for the link. I'll keep them in mind for sure!I know right? I thought they fit the suit perfectly and think they'll look even better with the plate attached.
Here's the link if you want to pick some up.
Thank you also! The undersuit work is definitely going to take quite a bit of time and extra work, but I really think it will make all the difference in the end.