You are using an out of date browser. It may not display this or other websites correctly.
You should upgrade or use an alternative browser.
You should upgrade or use an alternative browser.
Noble Spartan(mod's/add-on's begin)
- Thread starter thorn696
- Start date
- Status
- Not open for further replies.
Question???? Now that I'm getting to the shoulder-Bicep set up I need to know what would look better? Shoulder connected to the Bicep, OR Shoulder connected to the Chest plate? As of right now its hanging off the Chest plate. Any help here would be great....
I would go with the method that allows you the most movement, depending where you mount the shoulder it could hinder your arm movement where you can't even put your helmet on, I had my shoulder attached to my chest and it caused this to happen so I would experiment with it, either way Its going to look good
This is the primary problem with Stormtrooper and Vader costumers. However, the few costumes I have seen with the hsoulders connected to the biceps allows full rotation of the arms. Either that or attach the shoulders to the chest with an elastic strapping, allowing it to stretch away from the chest....I had my shoulder attached to my chest and it caused this to happen so I would experiment with it...
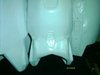
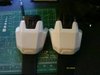
Time for this weeks update. This week I wet sanded the shines and added the venting on the back. I also added the details on the thighs, and made up the floating knee. Finely I stripped the Forearms and Biceps, and primed them with "PlastiKote" sandable primer as per smooth-on.


Thanks for the input, I will leave them as is then for now ( hanging off the chest)
Next week I will be very busy with work and will not have time for my project....so next update in two weeks.


This is the primary problem with Stormtrooper and Vader costumers. However, the few costumes I have seen with the hsoulders connected to the biceps allows full rotation of the arms. Either that or attach the shoulders to the chest with an elastic strapping, allowing it to stretch away from the chest.
I would go with the method that allows you the most movement, depending where you mount the shoulder it could hinder your arm movement where you can't even put your helmet on, I had my shoulder attached to my chest and it caused this to happen so I would experiment with it, either way Its going to look good
Thanks for the input, I will leave them as is then for now ( hanging off the chest)
Next week I will be very busy with work and will not have time for my project....so next update in two weeks.
Attachments
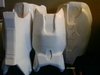


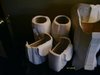
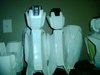

Time for this weeks update. This week I wet sanded the shines and added the venting on the back. I also added the details on the thighs, and made up the floating knee. Finely I stripped the Forearms and Biceps, and primed them with "PlastiKote" sandable primer as per smooth-on.
Thanks for the input, I will leave them as is then for now ( hanging off the chest)
Next week I will be very busy with work and will not have time for my project....so next update in two weeks.
WOW KEEP IT UP! THEY LOOK AMAZING! I think after this you'll have the makings for a Hero on here. I've seen many suits... few of this quality.
Attachments


Satchmo III
Well-Known Member
The details you've added, especially to the leg parts, look awesome. Overall I think everything looks very clean and professional. I'm looking forward to seeing your knee assembly in action.
I'm not very familiar with things like wet-sanding. If you have a moment I'm wondering if you could expand on how and why you've wet-sanded some of your pieces. Also, when you mention that you stripped the forearms and biceps, are you saying that you removed the primer that was on those pieces before re-priming with the PlastiKote? Is the idea that the PlastiKote is better to scuff up to increase the adhesion of the final paint? I apologize if these are silly questions...thought if I had them others might as well.
Get your work stuff complete so you can get back on your build. Keep it up Thorn696!
This week I wet sanded the shines and added the venting on the back. I also added the details on the thighs, and made up the floating knee. Finely I stripped the Forearms and Biceps, and primed them with "PlastiKote" sandable primer as per smooth-on.
I'm not very familiar with things like wet-sanding. If you have a moment I'm wondering if you could expand on how and why you've wet-sanded some of your pieces. Also, when you mention that you stripped the forearms and biceps, are you saying that you removed the primer that was on those pieces before re-priming with the PlastiKote? Is the idea that the PlastiKote is better to scuff up to increase the adhesion of the final paint? I apologize if these are silly questions...thought if I had them others might as well.
Get your work stuff complete so you can get back on your build. Keep it up Thorn696!
XxCrossFadexX
Jr Member
Man, this is going to look great!! Can't wait to see the finished product! ")
The details you've added, especially to the leg parts, look awesome. Overall I think everything looks very clean and professional. I'm looking forward to seeing your knee assembly in action.
I'm not very familiar with things like wet-sanding. If you have a moment I'm wondering if you could expand on how and why you've wet-sanded some of your pieces. Also, when you mention that you stripped the forearms and biceps, are you saying that you removed the primer that was on those pieces before re-priming with the PlastiKote? Is the idea that the PlastiKote is better to scuff up to increase the adhesion of the final paint? I apologize if these are silly questions...thought if I had them others might as well.
Get your work stuff complete so you can get back on your build. Keep it up Thorn696!
For my paint job I prime, sand, prime,sand. Then seal every thing with a with a Protective enamel.From there I add my card stock cut outs for detail work then seal again. I sand after each coat so that all those little pits and starches get filled in.
Wet sanding is using a fine grade sand paper(I'm using 600), wetting it and sand down the piece. I only do this when I get to the Protective enamel coats getting to keep it from getting the orange peel look, and/or to remove anything that gets into the paint. Once I get that paint looking smooth then I will go into the Finishing faze. If this were a car part You would using a finer sand paper each time to polish to that super high gloss look. Were I'm just getting mine set up as a fine base coat. Reason for this is that the final paint color is a super flat paint and I won't be able to sand any more at the stage. While I'm at it, Let me state why I'm using White primer. While most people know that using black primer makes a color stand out more vivid, and brings out details. White as a base coat will make the part lighter in color and if used right it will help in giving a part the aged worn look. Once I get to that stage then I will use a black wash to bring out the details.
As for stripping down the part, I was having a problem with the bicep's and for arms. So I stripped them down to the plastic then rubbed then down with alcohol to remove the oils and primed them with PlastiKote. Doing this did solve the problem with the forearms and most of the biceps. I did something wrong with the smooth cast 321 and this is making it sweat an oil. Time cures most of this and I have a work around for the few little spots that are still sweating. SO this a solution to a mistake that I made in mixing and pouring the smooth cast 321.
Smooth-on names "BullDog" and "PlastiKote" as being the 2 out of 30 primers that work best with there product. Primer increases the adhesion/bonding between paint and item being painted.
Looking really great thorn. Keep it up buddy.
Thank you.
Man, this is going to look great!! Can't wait to see the finished product!
You and me booth, I'm dyeing to get everything into paint. Thanks for the encouragement.
I dunno why this is still in the noob forum. This should be in the Epic forum.
Well I'll try not to let you down on that one, Thank you for saying so. ( I wouldn't mind getting out of the noob form by time it's in paint tho)
I dunno why this is still in the noob forum. This should be in the Epic forum.
Indeed. I will right a letter of recommendation to the admins if we need to.
Thank you.
You and me booth, I'm dyeing to get everything into paint. Thanks for the encouragement.
Well I'll try not to let you down on that one, Thank you for saying so.
RumMonkey4456
New Member
hey man, builds looking great. i was wondering, for the COD, what were your dimensions and scale for it? cuz im a little lost on how big i should make mine
Starvinartist80
Well-Known Member
I better post while I can, this should be elite soon. Your build is turning out fantastic. Wonderfuly smooth surface. Keep it up.
Indeed. I will right a letter of recommendation to the admins if we need to.
I'm still a long ways out from paint yet, let see if I can do this in a way that would make everyone proud to wear the 405th emblem.
hey man, builds looking great. i was wondering, for the COD, what were your dimensions and scale for it? cuz im a little lost on how big i should make mine
to be honest with you I cheated on the Cod. I made it to default scale then just cut out 2.5 inches out of each side in the front, (just behind the lights.)
How did you get those so smooth like that? Lots and lots of sanding?
Really looks like plastic? Or is it just white primer you used?
Sand, primer, spot putty, sand, primer and sand.....then repeat
I'ts smooth cast 321 for the most part ( plastic ) even tho I'm going to rondo a few parts to thicken them. And yes after primer I sealed them in a white base coat.
Side note: I have to seal each part after the detail add on's to protect them from the elements and/or the paint also makes the card stock harder. Sanding, sealing and wet sanding smooths out the parts.
I better post while I can, this should be elite soon. Your build is turning out fantastic. Wonderfuly smooth surface. Keep it up.
You honor me sir. Thank you. But I will say this, if it wasn't for my High school art teacher I wouldn't know how to do any of this. Who knows maybe one day I'll pick up a block of clay and see how much I remember of my Advanced Art 3 class's. My hats off to the teachers whom are not afraid to be different and teach things there way.
I'm still a long ways out from paint yet, let see if I can do this in a way that would make everyone proud to wear the 405th emblem.
Indeed. Though to be able to wear the 405th emblem, you have to apply for special permission. I was one of the lucky people who applied and was approved, which I feel bad about because my first suit got destroyed before I was able to upload pictures. I was literally washing off my hands from the final paint coat so I could go get my camera when the woman ruined it. And there are very strict guidelines.
The emblems colors must match perfectly to the emblem on the website.
It must be printed on a sticker and easily removable, though securely attached. (yes you can cut it out so there is no white border)
It must be worn with pride and respect, when you wear the emblem you represent the 405th infantry and you must behave in a way that represents the group well.
Starvinartist80
Well-Known Member
You honor me sir. Thank you. But I will say this, if it wasn't for my High school art teacher I wouldn't know how to do any of this. Who knows maybe one day I'll pick up a block of clay and see how much I remember of my Advanced Art 3 class's. My hats off to the teachers whom are not afraid to be different and teach things there way.
You are too kind. It is you who honor teachers by carrying on what you learned and putting it to good use. That is what makes our job worth it.
I thought smooth cast 321 was used for underneath to harden the pieces?
I might need to pick your brain about your techniques when I finish peping my helm and ready to start the next stage.
All to true, But..... Rondo will be allot easier to to use for those little ridges, rims, and any place that needs a fast thick coat of hard materiel. Remember Smooth cast go's on like water, were rondo go's on like a pudding. So I will be using it to thicken whats left on my parts. All that said I will also add I'm out of smooth cast and have to wait till Aug. before I get any more, were I have 2 can's of bondo and a can of fiberglass resin sitting here on my shelf right now
Indeed. Though to be able to wear the 405th emblem, you have to apply for special permission. I was one of the lucky people who applied and was approved, which I feel bad about because my first suit got destroyed before I was able to upload pictures. I was literally washing off my hands from the final paint coat so I could go get my camera when the woman ruined it. And there are very strict guidelines.
The emblems colors must match perfectly to the emblem on the website.
It must be printed on a sticker and easily removable, though securely attached. (yes you can cut it out so there is no white border)
It must be worn with pride and respect, when you wear the emblem you represent the 405th infantry and you must behave in a way that represents the group well.
Ahhh .....hmmmm. I'm sorry, I miss worded my sentence/thought. Were everything you have quoted is all to true and in the sticky. I Myself will not be Wearing, the EMBLEM of the 405th on my armor. The statement was more to the effect that my finished build would give credit to all the people of 405th and/or what they stand for. If I put a emblem/logo on my armor it would be my own or a modified version of "Long Ranged Death". Now that is (I hope) cleared up. I will add this, at a later time I may do up a pin of each. 405th,LRD, and mine and put them on a OppFor. cover, but I will take the time to go thru the proper formats before doing so.
- Status
- Not open for further replies.