ODST Build WIP -First Build-

Status
Not open for further replies.
Update 07

Okay, with this update I made a video explaining all that I had done and how my rig worked. I'll put it in when youtube starts to start working for me. As for now the suit is wearable. I'll put the pictures down below.


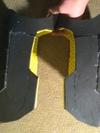
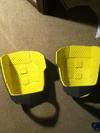
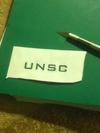
UNSC Stencil I made.
IMG_2417_zps077b1382.jpg

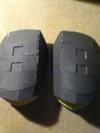
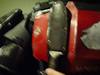
My foam butt plate next to my pepped one
IMG_2408_zps4af07674.jpg

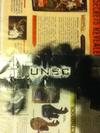
Another picture of the stencil after I used it
IMG_2469_zpsc984d559.jpg

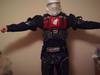
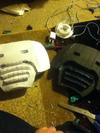
The armor's current state
IMG_2455_zps45b23819.jpg

And if you would wish to view the whole album, here is the link:
http://s1289.photobucket.com/user/GhostDragon_/slideshow/

All suggestions are appreciated.
 

Attachments

  • IMG_2417_zps077b1382.jpg
    IMG_2417_zps077b1382.jpg
    68.4 KB · Views: 149
  • IMG_2408_zps4af07674.jpg
    IMG_2408_zps4af07674.jpg
    86.9 KB · Views: 155
  • IMG_2469_zpsc984d559.jpg
    IMG_2469_zpsc984d559.jpg
    99.5 KB · Views: 163
  • IMG_2455_zps45b23819.jpg
    IMG_2455_zps45b23819.jpg
    70.8 KB · Views: 146
Last edited by a moderator:
cool build is your armor a custom build or is it Mickey from ODST?

Thanks! It's funny, I didn't ever compare the armor that I was making to Mickey's, but now that I am its very similar! I am making this as a custom build, as I plan to add pouches to the chest and an old combat knife that I'm going to dull. I chose the CQ shoulder because I liked the design, and I always loved to get up close and personal to my opponent. As far as the colour goes, It was between red and Cobalt.
 
Cool at this rate you should make infantryman in no time I have to ask are you going to put any attachments on your helmet?
 
Cool at this rate you should make infantryman in no time I have to ask are you going to put any attachments on your helmet?

As far as exterior attachments go, I think I'm going to go default with the helmet. As far as function wise, I'll add some LEDs to the exterior, a fan on the inside, and if I can figure it out, some inflatable bags to mold it to my head when I wear it(I probably won't do this last one).
 
Sounds legit but couldnt you possibly kill yourself with helmet air bags? I just got an old dirt bike helmet at a thrift shop and remove the pading to put in side my helmet
 
Update 08

Well, it's been a while. I didn't updated in the past week because I didn't think I had enough material to show. Now that I feel I do, I'll get right to the pictures.

I mad the thighs out of foam because I can sit down with it on without running the risk of cracking it. It is also comfortable to walk around it, and it doesn't impede on my movement that much.

IMG_2472_zpsb084e0fe.jpg

IMG_2473_zps5989e3a0.jpg

IMG_2474_zpsc9e65f5e.jpg

I have finished the painting of the thighs and rigged them to my under belt.

To touch up on the belt, I cut some aluminum from a pop can and cut out some pieces to glue over top of it.

IMG_2491_zps929bce07.jpg

IMG_2497_zps5a7119eb.jpg

The other thing I added to the belt was the cod cloth that goes out from the crotch plate. To keep it in place, it goes through my legs and attaches to the inside of the butt plate with some Velcro.

IMG_2500_zps347bb42f.jpg

SAM_0142_zps9ace8e5c.jpg

I realize that it is flatter than found in the game, and I am currently looking around for some think fabric that I can put under the foam.
Here is a picture of the belt buckle with the aluminum on it.

SAM_0143_zps8c09d8f0.jpg

I found a much better camera just floating around in my house, and I'll post pictures with it from now on.

IMG_2493_zps608f8bc8.jpg

Here is all the armor I have so far on me(with the exception of the gloves). While it does decrease my ability to use my arms, it doesn't impede on my dexterity TOO much, as I am still able to run, jump, crouch, and sit. I still have to fix my shoulders, as they are not correctly placed(on a side note, I put a blood type on my right shoulder, as well as a piece of foam to elevate it. Thanks to TD-0013 for the files) I have also put an emblem on the chest plate and added a piece of webbing to the chest core to add some detail.

SAM_0145_zpsf6ee4192.jpg

SAM_0146_zps4c61e71b.jpg

I personally really like how the back has turned out so far.

SAM_0150_zpsc70d815d.jpg

Here is an old rusted combat knife I found laying around. While it's not exactly cannon, I might end up using it(after I dull the blade and give it a new paint job of course).

SAM_0153_zps60e2a0ed.jpg

Here is where I plan to put the knife after everything is said and done.

SAM_0154_zpsb6080898.jpg

That is all for this update. Currently I am going about acquiring some more foam for shins and forearms, working on the boots, and making a neck seal. I appreciate all comments and suggestions!
 

Attachments

  • IMG_2472_zpsb084e0fe.jpg
    IMG_2472_zpsb084e0fe.jpg
    85.6 KB · Views: 140
  • SAM_0142_zps9ace8e5c.jpg
    SAM_0142_zps9ace8e5c.jpg
    14 KB · Views: 158
  • SAM_0143_zps8c09d8f0.jpg
    SAM_0143_zps8c09d8f0.jpg
    14 KB · Views: 169
  • IMG_2493_zps608f8bc8.jpg
    IMG_2493_zps608f8bc8.jpg
    14 KB · Views: 149
  • SAM_0145_zpsf6ee4192.jpg
    SAM_0145_zpsf6ee4192.jpg
    14 KB · Views: 149
  • SAM_0146_zps4c61e71b.jpg
    SAM_0146_zps4c61e71b.jpg
    52 KB · Views: 146
  • SAM_0150_zpsc70d815d.jpg
    SAM_0150_zpsc70d815d.jpg
    49.8 KB · Views: 157
  • IMG_2500_zps347bb42f.jpg
    IMG_2500_zps347bb42f.jpg
    92.2 KB · Views: 155
  • IMG_2497_zps5a7119eb.jpg
    IMG_2497_zps5a7119eb.jpg
    14 KB · Views: 147
  • IMG_2491_zps929bce07.jpg
    IMG_2491_zps929bce07.jpg
    14 KB · Views: 159
  • IMG_2474_zpsc9e65f5e.jpg
    IMG_2474_zpsc9e65f5e.jpg
    83.1 KB · Views: 142
  • IMG_2473_zps5989e3a0.jpg
    IMG_2473_zps5989e3a0.jpg
    84.8 KB · Views: 144
  • SAM_0154_zpsb6080898.jpg
    SAM_0154_zpsb6080898.jpg
    56 KB · Views: 152
  • SAM_0153_zps60e2a0ed.jpg
    SAM_0153_zps60e2a0ed.jpg
    14 KB · Views: 151
Status
Not open for further replies.
Back
Top