- Member DIN
- S024
Howdy folks,
I wanted to make an outline for the VK78 Commando rifle that I recently finished. I thought I would share the journey and a few things that I tried and learned along the way as well as share some of the assets that I put together for anyone else who was looking to make a commando rifle.
The files that I used were from TurboCharizard from the Free 3D model index.
link to that build thread here.
I made this prop to 100% scale from the files.
Tools:
Printing:
Not a ton interesting here. Technically i printed this all off at the end of 2021 but kept having to be pushed off to finish other projects and commissions. The important part of this is to remember to look ahead as to how the whole project will come together. there are parts that should be glued together and there are some parts that will be easier to glue together after you have sanded and primed at a minimum.
.jpg")

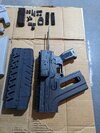
Rough assembly to check the size. Also you can tell i was going through the last bit of my silk PLA stores. (new armor coating ideas.
Prepping:
I used XTC3D on this but honestly it is a double edged sword, fills in the layer lines but you end up having to do a lot of sanding. I would probably use the bondo putty method if I was to do this again. now for hours and hours of prime and sand and prime and sand. Pro tip: I like to double side some tape and stick a bunch of parts to a piece of cardboard while doing the painting and priming step so that I can grab the whole piece of cardboard to paint from different angles and not get surfaces covered in paint.


I wanted to make an outline for the VK78 Commando rifle that I recently finished. I thought I would share the journey and a few things that I tried and learned along the way as well as share some of the assets that I put together for anyone else who was looking to make a commando rifle.
The files that I used were from TurboCharizard from the Free 3D model index.
link to that build thread here.
I made this prop to 100% scale from the files.
Tools:
- sandpaper
- filler primer
- airbrush
- XTC3D model resin
- dremel
- E6000
- superglue
- various paints
- angelus acrylic top coat
- petg sheet plastic .2mm
- printer paper
- PVC pipe
- steel rods link to amazon.
- Ultimaker Cura for 3d printing
- inkscape for making the stencils
Printing:
Not a ton interesting here. Technically i printed this all off at the end of 2021 but kept having to be pushed off to finish other projects and commissions. The important part of this is to remember to look ahead as to how the whole project will come together. there are parts that should be glued together and there are some parts that will be easier to glue together after you have sanded and primed at a minimum.
Rough assembly to check the size. Also you can tell i was going through the last bit of my silk PLA stores. (new armor coating ideas.
Prepping:
I used XTC3D on this but honestly it is a double edged sword, fills in the layer lines but you end up having to do a lot of sanding. I would probably use the bondo putty method if I was to do this again. now for hours and hours of prime and sand and prime and sand. Pro tip: I like to double side some tape and stick a bunch of parts to a piece of cardboard while doing the painting and priming step so that I can grab the whole piece of cardboard to paint from different angles and not get surfaces covered in paint.