After finishing the helmet, I set it on the shelf and moved on. I want to have a few more pieces finished before moving into resin coating, so that I can make progress on several at the same time. While one is drying, coat a second piece, then coat a third while both 1 and 2 are drying, etc. -- seems most efficient. So, I moved on to the chest. I think I did the Master Chief suit pieces in the same order. Creature of habit.
Before any building or printing of pieces, you MUST figure out scale. The Master Chief suit was relatively easy to scale. There are literally thousands of image references that work perfectly for scaling; it's a dream. With this suit, there are basically zero full-body, straight on shots of the full suit. There are a few of the group of dudes wearing the Ep 7 ST on stage, but they aren't perfectly straight on. Nevertheless, I used one of those images to scale the helmet, and to try to scale the suit to myself. I printed out a picture of one of those guys, and measured from the top of his head to the bottom of his feet, in millimeters. Then, I figured out my own height in cm. With those two figures, I could measure any piece of his armor vertically in mm, and using the ratio of that piece to the guy's full height, I could figure out how tall the piece should be for myself. and enter that into pepakura.
It all seemed so airtight until I was about three quarters of the way through cutting out the pieces of the chest.
I got to one of the arm cuffs, and realized I might have made a mistake -- the piece just seemed too small. I put it over my arm, and sure enough, it wouldn't fit all the way into the shoulder like it should. I know that could be fixed by removing some material after hardening, but I want the damn thing to be scaled correctly. I had to figure out a more precise method. And I had to throw away hours worth of work...

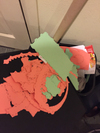
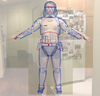
I noticed that the files came with one that was all of the pieces of the armor together. It seemed like the best way to get accurate measurements of how big the pieces should be would be to use a screencap of that in conjunction with a straight-on shot of myself. That way, I would be able to eyeball better measurements using a figure that I was familiar with: me. I blurred out the background image to avoid any internet weirdness, but this is the general idea. I'm interested in feedback for anyone that's done scaling this way before -- what have your experiences been like?

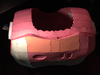
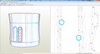
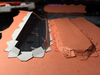
I printed out the arm cuff piece first, and sure enough, it fit over my shoulder. I took this to mean that I sorted out the scaling issue, and I've been charging forward on the chest piece. (In the files, it's actually called the back, and there's another piece called 'chest' that attaches to the front only. I'm calling it the chest anyways.) Fair warning: this pep file is not the same superb quality or detail as the helmet. There are enormous single pieces, and some of the number spacing flat out does not match from one piece to the next. In this example, the actual perfect alignment point is between 772 and 64. By 774, the pieces are way out of alignment, even though they are both solid pieces. Both are printed at the same scale/same time, and they are on the back of the chest, so they are not supposed to bend significantly enough to justify the difference in spacing. The hack job on the top of this piece was the result of several failed attempts to remove enough material to allow the two to lay flat. I'll just fix that butchery during/after hardening.

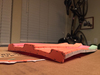
There are several instances of this crummy alignment across the larger panels of the chest. While it's annoying and can confound the symmetry of your piece, I am getting around it by gluing pieces together with only one or two tabs, and checking spacing as I go. When I find discrepancies, I use the tip of the hot glue gun to re-heat the glued tabs, remove the piece, and cut down whatever I need to. It's time consuming, but it's well worth whatever time I'll save in finishing.

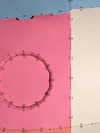
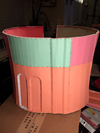
Chest Detail

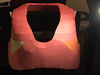
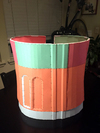
Yay, a paper sports bra.
I'll be away for a bit, but will resume after the holidays!
Before any building or printing of pieces, you MUST figure out scale. The Master Chief suit was relatively easy to scale. There are literally thousands of image references that work perfectly for scaling; it's a dream. With this suit, there are basically zero full-body, straight on shots of the full suit. There are a few of the group of dudes wearing the Ep 7 ST on stage, but they aren't perfectly straight on. Nevertheless, I used one of those images to scale the helmet, and to try to scale the suit to myself. I printed out a picture of one of those guys, and measured from the top of his head to the bottom of his feet, in millimeters. Then, I figured out my own height in cm. With those two figures, I could measure any piece of his armor vertically in mm, and using the ratio of that piece to the guy's full height, I could figure out how tall the piece should be for myself. and enter that into pepakura.
It all seemed so airtight until I was about three quarters of the way through cutting out the pieces of the chest.
I got to one of the arm cuffs, and realized I might have made a mistake -- the piece just seemed too small. I put it over my arm, and sure enough, it wouldn't fit all the way into the shoulder like it should. I know that could be fixed by removing some material after hardening, but I want the damn thing to be scaled correctly. I had to figure out a more precise method. And I had to throw away hours worth of work...
I noticed that the files came with one that was all of the pieces of the armor together. It seemed like the best way to get accurate measurements of how big the pieces should be would be to use a screencap of that in conjunction with a straight-on shot of myself. That way, I would be able to eyeball better measurements using a figure that I was familiar with: me. I blurred out the background image to avoid any internet weirdness, but this is the general idea. I'm interested in feedback for anyone that's done scaling this way before -- what have your experiences been like?
I printed out the arm cuff piece first, and sure enough, it fit over my shoulder. I took this to mean that I sorted out the scaling issue, and I've been charging forward on the chest piece. (In the files, it's actually called the back, and there's another piece called 'chest' that attaches to the front only. I'm calling it the chest anyways.) Fair warning: this pep file is not the same superb quality or detail as the helmet. There are enormous single pieces, and some of the number spacing flat out does not match from one piece to the next. In this example, the actual perfect alignment point is between 772 and 64. By 774, the pieces are way out of alignment, even though they are both solid pieces. Both are printed at the same scale/same time, and they are on the back of the chest, so they are not supposed to bend significantly enough to justify the difference in spacing. The hack job on the top of this piece was the result of several failed attempts to remove enough material to allow the two to lay flat. I'll just fix that butchery during/after hardening.
There are several instances of this crummy alignment across the larger panels of the chest. While it's annoying and can confound the symmetry of your piece, I am getting around it by gluing pieces together with only one or two tabs, and checking spacing as I go. When I find discrepancies, I use the tip of the hot glue gun to re-heat the glued tabs, remove the piece, and cut down whatever I need to. It's time consuming, but it's well worth whatever time I'll save in finishing.
Chest Detail
Yay, a paper sports bra.
I'll be away for a bit, but will resume after the holidays!

")