You are using an out of date browser. It may not display this or other websites correctly.
You should upgrade or use an alternative browser.
You should upgrade or use an alternative browser.
Halo 4 BR85HB SR (Pic heavy!) - First Major Project
- Thread starter RobTC
- Start date
- Status
- Not open for further replies.
Beast mode!!!!!
Yeah man.

Quick update, not too exciting but it's 24 images, so yeah. It's mainly a whole bunch of work on the grip, getting it ready for electronics.
Got a combination square, finally. There's ten bucks that I wish I'd spent a long time ago! Much easier not only on marking out stock but also squaring the bench tools.

Started drilling the magnet holes, this one went a little too far. I'm gonna have to push in some Bondo and try to get it to clump under the hole in such a way to surround the 1/4" diameter of the hole.

Time for some grip surgery to match the accuracy of the rest of the build. It was pretty much the first part I built, so a rebuild should probably have been expected.


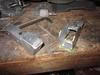
Trigger, charging lever grip, and safety selector!

Had to trim this down a little from measured dimensions, but should work fine.

Trigger cut out and shaped:

I had been trying to think of ways around this, but it wasn't to be. Had to bite the bullet. Fortunately there isn't any Bondo to replace!

Looking like it's coming together! This area still needs a lot of fitting work, I'm going to try to minimise the amount of glue/filler required on the kits.

Need to simulate the knurling on this, then add the little ridges and its stalk:

Still coming together nicely, I think!
Practicalities update: @Arcanine Harri51 RiBeck FoxtrotX146 Noble 10
Got the silicone ordered today; dropping $200 on a couple tubs of goop is mildly terrifying, for some reason. I think my current plan is to work on getting my own kit done (and ironing out the casting kinks in the process), and I can get an idea of shipping cost from that too. Then I'll start taking full payments (via PayPal) on the other kits and cast on demand, so I'm not wasting resin.
I've been thinking about it, and although it's irrelevant right now, in case of debate over the order of recipients, it'll go like this. The people on the "definite" list will get notified of the kit's availability and a response will be waited on for 21 days, after which their place in line will be forfeit. The people on the "maybe" list will get notified, but no place in line will be held. All shipments will be in order of getting on the list (which is in order of the mentions above) or of response if there are delays from the "definites".
If there's sufficient interest, I'll do a follow up run of kits at $350 (which is closer to their actual value, though regardless of my finishing skills will still be a little on the cheaper side vs their actual worth). Once the electronics systems are complete I should also be offering a fully finished static prop (degree of weathering up to the buyer) for $550 and a fully finished version with pre-installed electronics for $900. There may also be a "special edition" with a thermal scope for $1500... Because that'd be awesome and I think it's doable.
For those interested in aftermarket electronics parts, the way I have it set up now (ie. removed the "key" leg from the carry handle) the ammo counter display area will be easily accessible to install the projector (if I can build it small enough) and no chop-shopping of the carry handle will be necessary. Obviously this also means you can install your own LCD display if you prefer the loss of accuracy vs the high cost of a hand-built micro laser projector!
Because with all the electronics in here (especially now that Arcanine has convinced me to add sound if I can find a place for the speaker) space is going to be at an ultra-premium, I'm planning on using LiPo 18650 cells in the front of the foregrip. This means that batteries will not be included with electronics, since shipping multiple LiPos is a PITA. So allow an extra $60 for batteries and charger if you're going the pre-built electronics route. For those of you rolling your own more basic electronics solutions, the foregrip or magazine should have plenty of space for a bunch of high capacity NiMH AAs.
For practical/financial purposes, I'm gonna say let's assume general casting will begin early March.
I think that's all the meta-updates for now!
Last edited by a moderator:
Very nice work indeed, Rob. You're going to have to give me an idea of the price for the initial kits, so I'll know whether or not I can get the money in time. Otherwise, I'll give up my slot for somebody else and not hog the line.
I'm available via PM if you need me.
I'm available via PM if you need me.
FoxtrotX146
Member
I'm also sitting on the fence on this one. I doubt I will ever get to buy one but I appreciate the slot. You might as well open up a slot for someone else. I'm still very interested in the project though!
I'm also sitting on the fence on this one. I doubt I will ever get to buy one but I appreciate the slot. You might as well open up a slot for someone else. I'm still very interested in the project though!
Since you're just in the "maybe" list, you just get occasional notifications like this and again when it's ready for casting, you're not really in a "line", as it were. If you don't want the tagged updates, I can take you off the list though, no worries. You can always check back manually in a few weeks if you're not already subscribed. My subscription to this thread doesn't work though, so I'm not sure if anyone else's is updating.
Very nice work indeed, Rob. You're going to have to give me an idea of the price for the initial kits, so I'll know whether or not I can get the money in time. Otherwise, I'll give up my slot for somebody else and not hog the line.
I'm available via PM if you need me.
This initial run of five is at a bargain basement $230 + shipping (if my Smooth-On order is anything to go by, UPS shipping to continental US is only like $20-30) to help me recoup costs, basically. Since I should be able to meet you half way somewhere if your original plans still held, it'll just be $230.
Pickup is available to anyone else too if they can get to SW/central VA or SW WV (I still haven't got around to working on my license, so I'm limited to where my wife usually drives to).
Oh, cool! I spoke to my husband and he said he'd be willing to get me one for Valentine's Day (bless his heart, he spoils me rotten!) - and that's very acceptable. I'll speak to him about the delivery, he lives in Fredericksburg.
ok holy cow your boss with wood
Hahah, thanks man.
Oh, cool! I spoke to my husband and he said he'd be willing to get me one for Valentine's Day (bless his heart, he spoils me rotten!) - and that's very acceptable. I'll speak to him about the delivery, he lives in Fredericksburg.
D'aww, a battle rifle for Valentine's Day, that's adorable!
Let's see, Fredericksburg... Ok, meeting can probably happen in either Culpeper or Charlottesville, but we'll figure that out via PM in a few weeks I guess. Sounds good!FoxtrotX146
Member
Thanks! I really appreciate the convienence. I'd still like the updates since this project is so awesome!
- Member DIN
- S980
Started drilling the magnet holes, this one went a little too far. I'm gonna have to push in some Bondo and try to get it to clump under the hole in such a way to surround the 1/4" diameter of the hole.
View attachment 8771
Need to simulate the knurling on this, then add the little ridges and its stalk:
View attachment 8793
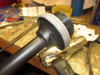
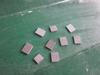
For my magnets, I filled the hole with JB Weld, dropped in the magnet, then covered the whole mess with tape to seal. Then lay over a piece of flat steel. This will bring the magnet perfectly level with the surface after cure. Double stacking the little magnets really strengthens their pull for more positive latching. I have also done both sides of a connection at the same time, separated by tape. This allows the magnets to align themselves perfectly for the most efficient and positive latch.
Here are the two sets of magnets in my Spartan Laser grip and the grip frame. After this shot, I put in the hinge pin and put everything in the desired position. The magnets positioned themselves and the end result was a firm and positive lock with no cleanup work needed.
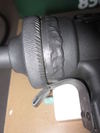
I simulate knurling with JB weld and a coarse file. As the JB sets to the consistency of model clay and it lo longer sticky, I press it against a file face to impart the reverse pattern. This produces a much more consistent result than trying to cut a pattern.
From This (airsoft M3 Greasegun)
To This.
Hope that's useful.
Redshirt
Woo Hoo, my 500th post! What's my prize?
Attachments
Hope that's useful.
Redshirt
Definitely, that's awesome! The problem with the magnets is that I can only do the hole for now in the master, since they'll actually get glued into the casts. I like that idea of oversizing slightly and then allowing them to find their own fit though.
The knurling idea is perfect, I'll try it today. I was planning on just cutting a bunch of lines with the Dremel thin cut disc and triangle filing them out, which probably wouldn't give the best results. Any idea on how long that set up time is on the JB Weld?
- Member DIN
- S980
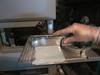
Thank you. Depends on the temperature. You can add heat (lamp, heat gun, etc) and get it to tack up in short order. In the garage this time of year it can be 14 hours. If you don't need a cross-pattern knurl, you can drag a saw blade through as well. Saw blade technique works with uncured Bondo (only because of the one-way cut).
Saw blade technique for grooving.


Redshirt
Saw blade technique for grooving.
Redshirt
Attachments
Just going to put this in here: how do you plan to split up the rifle for casting? And, I recall you mentioning the ability to install electronics, but: will this feature in the first run, or will the casts be 'solid'? I can talk to my electronics guy to get my own installed, but knowing if I have the capability to do so beforehand would be essential c:
Got some shots this afternoon for an HQ update once I have time to process them, maybe tomorrow.
@Arcanine
I'm going to try to get rotocasting working on the first run, for sure. Here it is all broken down and explained. I've put in my ideas for areas, obviously others may use them differently:

Edit: In other words, this is a real kit, as opposed to a simple one-piece rotocast "paintable kit". There are non-visible non-structural surfaces all over the place to get electronics in whilst still having enough surface area to epoxy parts together.
@Arcanine
I'm going to try to get rotocasting working on the first run, for sure. Here it is all broken down and explained. I've put in my ideas for areas, obviously others may use them differently:
Edit: In other words, this is a real kit, as opposed to a simple one-piece rotocast "paintable kit". There are non-visible non-structural surfaces all over the place to get electronics in whilst still having enough surface area to epoxy parts together.
Ah, I see. I'm still not quite sure about how you're going to be fitting stuff into the stock if it's solid, but perhaps I'm just missing something and need it explaining better.
Thanks, in any case - it all looks very, very good. I'll likely lay off of an ammo counter, unless I can figure one out. Are there plans for the scope as well? And, while I'm at it - I had the idea of a swappable orange muzzle for conventions, do you have any plans for something like this?
Thanks, in any case - it all looks very, very good. I'll likely lay off of an ammo counter, unless I can figure one out. Are there plans for the scope as well? And, while I'm at it - I had the idea of a swappable orange muzzle for conventions, do you have any plans for something like this?
The inside of the stock is built hollow, so it just needs casting in one solid piece as-is. This pic from a few updates ago shows the internal structure:

It should be easy enough to do a simple reflective overlay on the ammo counter which of course suits 99% of people.
No plans for an orange tip, though something like the insertable orange clip they use in the military might be good, or a simple orange plug. Given the accuracy of this build, that's probably something I should have considered, but it hadn't crossed my mind. Orange electrical tape, maybe? (http://www.amazon.com/Duck-299005-Electrical-4-Inch-Single/dp/B000BOHK58/)
And yeah, I'll be putting together a basic scope soon, just haven't got that far yet. It'll probably be solid with a curved recessed front "lens", and a slightly lower level of accuracy than the rest of the build, since I'm going to be rebuilding it for electronics. For now I'm working on final detailing and surface prep for a change of pace.
Got some HQ update shots processed. Not too many, but there isn't a whole lot left to show here really. I think these basically get the idea across.


Other than the scope, bolt heads, and some minor detailing, it's all just smoothing and filling for mouldmaking from here on out. Silicone arrives today!
Other than the scope, bolt heads, and some minor detailing, it's all just smoothing and filling for mouldmaking from here on out. Silicone arrives today!
I don't think there's anything left to say! Amazing!
If it were me, I would sand sand sand, to try and get it as smooth as possible before molding. I hear that a poleshed surface makes for a much better/cleaner cast.
Keep it up!
If it were me, I would sand sand sand, to try and get it as smooth as possible before molding. I hear that a poleshed surface makes for a much better/cleaner cast.
Keep it up!
I've changed my mind on the magazine; there isn't enough room in there for AA batteries or anything once the walls have built up to a sufficient rotocast thickness for regular handling. So that's going to get stuck together and solid cast. It might even be the first thing I mould, since it's quite a straightforward geometry for two-part box molding and easy to do the surface finishing on.
I've also broken off the barrel, because I want it solid cast, which means it would have to be cast pointing down, but the barrel itself is very deep and requires pointing up in order to keep the silicone "plug" straight. I'm not sure if I'm going to reinforce that part or not, since it's not functional and it doesn't matter too much if it drifts off by a millimeter or two at the end, unlike the mag well.
Right now I'm actually working on that part, adding the little clippy bits on the barrel "blob".
I'm planning on filling in all the hairline cracks and surface dimples with Bondo air-dry putty, then sanding the whole thing to 400 grit, and wet sanding as much of that as possible. All noticable external surfaces will be wet sanded to 1000 grit. All major external surfaces- the sides of the stock and carry handle, the foregrip, etc. will be wet sanded to 2000 grit. It should be like rubbing plain paper over it by the end. Then I'll seal it all with Pledge Future Shine, which is more "acrylic micro-crevice filler" than "floor wax", and then over that I'm currently planning on doing a final couple of coats of gloss auto enamel, which should lay down perfectly by that point and I shouldn't need to wet sand or buff that out at all, in theory. Then I guess it'll have to cure for a week (maybe I'll use acrylic gloss clear coat instead of auto enamel in the interests of time...).
I've already experimented with some of this, as you can see by the shine on the foregrip and the black enamel on the barrel jacket and grip, I just need to do it piece by piece.
Hopefully it isn't a nightmare to get the clay back out of the parts without damaging the surface finish. I wonder if I can just heat them to like 210F or whatever and it'll run off?
I've also broken off the barrel, because I want it solid cast, which means it would have to be cast pointing down, but the barrel itself is very deep and requires pointing up in order to keep the silicone "plug" straight. I'm not sure if I'm going to reinforce that part or not, since it's not functional and it doesn't matter too much if it drifts off by a millimeter or two at the end, unlike the mag well.
Right now I'm actually working on that part, adding the little clippy bits on the barrel "blob".
I don't think there's anything left to say! Amazing!
If it were me, I would sand sand sand, to try and get it as smooth as possible before molding. I hear that a poleshed surface makes for a much better/cleaner cast.
Keep it up!
I'm planning on filling in all the hairline cracks and surface dimples with Bondo air-dry putty, then sanding the whole thing to 400 grit, and wet sanding as much of that as possible. All noticable external surfaces will be wet sanded to 1000 grit. All major external surfaces- the sides of the stock and carry handle, the foregrip, etc. will be wet sanded to 2000 grit. It should be like rubbing plain paper over it by the end. Then I'll seal it all with Pledge Future Shine, which is more "acrylic micro-crevice filler" than "floor wax", and then over that I'm currently planning on doing a final couple of coats of gloss auto enamel, which should lay down perfectly by that point and I shouldn't need to wet sand or buff that out at all, in theory. Then I guess it'll have to cure for a week (maybe I'll use acrylic gloss clear coat instead of auto enamel in the interests of time...).
I've already experimented with some of this, as you can see by the shine on the foregrip and the black enamel on the barrel jacket and grip, I just need to do it piece by piece.
Hopefully it isn't a nightmare to get the clay back out of the parts without damaging the surface finish. I wonder if I can just heat them to like 210F or whatever and it'll run off?
- Status
- Not open for further replies.