98% accurate EMILE build finished pics 6-4

Status
Not open for further replies.
Sorry for the double post, but more updates on the way.
FE25A062-55B0-4B97-A353-9BC372368E70-1056-000000D58C0A2791_zps7fa23395.jpg


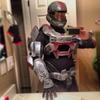
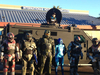
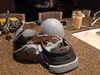
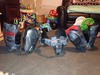
Theres a pile of all my finished parts, good fast progress this week, but not fast enough to make my goal of Halloween.
Oh well, the build continues.
82391BCD-C414-4DAD-AB21-A74590849B26-1056-000000C6C5427AA9_zps54bb77ae.jpg

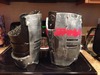
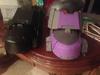
thighs are done, I need to create some brackets to hold my tactical bag on that left one, but the paint is dry at least.
36B30C74-946A-4362-9699-D8084447A41E-1056-000000D5935E7A81_zps89ee88bb.jpg

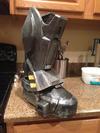
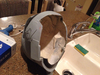
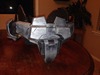
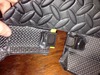
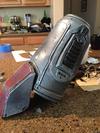
codpiece is done, this part was one of the most frustrating things I've ever built, no idea why but it took my 3 tries and countless wasted pieces, but this ones done too. It closes with a side release buckle, and the hip pad on the closure side is secured with magnets.
FF340893-488F-4AFA-BA36-190E76A6D4D9-1056-000000D5B68DC450_zpsbadfe03e.jpg

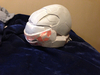
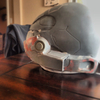
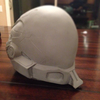
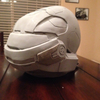
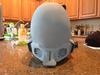
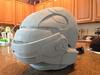
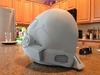
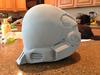
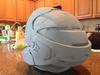
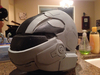
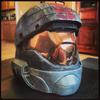
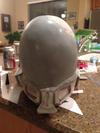
The good thing about missing my deadline is that I will be able to make a much more high quality helmet and visor combo. No updates on the bucket this time because I decided I'd rather have a wearable suit for Halloween than a helmet and shins.

Until next time.
 

Attachments

  • FE25A062-55B0-4B97-A353-9BC372368E70-1056-000000D58C0A2791_zps7fa23395.jpg
    FE25A062-55B0-4B97-A353-9BC372368E70-1056-000000D58C0A2791_zps7fa23395.jpg
    232 KB · Views: 220
  • 82391BCD-C414-4DAD-AB21-A74590849B26-1056-000000C6C5427AA9_zps54bb77ae.jpg
    82391BCD-C414-4DAD-AB21-A74590849B26-1056-000000C6C5427AA9_zps54bb77ae.jpg
    195.2 KB · Views: 205
  • 36B30C74-946A-4362-9699-D8084447A41E-1056-000000D5935E7A81_zps89ee88bb.jpg
    36B30C74-946A-4362-9699-D8084447A41E-1056-000000D5935E7A81_zps89ee88bb.jpg
    152.3 KB · Views: 211
  • FF340893-488F-4AFA-BA36-190E76A6D4D9-1056-000000D5B68DC450_zpsbadfe03e.jpg
    FF340893-488F-4AFA-BA36-190E76A6D4D9-1056-000000D5B68DC450_zpsbadfe03e.jpg
    226.1 KB · Views: 218
I made some more progress on this build in perpetration for an upcoming make a wish event in Phoenix. In its current state, the only pieces of armor that I'm lacking are knees and forearms. The chest will still need to be remade, and I also have a ton of grenades to make (20). The helmet is still being refined somewhat slowly, but progress is still happening on it. Pics await...
Since I won't have the EVA built in time I went to work on the old odst, getting it up to standard- I'm happy with the results
9E0CEBCB-201C-4A96-91CB-BE8280F6979D.jpg

i also refinished the old odst gauntlets- these are from a previous build and are not quite game accurate but they'll do for make a wish
66C4DF0E-9459-4929-AB62-C50FA19E499E.jpg

Next up, boots-
619E3B18-45AF-4894-9E16-B51948E1AE11.jpg

and finally, here's a shot of me dressed up this year for Halloween in my suit as it stood then- the biceps are build but not painted never mind the face I'm making...
96DFBEC3-F48E-4CBD-AEFF-A57427B47A31.jpg

I wasnt happy with the side vents on the model in comparison to the in game vents. This required several jack and cokes and some shaky handed surgery. I removed the vents, and built new ones from sign plastic, and blended the details with epoxy putty. Here's a pic of one side complete, I somehow didn't take a shot of both sides done.
D82565F0-F3B3-4FB4-A108-441AE7B8FC0C.jpg
 

Attachments

  • 9E0CEBCB-201C-4A96-91CB-BE8280F6979D.jpg
    9E0CEBCB-201C-4A96-91CB-BE8280F6979D.jpg
    92.1 KB · Views: 309
  • D82565F0-F3B3-4FB4-A108-441AE7B8FC0C.jpg
    D82565F0-F3B3-4FB4-A108-441AE7B8FC0C.jpg
    86.1 KB · Views: 292
  • 96DFBEC3-F48E-4CBD-AEFF-A57427B47A31.jpg
    96DFBEC3-F48E-4CBD-AEFF-A57427B47A31.jpg
    88.5 KB · Views: 290
  • 619E3B18-45AF-4894-9E16-B51948E1AE11.jpg
    619E3B18-45AF-4894-9E16-B51948E1AE11.jpg
    79.7 KB · Views: 276
  • 66C4DF0E-9459-4929-AB62-C50FA19E499E.jpg
    66C4DF0E-9459-4929-AB62-C50FA19E499E.jpg
    128.3 KB · Views: 264
I made some more progress on this build in perpetration for an upcoming make a wish event in Phoenix. In its current state, the only pieces of armor that I'm lacking are knees and forearms. The chest will still need to be remade, and I also have a ton of grenades to make (20). The helmet is still being refined somewhat slowly, but progress is still happening on it. Pics await...
Since I won't have the EVA built in time I went to work on the old odst, getting it up to standard- I'm happy with the results
9E0CEBCB-201C-4A96-91CB-BE8280F6979D.jpg

i also refinished the old odst gauntlets- these are from a previous build and are not quite game accurate but they'll do for make a wish
66C4DF0E-9459-4929-AB62-C50FA19E499E.jpg

Next up, boots-
619E3B18-45AF-4894-9E16-B51948E1AE11.jpg

and finally, here's a shot of me dressed up this year for Halloween in my suit as it stood then- the biceps are build but not painted never mind the face I'm making...
96DFBEC3-F48E-4CBD-AEFF-A57427B47A31.jpg

I wasnt happy with the side vents on the model in comparison to the in game vents. This required several jack and cokes and some shaky handed surgery. I removed the vents, and built new ones from sign plastic, and blended the details with epoxy putty. Here's a pic of one side complete, I somehow didn't take a shot of both sides done.
D82565F0-F3B3-4FB4-A108-441AE7B8FC0C.jpg

why do you look like iron man when he told everyone who to use the suits water purifier... just go :34 seconds in and you'll see what I mean.


Attachments

  • 66C4DF0E-9459-4929-AB62-C50FA19E499E.jpg
    66C4DF0E-9459-4929-AB62-C50FA19E499E.jpg
    128.3 KB · Views: 264
  • 619E3B18-45AF-4894-9E16-B51948E1AE11.jpg
    619E3B18-45AF-4894-9E16-B51948E1AE11.jpg
    79.7 KB · Views: 277
  • 96DFBEC3-F48E-4CBD-AEFF-A57427B47A31.jpg
    96DFBEC3-F48E-4CBD-AEFF-A57427B47A31.jpg
    88.5 KB · Views: 299
  • D82565F0-F3B3-4FB4-A108-441AE7B8FC0C.jpg
    D82565F0-F3B3-4FB4-A108-441AE7B8FC0C.jpg
    86.1 KB · Views: 282
  • 9E0CEBCB-201C-4A96-91CB-BE8280F6979D.jpg
    9E0CEBCB-201C-4A96-91CB-BE8280F6979D.jpg
    92.1 KB · Views: 266
Last edited by a moderator:
That's exactly what I'm doing there, except my purifier is just a pair of black 501's that fit better than my planned undersuit ;)
 
Your armor looks freaking sweet. And your boots! They look awesome!
I can't believe this charity thing is this next weekend. I'm going nuts over here. @_@
 
I am too! I'm in Vegas until Saturday so that's gonna be a hectic day of painting and strapping. My chest is still missing a rib too! Ahh! I have some work to do and no time to do it!
 
So this build hasn't died! Hooray for me, continuing with my projects like a big boy. A while back I was lucky enough to have been involved in a make a wish charity event for a boy that loved halo. I wasn't able to get my kit complete in time for the event, so used some leftover parts from a previous Halloween costume *odst*
F864F3DC-BA0A-475B-B0D9-0EFFC5B1855B.jpg

652765E1-133B-4B15-8697-32BDB3BCADB3.jpg
a2866fe30f11ee8950cf6ecd866d8f30.jpg

abd5b32e79d6bdd1181d060db964f6f4.jpg


I'm still working on the Helmet too, and at the rate I'm moving I expect it'll be ready to be cut into pieces this week- it will need to have a removable back to make it fit my head, and the visor needs to be made into a buck. Here's pics...
91b837b317e78c75811fcc26623479a7.jpg

bc455e8647f734431fc0598b0151bbed.jpg

b56dfa1ac7ae9b23581d92e3fbeda344.jpg

5bbbf48ef3db55f91fa126e2c479623e.jpg

you may notice that all those are the right side- the left is underway, but isn't finished yet, and the left visor still has some cellulite to iron out too- I'm excited about this, so hopefully this week I'll have finished pics to display and the beginnings of a vac machine in the works.
 

Attachments

  • F864F3DC-BA0A-475B-B0D9-0EFFC5B1855B.jpg
    F864F3DC-BA0A-475B-B0D9-0EFFC5B1855B.jpg
    77.2 KB · Views: 228
  • 652765E1-133B-4B15-8697-32BDB3BCADB3.jpg
    652765E1-133B-4B15-8697-32BDB3BCADB3.jpg
    112.2 KB · Views: 193
  • a2866fe30f11ee8950cf6ecd866d8f30.jpg
    a2866fe30f11ee8950cf6ecd866d8f30.jpg
    674.8 KB · Views: 178
  • abd5b32e79d6bdd1181d060db964f6f4.jpg
    abd5b32e79d6bdd1181d060db964f6f4.jpg
    747.5 KB · Views: 187
  • 91b837b317e78c75811fcc26623479a7.jpg
    91b837b317e78c75811fcc26623479a7.jpg
    685.6 KB · Views: 201
  • bc455e8647f734431fc0598b0151bbed.jpg
    bc455e8647f734431fc0598b0151bbed.jpg
    584.9 KB · Views: 192
  • 5bbbf48ef3db55f91fa126e2c479623e.jpg
    5bbbf48ef3db55f91fa126e2c479623e.jpg
    644.4 KB · Views: 192
  • b56dfa1ac7ae9b23581d92e3fbeda344.jpg
    b56dfa1ac7ae9b23581d92e3fbeda344.jpg
    665.8 KB · Views: 192
I'm done with this phase of the helmet! There's only like 7 more before it's wearable! Hooray!

8213A636-7206-4B6F-9D8E-CC0DC84AD628.jpg

93962FDB-D6D9-4D29-8942-B61F7E74A0E8.jpg

C9C98B44-F643-4657-9004-44AFA2B0F7E9.jpg

079DAD9C-3328-4079-BABA-EB1FAF8990E4.jpg

6F60A0ED-8468-468A-90FE-AF02B9F069A3.jpg

I've received some interest in molds of this, but I don't want to make the investment unless there are a few more people looking for one- if anyone would like one pm me and we can talk about a price or time frame. I want this done by the beginning of June, and I have half a set of armor to build as well, so time is limited for me to make molds, so if someone with some expertise wanted to do it we could work that out too- the same goes for the vac forming, I have no experience with it, so if anyone wanted the master and would make visors to sell, they'd be welcome to (assuming I think you know what you're doing)

next week I start on building a modest vacuum table, and I perform a face off mod to make it fit a human head! Then after that I'm making more Emile parts...
 

Attachments

  • 8213A636-7206-4B6F-9D8E-CC0DC84AD628.jpg
    8213A636-7206-4B6F-9D8E-CC0DC84AD628.jpg
    114.7 KB · Views: 194
  • C9C98B44-F643-4657-9004-44AFA2B0F7E9.jpg
    C9C98B44-F643-4657-9004-44AFA2B0F7E9.jpg
    98.7 KB · Views: 190
  • 93962FDB-D6D9-4D29-8942-B61F7E74A0E8.jpg
    93962FDB-D6D9-4D29-8942-B61F7E74A0E8.jpg
    111 KB · Views: 198
  • 6F60A0ED-8468-468A-90FE-AF02B9F069A3.jpg
    6F60A0ED-8468-468A-90FE-AF02B9F069A3.jpg
    110.2 KB · Views: 200
  • 079DAD9C-3328-4079-BABA-EB1FAF8990E4.jpg
    079DAD9C-3328-4079-BABA-EB1FAF8990E4.jpg
    95.5 KB · Views: 192
I made some more progress here, I textured the rubber areas of the helmet with some textured paint and plastidip to create a 'rhino liner' type texture
7a90afcb8ddfbd245a7ce05151fb9fd5.jpg

I then cut the back off the helmet to ensure that it would fit over my head, it does. Magnets are placed into the cutoff areas so it will clip in and is easily removed.
c0ba8ed785d9856cd047d70a6f76031d.jpg

next was the moment of truth: cutting the visor out to prepare for vacuforming. It was a little touch and go, but was a success in the end.
a7dce3dc732afa9431c89d87313b120b.jpg

this allowed me opportunities to test the fit of the items in a less conventional manner...
d006eca68a33dcc29fe602a1f4438c56.jpg

9aab5d99d7ce603ba140b2c80af47b25.jpg

im currently out in the shop building my vacuum rig, I'll post some pics of it when it's done.
Thanks for reading.
 

Attachments

  • 7a90afcb8ddfbd245a7ce05151fb9fd5.jpg
    7a90afcb8ddfbd245a7ce05151fb9fd5.jpg
    762.7 KB · Views: 174
  • c0ba8ed785d9856cd047d70a6f76031d.jpg
    c0ba8ed785d9856cd047d70a6f76031d.jpg
    835.1 KB · Views: 190
  • d006eca68a33dcc29fe602a1f4438c56.jpg
    d006eca68a33dcc29fe602a1f4438c56.jpg
    390 KB · Views: 180
  • a7dce3dc732afa9431c89d87313b120b.jpg
    a7dce3dc732afa9431c89d87313b120b.jpg
    813.9 KB · Views: 201
  • 9aab5d99d7ce603ba140b2c80af47b25.jpg
    9aab5d99d7ce603ba140b2c80af47b25.jpg
    401.5 KB · Views: 188
Looks great, Rosh! The black areas turned out really nice. Since you began to cut into it, I take it you aren't molding it after all?
Keep it up, man. I'm always excited to see more progress on this build.

-Ryan M-082
 
Actually I was planning on molding it after it was cut apart so any potential buyers wouldn't have any trimming to do- the casts would have preset positions for magnets and there would be no wasted urethane visor to trim out and throw in the trash, just flashing and seams to be cleaned.

Im im actually beginning to think that I will in fact mold it. My vac table is built now (liquid nails and silicone caulk curing as I type), and my concerns about being pressed for time on this suit before con are now fading, so a mold looks much more reasonable to me.

After i make my first visor pulls I'll have a better idea on whether I want a mold or not. I'm planning on making a test pull tomorrow on an old revan plug I have lying around, if it works I'll move onwards to the Eva visor. Excitement!
 
Oh, awesome! I need to warn you though, I tried to mold my forearm in pieces originally and I end up wasting a bunch of materials because of it. You need to make excess space around the edges so the mold is deep otherwise rotocasting becomes ridiculously hard to do.
Can't wait to see how your visor comes out. :)
 
It would actually be a one piece mold- it's hard to explain the plan, but it's something I stole off a guy that makes clonetrooper helmets and it's brilliant. I wish I could take credit for the idea, but it's just something I'm lifting off someone more talented than me. clonetroopers.net requires an account to view the forums or I'd just link it, maybe I'll mold it just to spread the idea to another community.
 
Status
Not open for further replies.
Back
Top