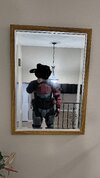
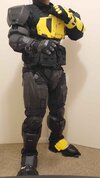
Is the third picture of the all black kit the current state of your gear, or is that the look you want to go for?
If you are asking how to achieve the look of that third picture, one of the keys to a really good paint job is weathering and layers.
We have some good threads in the Tutorial Index covering these topics:
i am planing on making the halo 2 armour but im going to buy the helmet could someone plz send me a tutorial or link to one on this topic or to my email, waleader1@yahoo.com ty

www.405th.com
Like:
Fifty shades of Weathering: Hey all and welcome to my weathering tutorial. I've had several people ask how I do my weathering on my Mk. VII armor (pictured below) so I decided I'll do a full weathering tutorial from how I choose how to paint my armor, chipping layers, ink washing, acrylic...
www.405th.com
But the quick and dirty version of how to achieve an excellent paint and detail job is:
-Ensure you use compatible paints. Using paints from the same brands ensures good cohesion. Mixing paints from different brands can lead to issues with different formulations and cure times that result in paints bubbling, cracking, or “orange peeling,” not adhering, or not curing. It is also always a good idea to do tests on a scrap piece of material to ensure that the paints will work well together before applying them to your armor.
-Physical Weathering. You can achieve a lot with a good paint job, but if you want to really sell your Spartan as a Battle Tested soldier, you can add physical damage to your piece. Take a Dremel or sanding file and add actual cuts, knicks, scraps, or gouges to your piece.
-Paint Chipping layers. In order to achieve the best effect on making it look like the paint is chipping, flaking, or peeling off your armor due to wear and tear, you need to layer it. Lay down a solid layer of your base metallic silver color first. Wait for it to fully cure. Then you want to mask it off. What you are doping is adding a physical barrier over the silver paint so that you can paint on the next layer of color, and then remove the mask exposing the silver base layer. There are a wide variety of materials you can use to mask off your silver layer. I, personally, have used everything from toothpaste, mustard, rubber cement, scraps of painter’s tape, Halloween store liquid latex, all the way up to professional art store masking fluids. The key is adding an actual physical layer of paint that gives dimension to the piece.
-Washes. In this step you take on a darker color and a wash of watered down application of it to your piece. This is used to simulate the dirt and grime that can build up on a piece in the field. Using the water down wash allows it to sink into the recessed areas of a piece and helps to make the details pop.
-Intentional application. When I started with Halo armor back in 2007, I added my damage and weathering sort of randomly. The location of the paint chipping and damage was less important than the amount or visibility of it. As time went on I better understood that the more intentional you placed your paint, damage, and weathering, the better it made your piece look at the end. Think about where damage occurs naturally. What piece of your armor would most likely bump, rub, or scrape. High points and edges of piece will receive more damage than recessed areas. Look at examples in real life, your car, light poles, railings, gym equipment. The places where the paint is damaged are the places that get the most contact. Don’t get me wrong, I still apply damage and weathering randomly to a piece as well as a finishing touch, but I try to remain more mindful of where natural weathering would occur to help really sell the piece.