Stop stealing my ideas, before I can make them!

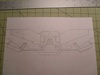
Just kidding though, I was wondering when people would start making interchangeable armor abilities for their suits (at least that's what I'm guessing that the drawing is, I could just be an idiot
). If my guess of armor ability is correct, which three are you going to be making?