You are using an out of date browser. It may not display this or other websites correctly.
You should upgrade or use an alternative browser.
You should upgrade or use an alternative browser.
Aztlan's Halo 4 Rogue + Binary Rifle + M6H + Exo-suit WIP, PIC HEAVY!
- Thread starter EVAkura
- Start date
- Status
- Not open for further replies.
JayOneSeven
Jr Member
Wow, that rifle is extremely well detailed and looks like it's going to be amazing! Go go go, more updates!!! Subbing t your thread :]
Looking amazing! I can't wait to see the finished product. Quick question though, I usually fit my electronics, then remove them to paint, then install them, are you doing the same thing?
Most of my electronics are soft mounted right now as I am working the detail parts around them still. When it comes to painting, I am still undecided on how I want to do it. I am thinking acrylic with a matte clear coat, or maybe epoxy, then acrylic.. not sure yet
") I do like the idea of hand painting as a pose to the demonic rattle can!
I do like the idea of hand painting as a pose to the demonic rattle can!Wow, that rifle is extremely well detailed and looks like it's going to be amazing! Go go go, more updates!!! Subbing t your thread :]
Thank you! Nothing great photo-wise to update today as I spent the day working on the rigidity of the weapon. It is SOLID now! I am just now starting on final detail work.
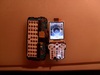
There is one thing that I could throw out there for any ideas. I would love to use this as my attached scope, but it will take some pretty significant modification. How cool would it be though? Also, I could use the rifle as my camera since all of it still works (except the calling/texting/web part that is!).

EDIT: Ah, what the heck, I went for it! Here is the beginning part.


Attachments
RYNO 666
Well-Known Member
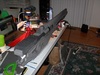
Yet another productive couple of days. I have been working on the structural integrity and electronics, but will just dictate what is up with pictures
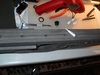
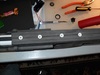
There are two of these channels running the length of each "barrel"
And here is the channel that I used to connect the two main lower parts together.
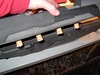
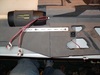
To connect the upper rear to the lower rear portion, I knew that I needed something that would be extremely sturdy. The next four pictures detail this process. In this picture I show the holes I drilled into the lower portion and also the anchors I used.
Then, because the upper portion is hollow, I took pan washers and fished them into the chamber, then tediously finessed the screws through. This was not an easy task at all... hence the reason why I temporarily screwed the corks on to the end of the screw so that they could not accidentally fall back out.
Here are the anchors screwed in with an extra dose of hot glue in each hole.
And lastly I removed the corks, started the screws into the anchors, then applied hot glue between the two pieces, and proceeded to hurriedly seat the screws before the glue got too cool. Worked like a charm!
Even though you really can't see it in this photo, there is a 3/4" wooden dowel going through the light chamber. This dowel serves as the last structural shoring piece. In all, there are six lengths doing this job. This thing is super solid now, while retaining it's light weight.
Then it was time for electronics!
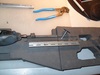
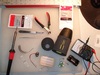
Here is the power switch, battery box, and the light chamber, all in position
And lastly, the circuit board I made. In all, there are two white LEDs in the light chamber, hook-ups for two super bright blue LEDs for the lower boxes on either side of the weapon, and one lead spare for each type for future additions.
I think this is where I sign off until tomorrow. I hope you enjoyed today's update


Great idea using unistrut to strengthen the center, and on the cell phone!
Gamertag: RYNOx666
Attachments
-
 SAM_0878_zpsc5c156e0.jpg183.5 KB · Views: 343
 -
 SAM_0876_zps1bf70468.jpg182.1 KB · Views: 355
 -
 SAM_0875_zps41201f94.jpg169.1 KB · Views: 348
 -
 SAM_0874_zpse26983dd.jpg171.7 KB · Views: 353
 -
 SAM_0873_zps1eabff6a.jpg166.8 KB · Views: 345
 -
 SAM_0877_zpse9c42128.jpg163.7 KB · Views: 362
 -
 SAM_0884_zpsde542b60.jpg165.6 KB · Views: 344
 -
 SAM_0883_zps52e08e62.jpg172.7 KB · Views: 361
 -
 SAM_0882_zpsed7ab7f2.jpg182.5 KB · Views: 353
 -
 SAM_0879_zps4aaf175a.jpg191.9 KB · Views: 365
JayOneSeven
Jr Member
Oh man that phone lens whadyamacallit looks freaking sick! I have so many old phones lay around here at home, you've just exploded my imagination!
Thanks guys for your support! I am totally loving this build and am really looking forward to when it comes time to paint/harden!
I know, right?!!! Just with the HALO 4 Helmets, you could totally use the camera lens in conjunction with the screen to alleviate the "visor" issue with the Infiltrator, Wetwork, Engineer, Stalker, Tracker, Vanguard, GUNGNIR, Venator, CIO, Protector, and Locus.... and that is just HALO stuff (and only helmets)!
That and I will be using my other "spare" phone with the same or similar HUD as a HUD for my Rogue helmet. Basically, I will take the screen and place it on the top facing down, and then use a clear sheet of plastic laid at a 60 degree down/outward angle (similar to the one the helmet already has, but a little less extreme) and the clear plastic will reflect what the screen has on it. This will be visible outside and inside, but not to the point where it will hinder my vision I have seen this done on a terminator helmet and it looks absolutely wicked because the reflection seems to hover and move from the outside... almost like it is tracking you.
Oh man that phone lens whadyamacallit looks freaking sick! I have so many old phones lay around here at home, you've just exploded my imagination!
I know, right?!!! Just with the HALO 4 Helmets, you could totally use the camera lens in conjunction with the screen to alleviate the "visor" issue with the Infiltrator, Wetwork, Engineer, Stalker, Tracker, Vanguard, GUNGNIR, Venator, CIO, Protector, and Locus.... and that is just HALO stuff (and only helmets)!
That and I will be using my other "spare" phone with the same or similar HUD as a HUD for my Rogue helmet. Basically, I will take the screen and place it on the top facing down, and then use a clear sheet of plastic laid at a 60 degree down/outward angle (similar to the one the helmet already has, but a little less extreme) and the clear plastic will reflect what the screen has on it. This will be visible outside and inside, but not to the point where it will hinder my vision
I have seen this done on a terminator helmet and it looks absolutely wicked because the reflection seems to hover and move from the outside... almost like it is tracking you.philosoraptorr
Jr Member
That rifle is looking amazing... keep up the fantastic work man
Wow that HUD plan sounds really cool. Make sure you post pics please.
Thanks again everyone. I will be posting pictures of all aspects (especially the cool parts
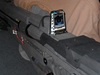
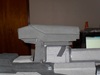
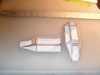
).I can not believe that my whole day was spent on this phone scope. Before I show the pics, I just want everyone to be aware that I know the attached scope sits back further than what it is supposed to by about 3 inches, but I didn't have a choice to move it any further forward due to the support beam. Oh well, I still really like the way it came out, and that's all that matters, right?
In this picture, you really can't see it too well, but there is a convex piece of plastic that goes with the curvature of the end of the scope.

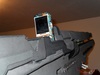
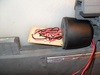
Side profile. Down towards the bottom center, there is a little square. That is the button to activate the camera. Just above that is the port I cut out to charge the phone.

Looking down the barrel view. What is the best part about using a Samsung phone???? You black out the A,M,U,N and you get SSG evenly spaced! How cool is that?!

And just a bonus shot from another angle.

Attachments

Man this is looking incredibly sick!!! This is such an awesome build.... I may attempt it once I have my classic Mark IV built...
Thank you so much
I am getting so excited for the weather to warm up because I have all of the materials just waiting. Where all the pepped pieces are right now, well, they still look like pep. I so want to get it past that point.The Binary Rifle is taking longer than what I figured, but I will not rush it. This detail work is so time consuming. I finally decided to break it up into parts so as not to get overwhelmed or disappointed with lack of progress. Today was the upper barrel. That ridgeline that goes almost the length of the barrel was a serious pain. I will finish that part up tomorrow and then focus on the light boxes on either side. Finishing up those will complete the electronics portion (keeping in mind I made two spare circuits for unforeseen expansion). Also, I found out that the phone/scope is longitudinally EXACTLY where it belongs (I found another reference photo with it attached!) but laterally about 1 inch too high. That, I can definitely live with
Anyways, sorry, no photo-updates today. I promise after I finish the light boxes tomorrow, I will update with a pic or two.
Have you thought about making a hot box for the resining of your pep work? I've done a frightening amount of my work in the winter here in RI, and my wife keeps me in the basement (appropriately), which isn't always known for warm temps. I took a big moving box, glued aluminum foil along the inside, and cut a small hole to drop a light bulb through. The bulb will work like the french fry station at a McDonalds keeping all that delicious home cooked goodness warm, and with decreased air movement and that bulb keeping the box temps pretty toasty, the resin will cure relatively quickly.
Just don't leave it unattended, or too close to the cardboard. I've never seen anything bad like a fire happen, but it does get rather hot.
Can you post pics of that "floating" terminator idea you were talking about? Really curious. Love the electronics work you're doing on the light rifle, god knows what that helmet will have going for it but I can't wait to see.
Best of luck and keep on building!
Have you thought about making a hot box for the resining of your pep work? I've done a frightening amount of my work in the winter here in RI, and my wife keeps me in the basement (appropriately), which isn't always known for warm temps. I took a big moving box, glued aluminum foil along the inside, and cut a small hole to drop a light bulb through. The bulb will work like the french fry station at a McDonalds keeping all that delicious home cooked goodness warm, and with decreased air movement and that bulb keeping the box temps pretty toasty, the resin will cure relatively quickly.
Just don't leave it unattended, or too close to the cardboard. I've never seen anything bad like a fire happen, but it does get rather hot.
Can you post pics of that "floating" terminator idea you were talking about? Really curious. Love the electronics work you're doing on the light rifle, god knows what that helmet will have going for it but I can't wait to see.
Best of luck and keep on building!
First, here is the link. It is the second article down the blog. The concept is actually really simple and has amazing results. I have already done a quick mock-up with crud materials and I am confident my in-visor HUD will rock.
Second, I have thought about that, but all four of us live in a studio! I have thought about doing it in our RV, but I am not sure if I would ever get the smell out! That and I just need to be patient. I have only about another month until I can start doing it outside hopefully. I can epoxy in the house, but just not rondo. I have two types of epoxy on hand. The one I use to harden the outside of my pep is no-odor, so it is safe inside. The other is Bondo brand, and that is what I will be using with the bondo to make my rondo. That stuff stinks bad
I have enough pep work along with this rifle to keep me busy for at least a month. I am in no hurry, have no deadline, and want to be sure that this project is perfect (my dream now is to earn the privilege of being in the Elite showcase).As promised, it is update day
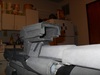
Today was light box day. My original plan was to make them using 3/8" EVA foam, but I quickly realized that they are far too small for that thickness, and would leave me no room for the LEDs. I then looked to my other stash of both 1/16" and 1/8" craft foam, but decided that would be far too flimsy. So I decided to go the cardstock/wooden craft stick/epoxy route. I managed to finish the boxes all the way up to drying the epoxy, but even with the room temperature at 81.5 degrees, it took 4 hours for the epoxy to cure. I love this no-odor stuff, but man, it takes forever to cure!
As always, progress is best described with photos.
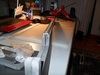
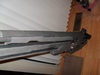
Here is the completed wrapping on the upper barrel. Keep in mind it is far from finished, it is just wrapped with the lip I added. That alone took the better part of two days to complete for both sides.

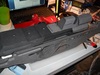
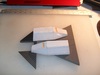
Here is the skeleton of the light boxes.

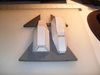
Side view of the completed and epoxied boxes

Front and rear view.

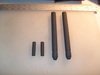
And four of the cylindrical pieces I had to shape and then painted. The two larger ones go below the lower barrel (I think they are supposed to be a bipod, but am unsure) and the two smaller ones go on either side of the scope. Also, I have started painting the PVA to the scope. Ah yes, another process which will take mucho time-o.

Tomorrow will be spent sanding the boxes and continuing on with the rifle's details. Thanks for checking in, and as always, comments/critique welcome
Today was light box day. My original plan was to make them using 3/8" EVA foam, but I quickly realized that they are far too small for that thickness, and would leave me no room for the LEDs. I then looked to my other stash of both 1/16" and 1/8" craft foam, but decided that would be far too flimsy. So I decided to go the cardstock/wooden craft stick/epoxy route. I managed to finish the boxes all the way up to drying the epoxy, but even with the room temperature at 81.5 degrees, it took 4 hours for the epoxy to cure. I love this no-odor stuff, but man, it takes forever to cure!
As always, progress is best described with photos.
Here is the completed wrapping on the upper barrel. Keep in mind it is far from finished, it is just wrapped with the lip I added. That alone took the better part of two days to complete for both sides.

Here is the skeleton of the light boxes.

Side view of the completed and epoxied boxes

Front and rear view.

And four of the cylindrical pieces I had to shape and then painted. The two larger ones go below the lower barrel (I think they are supposed to be a bipod, but am unsure) and the two smaller ones go on either side of the scope. Also, I have started painting the PVA to the scope. Ah yes, another process which will take mucho time-o.

Tomorrow will be spent sanding the boxes and continuing on with the rifle's details. Thanks for checking in, and as always, comments/critique welcome
Attachments
I... I want that binary rifle so badly. Looks amazing, and the Rouge build too.
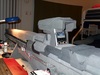
Thanks!Today has been the fine details once again. This is taking a lot longer than I thought it would, but I have been taking my time and it seems that I measure at least 5 times before making cuts.
This is just a quick update to let y'all know I am still working hard (no less than 10 hours a day) and will keep you posted.
In addition, I realized that I had not taken a shot with me holding it for scaling purposes. Well, that is now rectified. Here you go!

Attachments

- Status
- Not open for further replies.
Similar threads
- Replies
- 2
- Views
- 469
- Replies
- 2
- Views
- 1,410