Big Mac's ODST Build

Status
Not open for further replies.
WOW! Looks really nice! Cant even see any layer lines, especially on the wings. Is that just bondo and sanding? Or are you doing anything else?
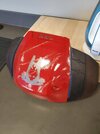
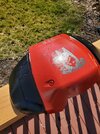
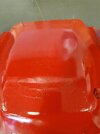
I am using Milliput Standard Epoxy putty to fill in and harden the layer separations, and Bondo Glazing and Spot putty to smooth the layer lines with light sanding. I started at 400 grit, then moved to 600 and finally 800 grit. It is super smooth, but you DO want to wear PPE while sanding.
After that, it is 2 coats of Rustoleum Black primer, 2 coats of Rustoleum flat black for the wings, and 2 coats of Rustoleum Black Stainless Steel Primer / Paint combo.
I am intending to put a Vinyl decal down as a stencil, and then top the center piece with 2 coats of Rustoleum Regal Red before a matte clear coat to finish everything...

On some pieces in the future, I want to try a trick of thinning the spot putty with acetone, and then spraying it on with an airbrush for super thin coats of putty.
That said, mileage will likely vary as I am moving up to a 0.6mm nozzle, and will need to tweak some things.
 
I would definatly look more into the layer seperation issue before printing more parts because it is making your parts weaker, love the paintjob!
 
I would definatly look more into the layer seperation issue before printing more parts because it is making your parts weaker, love the paintjob!
I've swapped to a 0.6 nozzle and a 0.4 layer height. Turned off the cooling fan. Now we wait and see.

In other news, the chest is done for now
 

Attachments

  • 20230304_112810.jpg
    20230304_112810.jpg
    1.3 MB · Views: 59
  • 20230304_112814.jpg
    20230304_112814.jpg
    2 MB · Views: 62
  • 20230304_135509.jpg
    20230304_135509.jpg
    1.7 MB · Views: 56
I've swapped to a 0.6 nozzle and a 0.4 layer height. Turned off the cooling fan. Now we wait and see.

In other news, the chest is done for now
Wow wow!! That decal looks amazing! How did you do that stencil or what did you use for that? I really really want to try that on my chest armor now.

Also yah the swap to .6 might be really good. I have really liked it since I switch one of my printers over and I'm about to swap my other one over to a .8
So I made some vinyl decals at my college's makerspace, and used them as a stencil over the base coat of Black Stainless Steel.

Once the coat of Red was tacky, I removed the decals, and used a weeding stick to scratch the surface down to the steel paint and make the claw marks.
 

Attachments

  • 20230304_101526.jpg
    20230304_101526.jpg
    1.9 MB · Views: 72
  • 20230304_105143.jpg
    20230304_105143.jpg
    1.7 MB · Views: 74
Chest plate came out really good, I love the odst symbol on it, can't wait to see more of your build
 
Status
Not open for further replies.
Back
Top